
How To Wrap Text Around A Circle with Photoshop
How To Wrap Text Around A Circle with Photoshop https://logosbynick.com/wp-content/uploads/2020/04/wrap-text-around-a-circle-with-photoshop.png 800 470 Nick Saporito https://secure.gravatar.com/avatar/8e31bf392f0ba8850f29a1a2e833cdd020909bfd44613c7e222072c40e031c34?s=96&d=mm&r=gToday’s tutorial is for those of you who may be looking to get your feet wet with Adobe Photoshop. In this lesson I’ll be demonstrating how you can wrap text around a circle with Photoshop — both inside and outside of a circle. This is something that even a first-time user of Photoshop can follow along with.
The following is a summarized overview of the steps taken to get your text wrapped around a circle. For a more in-depth learning experience with step-by-step instructions, be sure to check out the video tutorial below:
Wrap Text Around A Circle with Photoshop
To wrap text around a circle with Photoshop, we’ll need to progress through the following steps…
- Step 1: Create a new document with horizontal and vertical guides, then create a circle in the center of the canvas
- Step 2: Use the Horizontal Type Tool to place your text around the outside edge of the circle
- Step 3: Use the Path Selection tool to adjust the positioning of your text on the circle
- Step 4: Create a new circle on a new layer that is larger than the original circle
- Step 5: Using the Horizontal Type Tool again, place text on the inside of the new, larger circle
Let’s explore these steps in more detail.
Step 1: Create A Document
The first thing we’re going to do is create a new document sized at 1,280 x 1,280 pixels, then create both a vertical and horizontal guide, each at 50%. You can do this by navigating to View > New Guide.
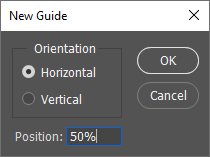
Repeat this step for both the horizontal and vertical axis.
Your document should look something like this…

Now we’re going to grab the Ellipse Tool to create a circle in the center of the canvas. The tool is hidden within a sub menu of the Rectangle Tool, so be sure to right-click the tool to bring up the sub menu.

Bring your cursor to the center of the page, where the horizontal and vertical guides intersect, then click and drag to create an ellipse. While holding the click, press down on Shift and Alt on your keyboard. This will allow you to create a perfectly symmetrical circle that expands from the center of the document.

Step 2: Place Your Text On The Circle
Grab the Horizontal Type Tool (keyboard shortcut: T) and click on the outer edge of your circle. This will generate a blinking cursor on the circle. Once you begin to type, the text will be generated around the circle.

You can adjust the font, style, size, and color of your text in the toolbar at the top of the screen. For this tutorial I’m using League Gothic, but you can use whatever font you’d like.

Step 3: Adjust The Positioning
Now it’s time to rotate the circle so that we can position the text exactly where we’d like it to be on the circle.
To do this, grab the Path Selection Tool (keyboard shortcut: A) and click and drag the little black node on the edge of the circle to adjust the placement of the text.

Make sure it is placed evenly at the top of your circle.
Step 4: Create A New Circle
Now that the top half of the text is wrapped around the outside of the circle, we’re going to work on creating some more text and wrapping it around the inside of a circle.
First, press control + shift + N on your keyboard to create a new layer, then grab the Ellipse Tool once again and create another circle starting from the center of the page. Again, make sure to hold shift and alt while scaling the circle so that it locks the proportions and expands from the center of the canvas, just like you did for the first circle.
Make this circle larger than the previous circle. It should be just large enough that the edge of the circle lays flush against the top of the text you’ve already created.

Your newly-created circle will probably cause the text you previously created to no longer be visible. To correct this, simply click and drag the new layer (in the Layers menu to the bottom-right of the screen) below the top layer so that it becomes the second layer. Your text should become visible once again.
Step 5: Generate Text On The Inside Of Your Circle
Grab the Horizontal Type Tool once again and click on the outer edge of the new, larger circle in order to add some text to it.
The text will be placed on the outside of the circle at first.

The wrap your text around the inside of the circle, grab the Path Selection Tool again, then click and drag the node on the edge of the circle and bring it inside of the circle. This will lead the text within the circle as well. While you’re at it, you can use the same tool to adjust the placement of the text inside of the circle.

You may find that after you placed your text, the letters look a little cramped and too close together. To space them out a little further, grab the Type tool again and triple-click on the text to highlight the entire line. Then, hold Alt on your keyboard and press the right arrow key on your keyboard until the letter spacing is consistent with the text on the top/outside of the circle.

The final step is to simply turn off the visibility of the two circle layers and the background layer, and we’re done!

At this point you can choose to save your work or export it as a PNG or JPG if you’d like. And that is how you can wrap text around a circle with Photoshop!
Conclusion
It’s not very difficult to wrap text around a circle with Photoshop. In fact, if you’ve watched my tutorial about doing the same with Illustrator then you’ll probably realize that it’s quite similar. One thing I love about working with Adobe software is how consistent the workflow is when working across all of the different applications.
If you have any questions simply leave a comment below. As always, thanks for watching!
Learn To Master The SoftwareGain a complete understanding of your favorite design apps with my comprehensive collection of video courses. Each course grants access to our private community where you can ask questions and get help when needed.
|
||||||||||||||||||||||||||||||||


You saved me! What a great explanation, thank you for taking the time to do this. Easiest set of instructions to follow.
Glad to help!
Nick,
As part of a bear tribute, I am trying to mimic the oval text channel look of the legacy Celestial Seasonings Sleepy Time Logo with my own text and image. That logo has an oval on the inside and the outside of the text circle.
I was able to create an oval around the inside of my words and the outside of the words on a different text levels following your instructions. But I cannot get the effect of seeing the text with both elliptical ovals visible at the same time.