Inkscape VS Affinity Designer | The Ultimate Comparison
Inkscape VS Affinity Designer | The Ultimate Comparison https://logosbynick.com/wp-content/uploads/2022/03/inkscape-vs-affinity-designer.png 800 470 Nick Saporito https://secure.gravatar.com/avatar/8e31bf392f0ba8850f29a1a2e833cdd020909bfd44613c7e222072c40e031c34?s=96&d=mm&r=gInkscape and Affinity Designer are both vector-based alternatives to Adobe Illustrator — the industry standard in vector design software. In the past we’ve gone over how each of these applications stack up against Illustrator, but in this post we’ll be comparing Inkscape vs Affinity Designer to see which of the two makes for the most formidable foe to Adobe’s juggernaut.
This post is somewhat of a follow up to a YouTube video I made a couple of years ago reacting to Affinity Designer for the first time as a long-time Inkscape user. In the video I shared my thoughts and first impressions of the software as someone who has been using Inkscape professionally for over a decade.
Well, over the past couple of years I have been using Affinity Designer a lot! I’ve made countless tutorials about it and was even using it as my daily driver for a while, so I’m certain that I now have a good enough understanding of the these two applications to make this Inkscape vs Affinity Designer comparison as comprehensive as any other. Let’s dig in!
Inkscape VS Affinity Designer
Check out the following video that I made for the Logos By Nick YouTube channel for a demonstration of how Inkscape and Affinity Designer stack up against each other:
UPDATE: In November of 2022 Serif released version 2.0 of Affinity Designer, and with it comes many new tools and features that impact this comparison. You can see a full list of new features added on the Affinity Website, or you can watch a YouTube Video that I made going over some of the major additions.
The contents of this article have been updated to reflect the new updates. Those of you who are still using the older version of Affinity Designer will be missing these new features– some of which Inkscape already has. These include:
- Warp transformations
- Xray vision
- Shape building tools
- And more
Continue on for a complete breakdown of all the main differences between Inkscape and Affinity Designer.
About
If you’ve landed on this article then chances are you’re at least vaguely familiar with one or more of these apps. Regardless, let’s kick off our Inkscape vs Affinity Designer comparison by briefly touching on what each of these applications are and what they do.
What is Inkscape?
Inkscape is a free and Open Source vector graphics editor. It serves as a low-cost (no cost) alternative to Adobe Illustrator.
Inkscape — developed and maintained as a labor of love by a team of volunteers — allows you to create your own vector graphics and edit vector files in its native SVG format.
Vector graphics, unlike pixel-based graphics, are made of coordinate points that dictate the properties of a design element on an X and Y axis. The benefit of working with vectors is that it allows you to create drawings with clean lines that can be scaled up infinitely.
What is Affinity Designer?
Affinity Designer is a commercial design application developed by Serif.

Much like Inkscape, Affinity Designer is a vector graphics editor. However, Affinity Designer also has a pixel-based photo editor built in, allowing you to not just work in a vector environment, but edit photos as well!
This is a feature that is unique to Affinity Designer. No other major design application on the market currently has a vector and raster editor built in. Because of this, Affinity Designer is somewhat of a 2-in-1 design solution. It would be like combining Photoshop and Illustrator into one app.
Advantages Of Using Inkscape
Let’s have a look at some areas where Inkscape outshines Affinity Designer.
It’s more accessible
The biggest and most obvious advantage Inkscape has over Affinity Designer is that it has a lower barrier to entry.
Inkscape is free and Open Source, meaning it’ll cost you nothing. Designer, on the other hand, usually sells for anywhere between $25 to $50 USD depending on whether or not they’re running a sale.
In addition, Inkscape is available on all desktop operating systems, including:
- Windows
- Mac
- Linux
Affinity Designer, on the other hand, is only available on Windows and Mac (and you’ll have to purchase copies for each if you use both operating systems.)
Has vector image tracing abilities
Another feature you’ll enjoy as an Inkscape user is the ability to create vector tracings from images:

Inkscape’s Trace Bitmap feature allows you to create monotone vector silhouettes and even full scale color tracings of images.
Affinity Designer, on the other hand, has no such capability.
Can create halftones
Unlike Affinity Designer, Inkscape has the ability to make vector halftone patterns via the cloning feature:
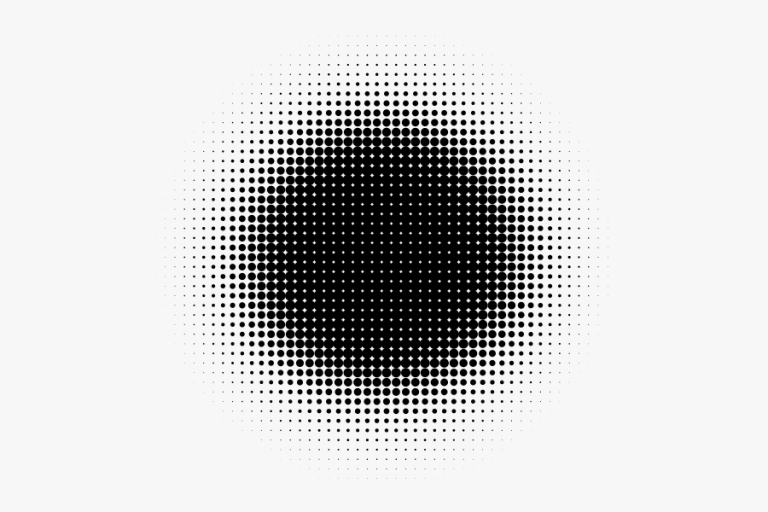
Halftones are sort of like a dot pattern that transitions like a gradient. In Affinity Designer, there is no such feature that will allow you to generate these patterns. Inkscape, however, has the ability to do so.
Can create and edit meshes
Affinity Designer and Inkscape are quite similar in terms of working with gradients. Each application allows you to make various types of gradients, including:
- Linear
- Radial
- Elliptical
- Conical
- And more
The difference here between Inkscape vs Affinity Designer is that Inkscape allows you to create mesh gradients. Mesh gradients are gradients where the colors are laid out on a grid:
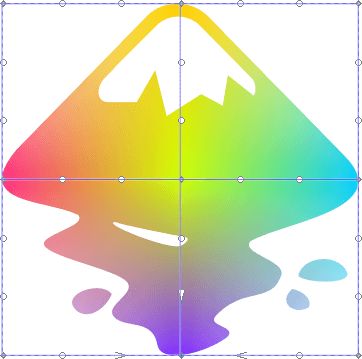
The colors of a mesh gradient follow a square grid.
As of the time of this writing, Affinity Designer has no such capability.
Better Pen Tool modes
One of the more subtle advantages Inkscape has over Affinity Designer is how the Pen Tool functions.
The Pen Tool functions the same in either application, but Inkscape comes with more Pen Tool modes to choose from, such as drawing Spiro paths. In addition, the BSpline setting functions somewhat as a pen tool with training wheels, allowing you to draw with precision without having to endure the steep learning curve of the regular pen tool.
Affinity Designer’s pen tool does have a Smart Mode that functions similarly, but by comparison is a bit more erratic and unpredictable than Inkscape’s BSpline setting.
Better align & distribute controls
Another minor advantage in Inkscape’s favor is how aligning and distributing objects works.
Simply put, Inkscape offers more options for aligning and distributing your design elements. This is apparent just by comparing the align menus of each.
Inkscape:

And Affinity Designer:

Not only does the Align & Distribute menu in Inkscape have more controls, but it can be docked to the side of your screen and open at all times.
Affinity Designer’s align menu, on the other hand, is obscured behind a dropdown menu that you’ll need to navigate to every time you want to use it. This can become tedious and frustrating when working on big projects with lots of objects.
What’s more, Inkscape has on-canvas alignment handles, allowing you to align and distribute objects without needing the menu in the first place!
Better snapping controls
One of the more frustrating aspects of working with Affinity Designer is the snapping controls. In my experience, the snapping controls in Designer don’t always work as expected for some reason.
Inkscape, on the other hand, is a different story. The snapping controls in Inkscape work so well that it’s almost annoying. Not only that, but there’s more snapping options as well. Inkscape allows you to:
- Snap to an object’s center point
- Snap to an object’s midpoint
- Snap to the baseline of a text object
- And more
Easier to resize the document
One area where you’ll be better off with Inkscape vs Affinity Designer is when it comes to resizing your documents.
Having the ability to resize your document to fit your design contents is one of the most common tasks you’ll perform as a graphic designer working in a vector environment.
Inkscape makes this process easier than any other. You can quickly resize your canvas to fit your design elements by simply selecting them and pressing Control + Shift + R on your keyboard. Once executed, the document’s page borders will be updated to fit the selected object(s).
Affinity Designer has no such ability. Instead, you’ll have to change the document’s size manually, either by using the Document Setup menu or the Artboards Tool.
Path Effects
Earlier on we touched on Inkscape having the ability to make more advanced transformations to objects, such as perspective and envelope deformations. In addition to that, Inkscape allows you to make even more advanced transformations via the Path Effects menu:
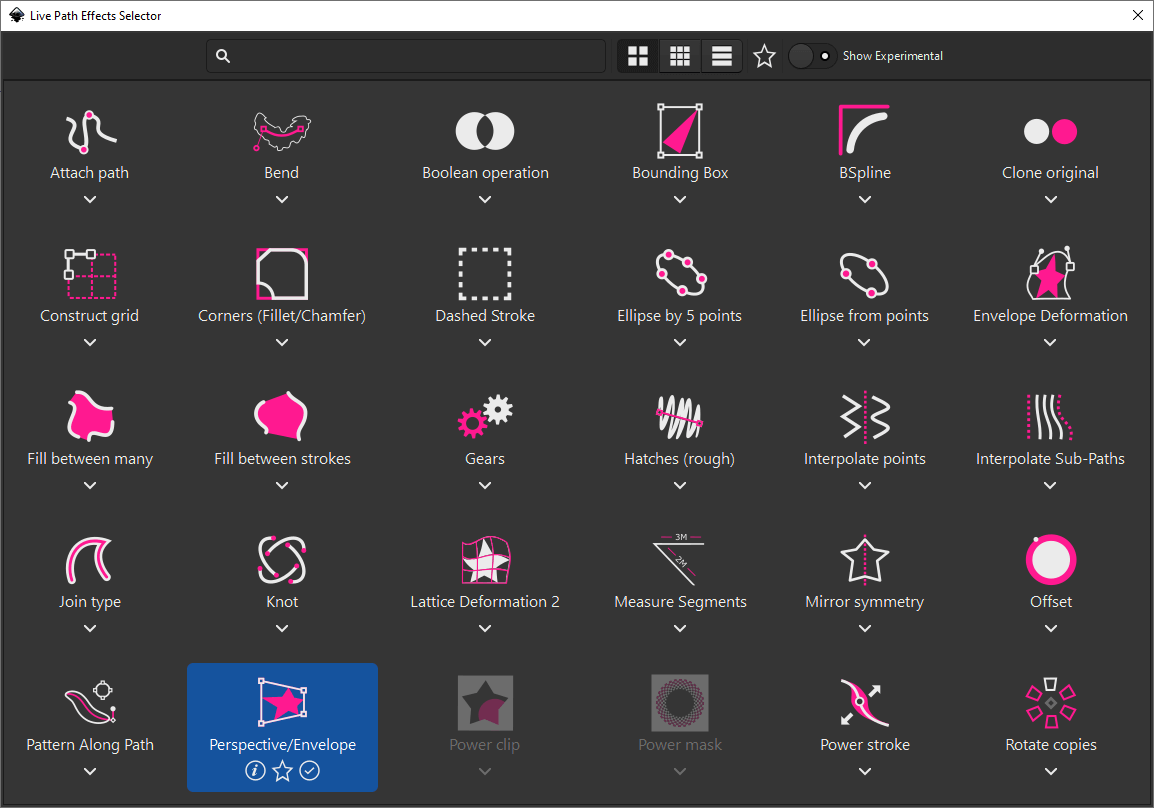
Path effects are advanced transformations that you can make to vector paths.
The Path Effects menu in Inkscape is an assortment of advanced transformations you can make to a vector path, including:
- Crosshatching
- Mirror symmetry
- Slicing
- And more
Affinity Designer falls even further behind Inkscape in this regard, making it clear that if you plan on creating any kind of advanced vector illustrations, Inkscape is the way to go.
Lots of useful extensions built in
Finally, Inkscape comes packed with a variety of useful extensions that can do things such as:
- Generate barcodes and QR codes
- Generate calendars
- Interpolate objects
- Extrude objects
- And more
Although a lack of these features probably won’t be a deal breaker for you, having them is a nice added benefit — a benefit that Affinity Designer is devoid of.
Advantages Of Using Affinity Designer
Now that we’ve gone over some of the advantages you’ll enjoy as an Inkscape user, let’s take a look at some of the things that Affinity Designer does better.
Has a pixel-based editor built in
The marquee advantage that Affinity Designer has over Inkscape (and pretty much every other graphic design application for that matter) is that it combines both vector and raster image editing abilities.
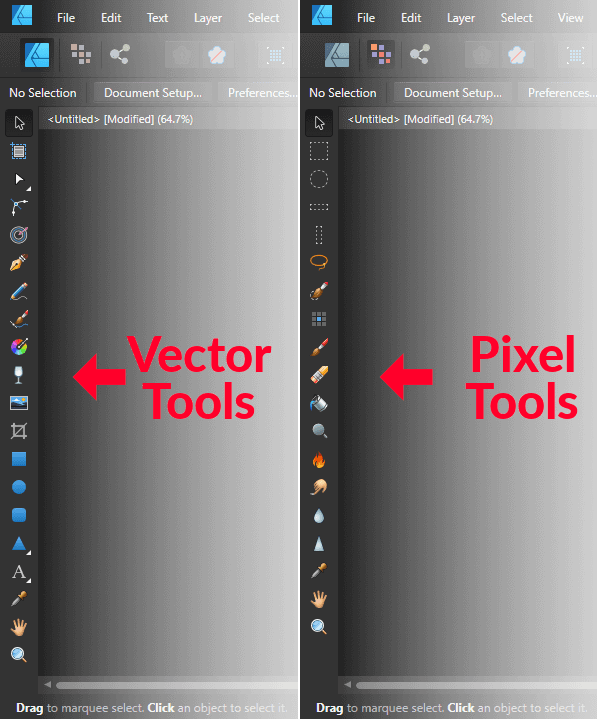
Unlike Inkscape, Affinity Designer has tools for both vector design and pixel editing.
Affinity Designer is somewhat of a 2-in-1 application, breaking down into two personas:
- Designer Persona: used for creating vector illustrations and editing vector file formats
- Pixel Persona: used for editing pixel-based imagery
No other design software does this, making Affinity Designer an innovative and unique tool. Having the ability to toggle between these two design environments to edit a single file is so much more convenient than exporting your designs and having to switch back and forth between apps.
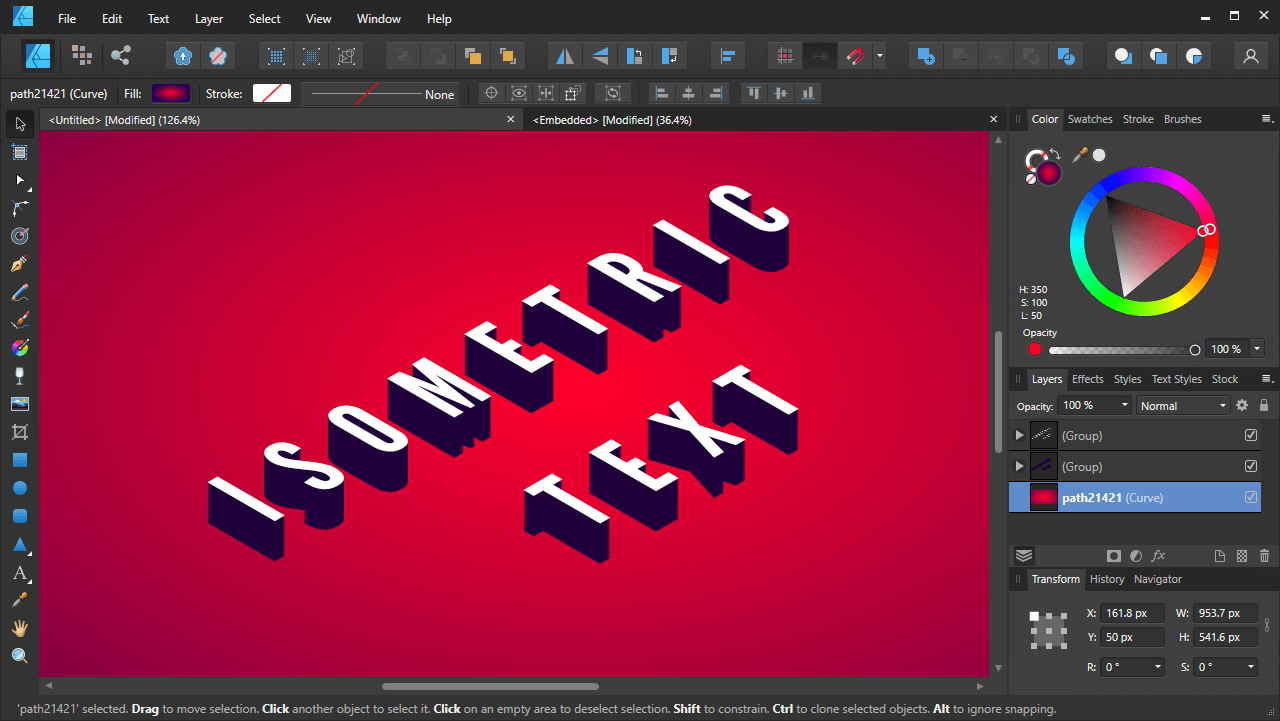
Can have multiple documents open at a time
Another thing I really like about Affinity Designer is that it lets you have multiple documents open at a time via the tabbing system just above the workspace:

Affinity Designer allows you to have multiple documents open at a time.
This means that you can have several projects opened and accessible in a single workflow.
Inkscape, on the other hand, can only work with a single document at a time. Working with multiple documents in Inkscape will mean having multiple application windows open at a time.
Adjustment layers
Adjustment layers are non-destructive filters you can apply to a single layer:
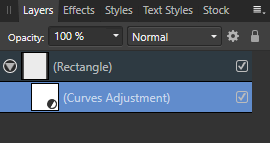
Affinity Designer allows you to apply pixel-based adjustment layers to vector layers.
This is something that is typically only found in pixel-based photo editing applications. However, in Affinity Designer you can add pixel-based adjustment layers to vector objects!
This means that you can do things like make an object black and white, adjust its color curves, invert its colors, adjust its brightness and contrast, shadows and highlights, and more. And since adjustment layers are non-destructive, you can easily disable these edits at any point.
This is a feature that we’ve never seen in any vector design application, including Illustrator. And I must say, I have really taken a liking to it! Having the ability to adjust the color curves of a vector design, without exporting and opening it elsewhere, is very convenient and difficult to let go of once you’ve gotten used to it.
Easier to work with text
One of the most frustrating aspects of using Inkscape is having to work with text — especially large bodies of text.
For whatever reason, Inkscape just doesn’t handle text well. The Text and Font menu is regularly unable to preview third-party fonts correctly, and if you have too many fonts installed then Inkscape will slow down and sputter regardless of your hardware.
Working with text in Affinity Designer, on the other hand, is a refreshing change of pace. All of the fonts display as intended, and browsing through them will not crash your system.
Not only that, but it’s easier to cycle through different fonts in Designer as well. Simply open the dropdown menu and hover your cursor over the list to generate a preview.
Easier to work with text on paths
Not only is it easier to work with text in Affinity Designer than it is in Inkscape, but it’s also easier to work with text that is placed on path. Like when wrapping text around a circle, for example:
When placing text on a path in Affinity Designer, you are provided handles that allow you to dictate the start and end point point of the text, and whether the text flows inside or outside of the path.
Inkscape, on the other hand, makes this process much more difficult. There are no on-canvas handles for adjusting the text on the path, and no other way to position the text aside from rotating the object and putting empty spaces in the text.
Easier to work with clipping paths and masks
Another area where Affinity Designer is easier to work with than Inkscape is when it comes to making clipping paths and layer masks.
Clipping paths are when you take one object and use it as a fill property for another object. Layer masks allow you to make certain parts of an image transparent in a non-destructive way:

Affinity Designer makes this process easier than any other application by allowing you to simply drop one layer on top of another layer to create a clipping mask:
Inkscape allows you to do this as well, but you’ll have to navigate through the menu system to find the feature, and once the clipping path applied, you won’t be able to edit it retroactively like you can in Designer.
Better for painting and brushing
Inkscape vs Affinity Designer is less of a dilemma if you’re somebody who routinely does any kind of freehand drawing, painting, sketching, or brushing. The reason why is because Affinity Designer has paint brushes built in:
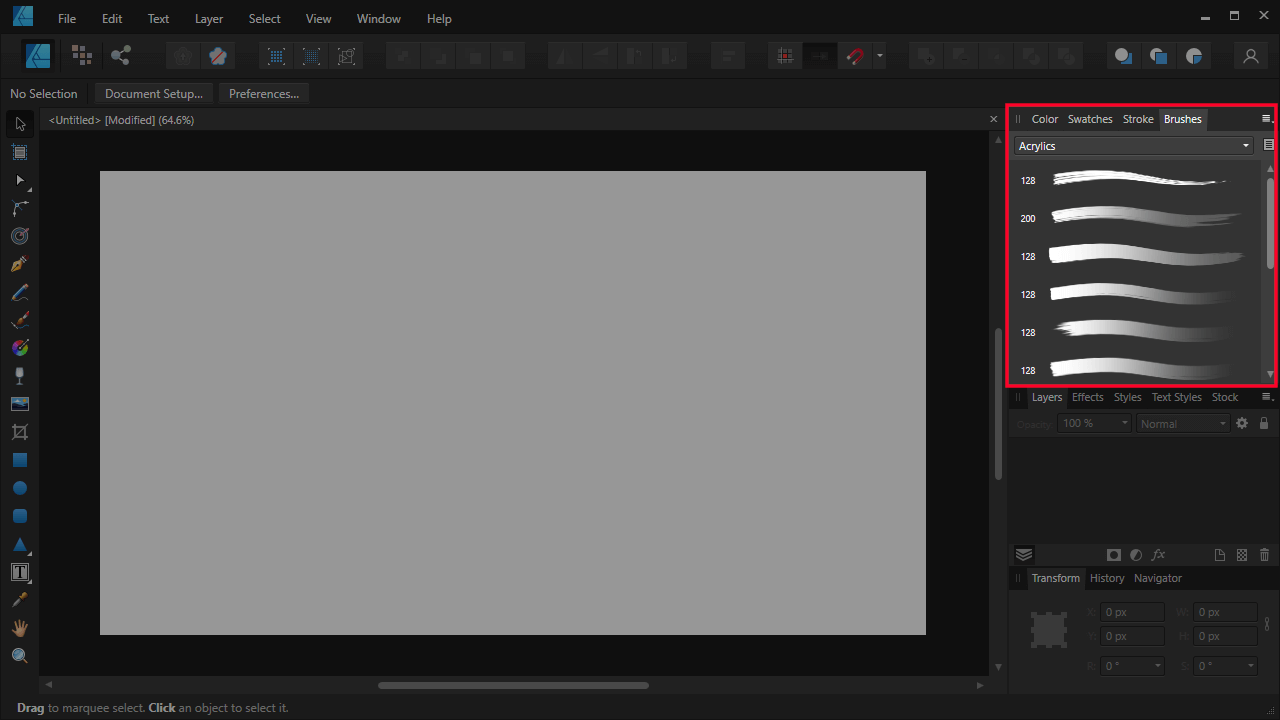
Inkscape has no such feature. There are workarounds for creating custom brushes, but it doesn’t work nearly as well as it does in Designer. Affinity Designer comes packed with dozens of brushes and styles to pick from and work with.
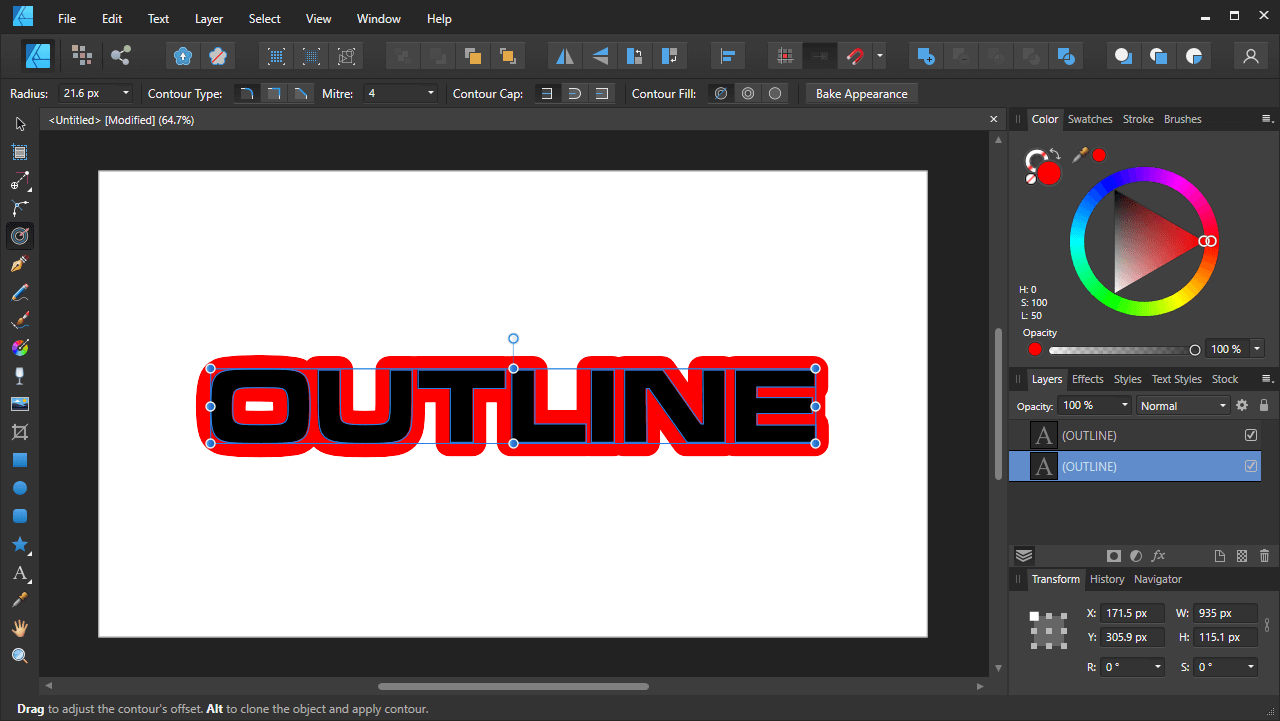
More handy tools
In addition to all of the other features that Affinity Designer has, it also has some handy tools that will make your life much easier as a vector designer than it would as an Inkscape user.
One such example would be the Contour Tool, which allows you to offset a path using on-canvas handles:
Or the Vector Crop Tool — which provides on-canvas handles for quickly cropping images:
Both of these things can be done in Inkscape, of course, but these dedicated tools make for a much more efficient workflow in Designer.
Isometric tools
One of the most powerful tools Affinity Designer has to offer is its Isometric Tool:
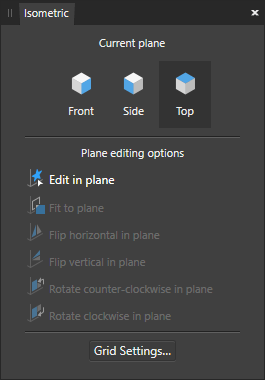
The Isometric Menu allows you to place objects on isometric planes. It also allows you to change the position and orientation of your select object, relative to the grid.
This tool allows you to take a flat 2D object and place it on either side of a three-sided cube to create an isometric effect:
This can be done in Inkscape as well, but since Inkscape doesn’t have an equivalent feature, it’ll have to be done manually using basic transformations, like shearing and rotating.
Linked stock photo directories
One of my favorite features of Affinity Designer is the built-in stock photo library.
Granted, this library doesn’t actually store any stock imagery. Instead, it links you to the online directories of Pexels and Pixabay — two websites where you can download free stock photos.
Normally, you would have to download these images and import (or paste) them onto your document. However, the Stock menu allows you to search these sites for stock photos and import them into your workspace directly within the software!
This is a really handy feature that’s hard to live without once you get used to it — a feature that Inkscape is without.
CMYK Support
No comparison of Inkscape vs Affinity Designer would be complete without mentioning CMYK — a color format required when creating documents for print, and it’s also the bane of Inkscape’s existence. The Open Source editor is famously without the ability to work in the CMYK color space and save files with a CMYK color profile.
By default, Inkscape uses the RGB format, which is fine when designing things for digital displays, but will create a muddy and inaccurate composition when printed.
Affinity Designer users can rest easy knowing that the software comes with the ability to assign various color profiles, including both RGB and CMYK varieties.
Can create multi-page documents
Another area where Affinity Designer outshines Inkscape is in its ability to save your work as a multi-page document.
The entire Inkscape application, by contrast, functions as just a single document. Anything that you save or render in Inkscape will be saved as a single page. Making multi-page PDF documents, for example, is not possible in Inkscape without outside help.
As a Designer user though, you’ll be able to make multi-page documents as long as you’d like.
Allows you to batch export
If you’re working with an array of objects and design elements that need to be rendered separately, you may be delighted to hear that Affinity Designer has a batch export feature built in which allows you to export multiple files at once. This can be really useful when creating logo variations for a client, or designing the user interface for an app, for example.
Inkscape users, on the other hand, are left in the dark without an equivalent. Instead, you’ll have to manually export each object one by one. And yes, I am aware there is a batch export feature, but it’s only for PNG images. Designer allows you to export in any format you’d like.
Has a mobile companion app for iPad
If you’re somebody who regularly does design work with an iPad then you may want to opt for Affinity Designer over Inkscape as it has a very powerful mobile app for iOS:
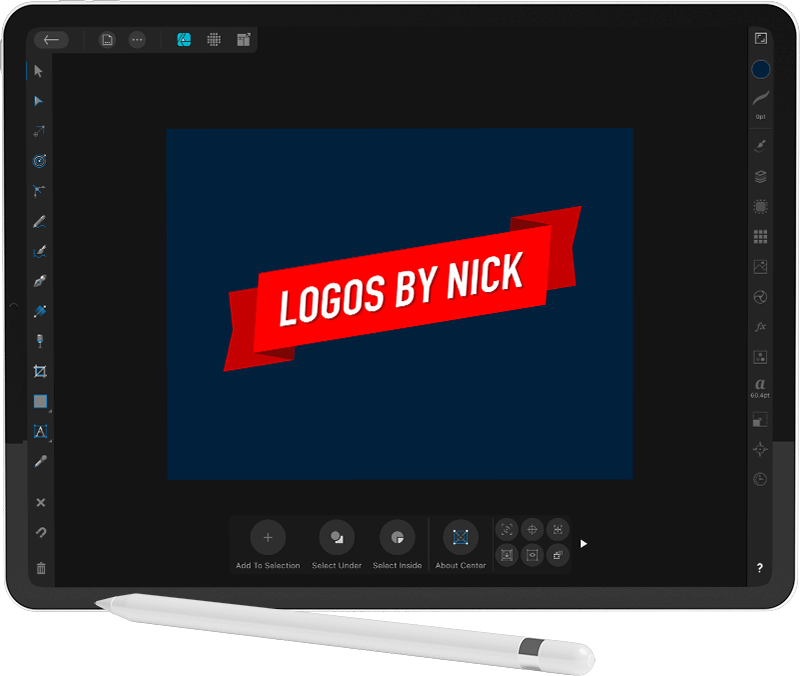
Granted, you’ll have to purchase this app separately, but its feature-rich nature and powerful tools make it well worth the money. And once you have it you’ll be able to work on the same document between devices without skipping a beat.
It’s more stable
Another advantage that cannot be overlooked is how much more stable Affinity Designer is than Inkscape.
You don’t have to be a veteran Inkscape user to know that it has stability issues and crashes on a routine basis. It has gotten better over the years, but it’s nowhere near as reliable as Affinity Designer is.
Has better documentation
Finally, if you’re looking to learn how to use either application, you’ll have an easier time finding answers to your questions in Affinity Designer’s documentation than you will in Inkscape’s. This is because Inkscape’s documentation is incomplete. There are various tools and features in the software that you cannot find documentation for, which can be frustrating. This is likely due to the fact that Designer is a commercial product with commercial support behind it.
When To Use Inkscape…
Now that we’ve gone over the differences between Inkscape vs Affinity Designer as far as features go, let’s have a look at some case uses where each would come in handy, starting with Inkscape.
Vector illustrations
Tying in with the previous point about Affinity Designer being unable to make advanced edits to vector objects, this also means that Inkscape would be preferable when making any kind of vector illustrations. A good example of this would be when drawing rooms, houses and buildings:

Without some of the advanced path effects found in Inkscape, Affinity Designer isn’t as advanced of an illustration tool. Instead, Designer is better suited for simple illustrations and common edits to vector files.
Linux users
Finally, Inkscape would be the tool of choice if you are a Linux user. In fact, it’s your only choice as a Linux user because Serif has yet to make any of its apps available on the platform.
That’s not the only reason why Inkscape is preferable for Linux users though. In my experience, Inkscape tends to be more stable and less buggy when using it on a Linux desktop.
When To Use Affinity Designer…
Now let’s have a look at some use cases where you should opt for Affinity Designer over Inkscape.
Making any kind of edit to a pixel-based image
By now it should go without saying that if you need to make any kind of edits to a photograph or pixel-based image, Affinity Designer’s Pixel Persona makes it a much more viable tool for doing so. Edits include:
Delete backgrounds
- Cropping images
- Resizing images
- And more
Some of these edits can be made in Inkscape as well via extensions and plugins, but in Designer they’re more a part of the core functionality, making it more suitable for handling these tasks.
Designing books, ebooks, brochures, etc.
Affinity Designer would also be the better tool to use whenever doing any kind of desktop publishing, including making designs for:
- Books and Ebooks
- Guides and manuals
- Brochures
- Flyers
- And more
The reason why is twofold. Unlike Inkscape, Affinity Designer lets you create multi-page documents, and as we touched on earlier, it’s much easier to work with text in Designer than it is in Inkscape. Especially large bodies of text.
Having designed entire ebooks in Inkscape in the past myself, I know firsthand just how frustrating it can be to work with large bodies of text in the software.
Designing anything for print
Because of its ability to work in a CMYK environment and output files with a CMYK color profile, Affinity Designer would also be the better tool to use when designing something for print.
Anything designed in Inkscape will be forced to have an RGB color profile, meaning if you print it, the colors will not look the same in print as they do on your screen. This makes the Inkscape vs Affinity Designer dilemma that much easier for those who routinely design for print.
Designing app icons and user interface
Another area where you may want to consider Affinity Designer over Inkscape is for designing icons and user interface.
The reason why is because Designer lets you batch export design elements, which can be really useful when designing something like app icons, for example.
Inkscape doesn’t have the ability to batch export design elements. This means that if you were to design an app icon in Inkscape, you’d have to export each size variation one by one. In Designer, however, you could simply batch export all of those variations in one shot.
Painting, drawing and sketching
The brushes built into Affinity Designer make it a much better tool to use than Inkscape if you do any kind of freehand drawing, painting or sketching.
That’s not to say that this can’t be done in Inkscape via workarounds. However, Designer doesn’t require any, making it a better tool.
Working cross-platform
If you’re going to be working cross-platform — between desktop and mobile environments in particular — then Designer would absolutely be the better choice due to its mobile app for the iPad.
Inkscape, on the other hand, has nothing of the sort.
Mac users
Finally, if you’re a Mac user then Affinity Designer would probably be a safer bet than Inkscape.
In my experience, Inkscape doesn’t run too well on the Mac operating system. I’ve encountered lots of bugs, crashes, and the occasional missing feature. And these issues seem to have been exacerbated since the release of Big Sur last year.
In Conclusion
In the matchup between Inkscape vs Affinity Designer, I think it’s safe to say that one application isn’t definitively better than the other. Inkscape would be ideal if your focus is on working with vectors, whereas Affinity Designer would be suitable as an all-in-one solution for casual design tasks.
They each have strengths and weaknesses of their own. However, their weaknesses complement each other quite well, and if you have copies of both, it’s safe to say that you’ll never need Adobe Illustrator.
If you have any questions or feedback just leave a comment below!
Learn To Master The SoftwareGain a complete understanding of your favorite design apps with my comprehensive collection of video courses. Each course grants access to our private community where you can ask questions and get help when needed.
|
||||||||||||||||||||||||||||||||


So far, after using Inkscape for more than 13 years, I agree with you about text tool. Although in newer version Inkscape has improve this segment but it was still buggy if handling so many text.
Great!!!
Nick,
As a former teacher, I wanted to say thanks for all of the incredible educational courses and videos (I just got your complete bundle the other day and have made it through about a third of the Inkscape Master Class, so far). I am also thinking about purchasing Affinity Designer 2 after I read this comparison. I think I might know the answer to one of my questions, but here they are: 1) Do you know if Designer 2 has a T-shirt or hat/baseball cap template? 2) Would you recommend Designer 2 for creating simple text-based (with large numbers for sports) graphics for screen printing?
Hi Chad, I don’t think there are any templates for t shirts and ball caps. The templates included are all based on screen resolutions (eg 1080p, 4k, 1440p, etc.) And yes, I would recommend Designer over Inkscape when it comes to working with text. Working with text in Inkscape has become a pain. Designer is also better for anything print-related.
Now that Affinity Designer 2 has come out, the comparison needs updating
Done!
One should put in consideration path alteration produce by ‘stroke to path’ and other operations on path like union, difference etc. Check the ‘before and after’ to see the open source scandal: adding super features while not even capable of correctly implementing basic stuff.
Hey Nick
Love your content and tutorials… so clear and helpful for new designers lost in the digital spaces 🙂
Maybe I’m not understanding this well enough but in Affinity Designer you can convert an element to a curve and then distort etc with the node tool (pretty sure I just did this!). Is this a new feature bringing AD in line with Inkscape or am I getting confused 🙂
Thanks again!
Hi Marc, editing nodes isn’t the same as distorting objects. For example, you can use nodes to change the perspective of a square, but that won’t work for a text object as a text object would have lots of nodes that would all need to be moved manually in order to create the appearance of a perspective distortion. As far as I know there haven’t been any meaningful updates to Affinity Designer since writing this article.
I wish I could get past the “Not Responding” when I attempt to do something with the current version of Inkscape. Free or not, it’s useless if it simply doesn’t work.
Hey Nick, thanks for all the tutorials and help you dish out on this website, its fantastic.
You’ve got a major hang up on designer’s lack of perspective, warp and other distortions which is valid. However I just got Affinity photo on sale about a week ago and it has all of those essential distortion functions and more. It’s definitely a work around, but was a major relief when I discovered them. I know this is a comparison between inkscape and designer, but the affinity platform prides itself on fantastic cross compatibility so i wanted to stick up for it hahaha.
Thanks again for all your help!
Thank you Nick for this helpful comparison!
I have both installed on my system, and just wanted to share that with Inkscape 1.2 it is now possible to work with multiple pages documents.
Also, even if maybe less important for a veteran inkscape user, I find Affinity Designer way more intuitive in its use, and this allows me to work faster, expecially since I’m not a professional designer.
Thank you and keep up the good work
You stated that Affinity doesn’t have mesh gradient but it actually has something better, a freeform gradient. The appearances tab added in January 2020 allows you to add multiple gradients and strokes to a shape. You can set a circle or ellipse gradient and set the right to transparent and blend mode to average and you have gradient points which will interact with one another. Play around with the blend modes and you can get interesting effects.
True, although not the same but a solid workaround. Thanks for sharing!