
How To Use Trace Bitmap In Inkscape | Tutorial
How To Use Trace Bitmap In Inkscape | Tutorial https://logosbynick.com/wp-content/uploads/2021/03/trace-bitmap-in-inkscape.png 800 470 Nick Saporito https://secure.gravatar.com/avatar/8e31bf392f0ba8850f29a1a2e833cdd020909bfd44613c7e222072c40e031c34?s=96&d=mm&r=gTrace Bitmap is a feature in Inkscape that allows you to auto-generate vector tracings of pixel-based images, and in this tutorial we’ll be going over how you can do just that.
This feature is absent in many of the premium design apps, making Inkscape an invaluable free tool for users who may be missing out on the ability to trace vectors from images. Doing so allows you to make all kinds of interesting and unique creations; including logos, icons, headers, posters, and more. And the great thing about using Trace Bitmap in Inkscape is that it auto-traces as well as any other vector app– including Adobe Illustrator!
Trace Bitmap: How To Use
The following video tutorial will walk you through the entire process, step-by-step:
Continue on for a written overview.
Getting Started With Trace Bitmap:
Tracing Modes: |
Step 1: Click on an image to select it
To get started with tracing your image, you’ll first need to make sure that you have it selected so that the software knows what to trace. Simply click on your image to select it.
It should be noted that Trace Bitmap only works on pixel-based images. If you are trying to trace a vector path, it will not work.
Step 2: Open the Trace Bitmap menu by pressing Shift+Alt+B
With your image selected, open the Trace Bitmap menu by pressing Shift+Alt+B on your keyboard if you are a Windows or Linux user, or Shift+Option+B if you’re on Mac.
It can also be located via the menu system by navigating to:
Path > Trace Bitmap
Step 3: Choose the desired mode for your tracing
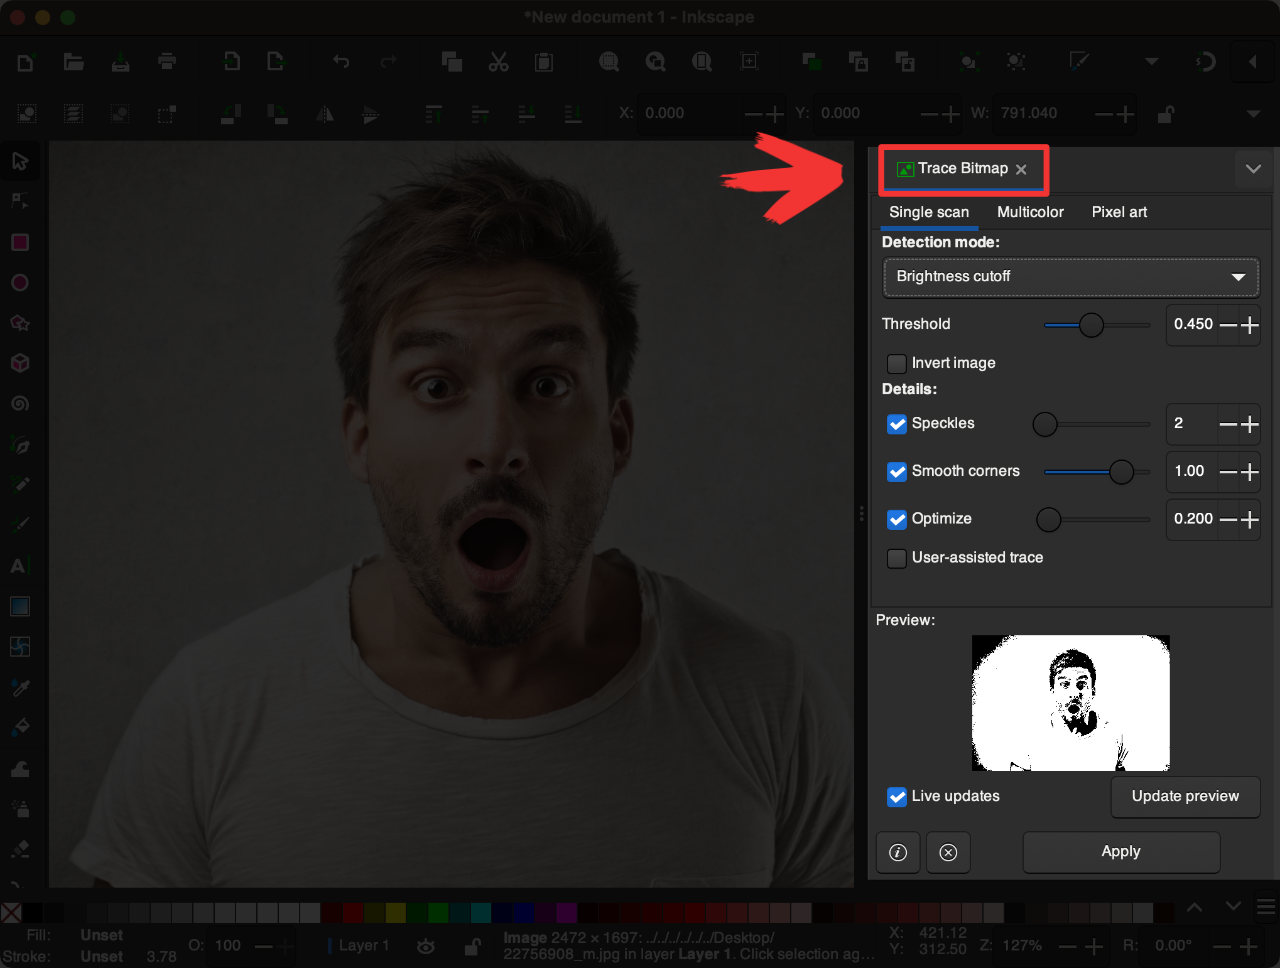
Once opened, the Trace Bitmap menu will populate on the right-hand side of your screen as a dockable menu. It should look something like this, with a window that shows a vector tracing preview of your selected image:
Click to enlarge.
At the top of the menu you will see three separate tabs. These represent tracing modes, and they’re important to know because they will determine the type of tracing the software generates.
There are three modes:
- Single Scan
- Multicolor
- Pixel Art
Let’s have a look at what each does so you can decide which type of tracing you’d like to make.
Tracing Modes Explained
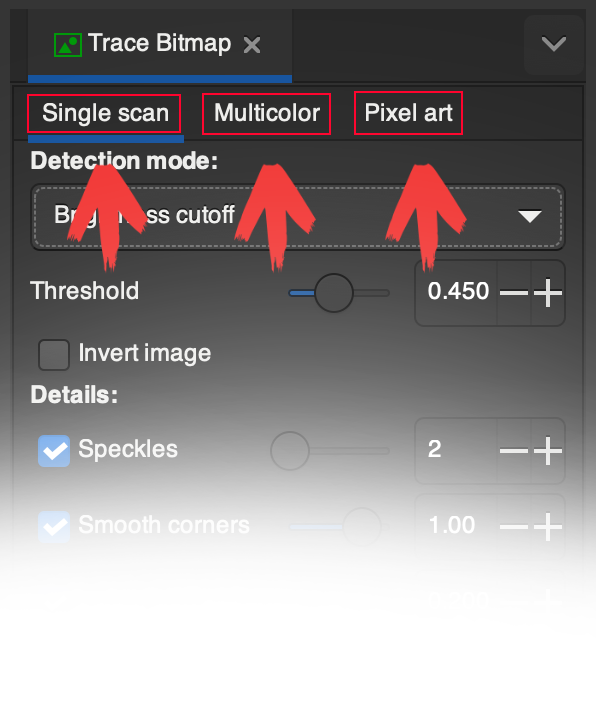
The image below depicts where the three tracing modes in Trace Bitmap can be accessed:
Click to enlarge.
Clicking on each tab will populate an array of settings that are unique to each mode.
Single Scan
The Single Scan mode allows you to create a single monotone tracing of your image in all black. It uses areas of contrast in the image to determine what exactly should be traced:

Within the settings menu of the Single Scan mode, you will see additional modes that represent different methods the software will use to trace your image. These include:
- Brightness Cutoff
- Edge Detection
- Color Quantization
- Autotrace
- Centerline
The best way to determine which of these modes to use is to cycle through each of them one-by-one to see which of them generates the most accurate tracing of your image in the preview window. You can adjust the sliders below to fine-tune your selection further.
Multicolor
The Multicolor mode allows you to generate vector tracings of your selected image in full color:

Much like the Single Scan mode, there are various modes to choose from within:
- Brightness Steps: This mode references the colors in your image to generate a vector tracing that varies in brightness.
- Colors: This mode generates vector tracings in full color. You can increase or decrease the numbers of colors used in the tracing to make it simpler or more detailed.
- Grays: This mode generates tracings in grayscale, otherwise known as black & white.
- Autotrace: This mode works like the Colors mode, but it take a little longer to process as it renders more details.
Adjust the sliders below to tweak the tracing further and fine-tune it to your liking.
Pixel Art
The final tracing mode in the Trace Bitmap menu is Pixel Art, which is meant for tracing small icons that require fine details:
Click to enlarge.
As you may have noticed by now, the tracings generated with Trace Bitmap aren’t always accurate or crisp. For example, it has a tendency to round corners and smooth edges excessively. This can be problematic if you’re tracing something detailed that requires more accuracy.
This is where the Pixel Art mode comes in. This mode will generate more accurate tracings of your selected image, but there is a caveat. This mode is very CPU-intensive, so it is recommended that it only be used on small images (such as icons) that are no larger than 100 x 100 pixels.
There are two primary modes within the Pixel Art mode:
- Voroni: This mode creates a tracing that consists of lots of tiny vector boxes that are individually colored.
- B-Splines: This mode generates a tracing that consists of larger vector shapes.
Once again, there are settings sliders below that can be adjusted to tweak the tracing to your liking.
Once you are satisfied with the preview of your tracing, press the Apply button to generate it and you are done!
In Conclusion
The Trace Bitmap feature in Inkscape is a useful tool that will certainly come in handy for you at some point. I’ve been using it for years personally. And considering that certain premium vector editors do not come with an equivalent, it’s quite impressive that the Inkscape team was capable of producing such a powerful feature.
Learn To Master The SoftwareGain a complete understanding of your favorite design apps with my comprehensive collection of video courses. Each course grants access to our private community where you can ask questions and get help when needed.
|
||||||||||||||||||||||||||||||||


I may be chasing down the wrong path here but after doing a multiple scan scan on something, say 25. Now I have 25 separate ‘layers’. I’ve tried union and combine but both destroy the image, is grouping the only viable option at this point ?
Yes, grouping is the only way to combine those objects together so that they behave as a unit while preserving their appearance at the same time.
After you have broken an image into individual color scans using Path – Trace Bitmap, how do you download each individual color scan to the computer for later printing. I’m a woodworker and I want to print each color scan and put it on plywood to cut each layer individually to create a layered color portrait.
You would have to separate each element and place them in new documents of their own. Then you can print directly from within Inkscape.