
How To Cut A Hole In An Object With Inkscape | Beginner Tutorial
How To Cut A Hole In An Object With Inkscape | Beginner Tutorial https://logosbynick.com/wp-content/uploads/2020/04/cut-hole-in-an-object-with-inkscape.jpg 800 470 Nick Saporito https://secure.gravatar.com/avatar/8e31bf392f0ba8850f29a1a2e833cdd020909bfd44613c7e222072c40e031c34?s=96&d=mm&r=gIn this tutorial I’ll be demonstrating how to cut a hole in an object with Inkscape. This is a very basic function that is handy to know when working with vector objects, and it’s a great lesson for beginners and first-time users of Inkscape.
The following is an overview of the steps taken to achieve this effect. If you’d like a more in-depth explanation with step-by-step instructions, I’d highly recommend that you watch the video tutorial below:
Cut A Hole In An Object With Inkscape
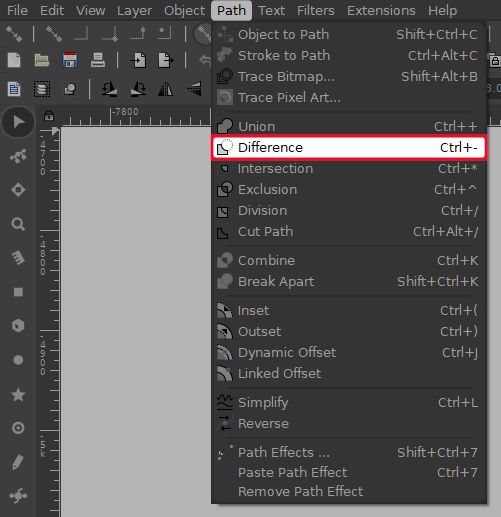
| To cut a hole in an object with Inkscape, place the object you’d like to cut the hole with over the object you’d like it cut into, select them both, and navigate to Path > Difference. |
In order to cut a hole in our object, we first need to define what shape the hole will be, and what object we’ll be cutting the hole into. For this tutorial I’ll be using the following red square and blue star as an example.
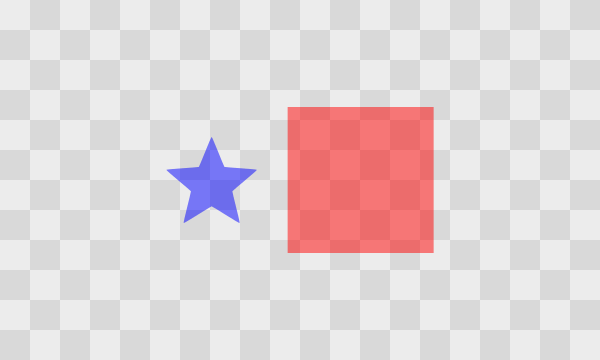
My goal is to cut a hole in the red square using the blue star so that there’s a star-shaped hole in the square with transparency/negative space showing through. I placed both objects on a checkerboard pattern to help illustrate where the negative space (the “hole”) will be.
Path Functions
To accomplish this we’ll be using one of Inkscape’s path functions. More specifically, a path function known as Difference.
The Difference path function allows you to subtract an object from another object. However, in order for it to work properly, there’s a few conditions that need to be met…
- The object you wish to subtract must be positioned above the object you wish to subtract it from. Whichever object is on top is going to be what gets cut into the object beneath it.
- Both objects must be pure vector paths otherwise it will not work. They cannot be photos, raster images, text objects, or anything else that isn’t a path. It also cannot be paths that have filters, clips, or masks applied.
- Both objects must be individual paths. This particular path function will not work on groups of paths. Everything must be ungrouped, and it cannot be more than 2 objects.
That said, let’s get started.
The first thing I want to do is make sure that the object I wish to cut the hole with is positioned above the object I’m cutting it into. In my example it would be the star. So I’m going to make sure the star is raised to the top by selecting it and clicking the Raise Selection To The Top icon in the top toolbar. Alternatively, you can simply press the Home key on your keyboard instead.
Click and drag your object over the object you’d like to cut the hole into and position it exactly where you’d like the hole to be.

Now, select both objects. You can select both objects with the Select tool by holding Shift and clicking on each. You can also select them by clicking and dragging to create a bounding box that encapsulates them both.
With both objects selected, navigate to Path > Difference.
If done correctly, you should have successfully cut a hole in your object, as indicated by my example below.

Notice the checkerboard pattern showing through the negative space where the hole is.
And that’s all there is to it!
Learn More
If you’d like to learn more about all of the other path functions and how they work, I have an entire video series where I explain each of them and demonstrate how they work in my Inkscape Master Class. We also have a private community where I can give you one-on-one assistance if you have questions about anything or need clarification.
If you have any questions or run into any problems with this tutorial simply leave a comment below. As always, thanks for watching!
Learn To Master The SoftwareGain a complete understanding of your favorite design apps with my comprehensive collection of video courses. Each course grants access to our private community where you can ask questions and get help when needed.
|
||||||||||||||||||||||||||||||||


Next trick: doing this more than once on the same object!
This works the first time.
But the second time a user tries to cut a shape out of the same image, the results are totally whack.
Hello Nick,
I swear I have two “pathed” vector objects and when I select difference, nothing happens? Can you help please?
Have you tried ungrouping them? Even if the objects aren’t grouped with other objects, sometimes if you accidentally hit the group shortcut or button it will have it applied and path operations won’t work. Try ungrouping everything a few times and try again (control + shift + g)
Does not work for me.
Hi Zia, what exactly is going wrong? Could you elaborate?
if Zia is having the same issue as me, everything, or more simply put, nothing happens when selecting Difference.
Amazing, thankyou!
hi can i ask you something
hello nick, great tutorial, how can i do what you did on the thumbnail? with blender?
It’s a PSD mockup I got here. You can use Photoshop or a web-based editor (Photopea.com) to place your logo. I have a tutorial about it here: https://logosbynick.com/use-psd-mockups-without-photoshop/