
How To Convert A PNG To Vector with Adobe Illustrator
How To Convert A PNG To Vector with Adobe Illustrator https://logosbynick.com/wp-content/uploads/2020/10/convert-png-to-vector.png 800 470 Nick Saporito https://secure.gravatar.com/avatar/8e31bf392f0ba8850f29a1a2e833cdd020909bfd44613c7e222072c40e031c34?s=96&d=mm&r=gIf you have a PNG file and you want to take advantage of the benefits of working with vector graphics — like infinite scaling and editability — then you’ll need a vector file format to work with. Unfortunately, the PNG format is not a vector format. In this tutorial I’ll be demonstrating two different ways in which you can convert a PNG to vector with Adobe Illustrator. The first is by utilizing the Image Trace feature, and the second is by manually tracing your design.
The following is a written tutorial where I provide an overview of the steps taken to convert a PNG the vector with Adobe Illustrator. For complete step-by-step instructions, please watch the video tutorial below:
Raster and Vector Formats
When working with static digital imagery, there’s two types of graphics — vector and raster. The difference between them are significant.
Raster Graphics
Raster graphics are digital images comprised of individual colored boxes known as pixels.
Raster images are made of individual colored boxes known as pixels
The following file types are examples of raster formats…
- JPG
- PNG
- GIF
The benefit of working with raster imagery is that it’s capable of retaining an infinite amount of fine detail, making it the ideal format when working with photos.
The downside of working with raster imagery is that it doesn’t scale well. For example, if you have to enlarge a logo to make it fit the side of a vehicle wrap, there’s going to be pixelation, or in other words, the individual colored boxes are going to become more visible.
Vector Graphics
Unlike the raster format, vector graphics are comprised of a series of coordinate points that dictate the properties of a graphic on an X and Y axis.

Vector graphics can be scaled infinitely without quality loss
The following file types are examples of vector formats…
- SVG
- AI
- EPS
The benefit of working with vector graphics is that they’re easy to edit and they can be scaled up infinitely without quality loss. This makes the vector format ideal for something like a logo design, where the design will need to be used in many different contexts.
The downside of working with vector graphics is that they’re not as capable of producing fine details as the raster format is. Because of this, vector graphics are better suited for simple illustrations, user interface, icons, and logo design.
Converting A PNG To Vector
This brings us to the topic of PNG files as it relates to the vector format. Let’s say you have a logo, icon, or some kind of illustration that is in PNG format, and you want to convert it to a vector format in order to take advantage of all the benefits the vector format has to offer. Unfortunately, it’s not as simple as converting one file type to another.
Since PNG is a raster format, there’s no way to directly convert it to a vector format. It would be like trying to turn an omelet back into an egg. If you don’t have a source vector file for your PNG file, then you’ll have to create a vector tracing it.
In order to create a vector tracing of your PNG file, you’ll need to use a vector graphics application, like Inkscape or Adobe Illustrator.
Convert A PNG To Vector with Adobe Illustrator
In the following demonstration I’ll be going over two different ways in which you can convert a PNG to vector with Adobe Illustrator by creating a tracing of it. The two different methods I’ll be covering are as follows…
- Automatic Tracing: Depending on how simple your design is, you may be able to utilize a built-in feature that uses AI to automatically generate a vector tracing of your PNG design.
- Manual Tracing: If your design is a little more complex, then you’ll have to manually draw a tracing by hand using basic shapes and drawing tools.
It is recommended that you try the automated tracing option first, since it takes the least amount of time. Then, if it turns out that your design is too detail to get an accurate vector tracing of it, then you can move on to the manual tracing method.
Automatic Tracing
The first way in which you can convert a PNG to vector with Adobe Illustrator is by using the Image Trace feature.
The Image Trace feature uses a predictive algorithm to generate a vector tracing of an image based on the image’s composition.

I recently made an extensive tutorial about how to use the Image Trace feature if you want to learn more about how it works.
The benefit of using the Image Trace feature is that it’s quick and easy. The downside is that, depending on the complexity of your image, it isn’t always accurate.
How To Auto-Trace Your PNG File
To create a vector tracing of your PNG file, first open a new document, then import your PNG file into Illustrator by going to File > Place and locating your file on your disk.
Import your file into Illustrator by navigating to File > Place.
Select your file with the Select Tool, then open the Image Trace menu by navigating to Window > Image Trace.

The Image Trace menu, which allows you to create a vector tracing of any image.
If your PNG has color then make sure to choose “color” from the Mode drop down. If it’s a simple black and white design, then leave the defaults as they are. Then toggle on the preview to see how your tracing looks.
If tracing a black and white design, you may have to adjust the threshold slider depending on the composition of your PNG. If tracing a PNG with color, you may have to adjust the number of colors accordingly. Just make sure to keep the Preview option toggled so you can gauge the accuracy of the tracing yourself.
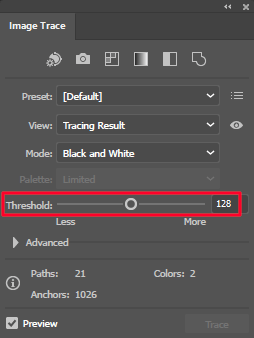
You may have to adjust the Threshold slider depending on the composition of your image.
If you’re happy with the accuracy of your tracing, go ahead and click Trace to generate it.

The Image Trace feature allows you to create a quick vector tracing of your PNG file.
Once you’ve rendered your vector tracing, you’ll need to edit it a little further to get rid of the background.
To do so, go to Object > Expand, then go to Object > Ungroup twice. You should then be able to remove the background and any other unwanted area of negative space.
Manual Tracing
If you’ve tried using the Image Trace feature to convert your PNG to vector with Adobe Illustrator, and the resulting trace isn’t very accurate, then that means you’re working with an image with too complex of a composition for automatic tracing. You’ll have to manually trace your PNG instead.
How To Manually Trace Your PNG File
To create a manual tracing of your PNG file, the first thing you want to do is look for common shapes in your design. The following are examples of common shapes…
- Squares and rectangle
- Circle and ellipses
- Triangles
- Polygons
- Stars
Identifying these shapes in your design is useful because Illustrator already has dedicated tools for creating these shapes. Using these tools will not only save you time, but they’ll produce more accurate results than if you had to draw them manually.

Identifying common shapes in your design can save you a lot of time.
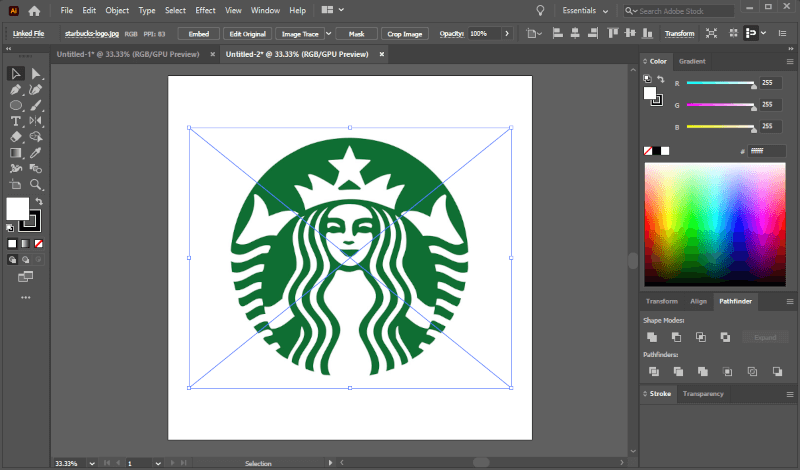
For this demonstration I used the Starbuck’s logo, which is encompassed within a circle. Therefore, I was able to use the Ellipse Tool to quickly create that portion of the design.
As you can see in this demonstration, this example logo consists of a circle.
If your design has common shapes within it, go ahead and trace over them with the necessary tool for that respective shape.
Once you’ve gotten the common shapes out of the way, the next step would be to use the Pen Tool and the Curvature Tool to manually trace over the more complex areas of the design. In my example, it would be the girl illustration and the accent pieces on the side.
It is recommended that you reduce the opacity of your tracing so that you can see how it lines up with the original image.
The tool you should use for manual tracing depends on the style of lines you’ll be tracing.
- Pen Tool: The Pen Tool is ideal for tracing over straight lines. You can check out my tutorial on using the Pen Tool in Illustrator to learn more about how it works.
- Curvature Tool: The Curvature Tool is ideal for tracing over lines that are wavy and curved. It automatically creates curved lines based on where you place your anchor points.
Once you’ve finished tracing shapes over your PNG image, you can then use Shape Modes to create negative space where it needs to be.

The finished tracing is a true vector conversion of your PNG file.
As I mentioned earlier in this post, make sure to sure to watch the video tutorial at the top of the page if you’d like complete step-by-step instructions on how to do this.
Once finished, your vector tracing is complete! You can go ahead and save your file in any desired vector format and reap all of the benefits of working with vector graphics!
Conclusion
That concludes today’s tutorial on how to convert a PNG to vector with Adobe Illustrator. The automated tracing featured works great for simple designs and can save you a lot of time. But if your design is too complex to get an accurate tracing, or if you want a more precise tracing, then the manual tracing method would be the next best option.
If you have any questions then simply leave a comment below. As always, thanks for watching!
Learn To Master The SoftwareGain a complete understanding of your favorite design apps with my comprehensive collection of video courses. Each course grants access to our private community where you can ask questions and get help when needed.
|
||||||||||||||||||||||||||||||||


You might also like


6 comments
-
-
Nick Saporito
Try SVG format instead. It’s like AI but more of a universal (and web-friendly) vector format.
-
-
Linda Hall
You can’t even know how much this video helped me (even though I had to watch parts of it about 10 times, lol…I don’t use Illustrator often)! Thank you for the great step-by-step instructions, I wish I’d found this video ages ago.
-
-
Nicola
Thanks, this helped me a lot. I was struggling to edit the colour on a png logo within Illustrator, now I’ve been able to fully edit every component.
-
Lauren
Hi there! Thanks for the video, very informative! I was wondering what file format the vector should be in to then use in other spaces? I’m trying to use my vector in web design but I can’t seem to upload the file in AI format.
Thanks so much in advance!