Using Inkscape to Convert PNG to SVG Format
Using Inkscape to Convert PNG to SVG Format https://logosbynick.com/wp-content/uploads/2017/11/inkscape-convert-png-to-svg-1.png 800 470 Nick Saporito https://secure.gravatar.com/avatar/8e31bf392f0ba8850f29a1a2e833cdd020909bfd44613c7e222072c40e031c34?s=96&d=mm&r=gA question commonly asked by newcomers is how they can use Inkscape to convert PNG to SVG format. This is sort of like trying to turn an omelette back into an egg though — the order of operations is backwards. SVG files are what’s used to generate PNG images. Trying to accomplish the inverse of that would be futile, but there are solutions to this problem that I will be going over in this post.
Why It’s Easier Said Than Done
File formats ending in .png are raster graphics, meaning they’re made entirely of individual colored boxes known as pixels. Graphics made of pixels are static and set at a specific size. The more you zoom in on them or try to enlarge them, the more visible the individual pixels become.

Example of a raster graphic
Vector graphics (unlike raster graphics) are not made of pixels; they’re made of mathematical formulas that dictate all of the properties of a graphic on an X and Y axis. Since these formulas are far more dynamic than a series of static boxes, vector formats (like SVG) offer many more benefits, like being fully editable with vector graphics software, and having the ability to enlarge them infinitely without quality loss.

Example of a vector graphic
I assume that the reason you’re trying to use Inkscape to convert PNG to SVG format is because you’d like to take advantage of these benefits. Unfortunately, it simply isn’t possible. As I mentioned earlier, SVG files are what’s used to generate PNG files. The SVG is used as a reference to generate a series of static pixels that form the PNG file, and once that file is generated, the rest of the information from the SVG file (the mathematical formulas) is absent from it. The PNG format in and of itself is not capable of retaining such information.
Because of this, there’s simply no way to take an already rasterized, flattened image and transform it into a series of dynamic mathematical formulas.
Converting PNG To SVG: What Your Options Are
As mentioned previously, just because you can’t directly make the format conversion, that doesn’t mean there aren’t solutions to your problem.

In order to create a true vector SVG file from a PNG, you’ll have to create an entirely new SVG file by tracing over your PNG. There’s two ways to go about tracing a PNG with Inkscape, and luckily neither of them require you to be an expert with the software.
Method 1: Auto-Tracing
The first way you can trace your PNG file is by using the Trace Bitmap function in Inkscape. The Trace Bitmap extension scans your image and uses it as a reference to automatically generate a vector rendering of it.
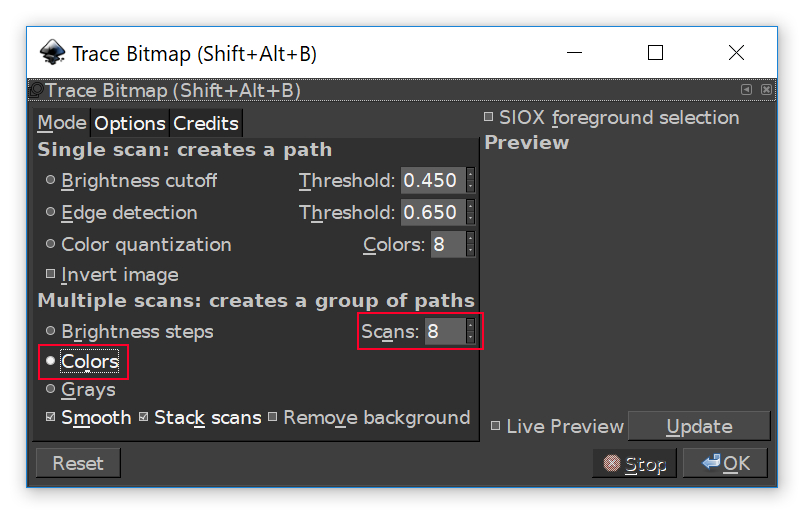
To use the Trace Bitmap function, simply select the object you’d like to trace, then go to Path > Trace Bitmap. This will bring up the interface menu depicted above (check out my Inkscape dark theme tutorial if you’d like a dark interface like mine.)
Assuming you’d like to create a complete retrace of the image and not just a monotone silhouette, choose Color from the Multiple Scans menu. After that it’s time to set the Scans. Scans are basically the number of colors that will be used in the tracing. If you’re working with a really simple PNG that only uses 2 or 3 colors, set the Scans to 2 or 3. If it has more, use more.
It may be worth it to experiment with different numbers of scans to see what works out best. You can click the Update button to generate a preview in the preview window before finalizing your selection.

The Trace Bitmap function handles simple graphics quite well
After you’ve finalized your tracing and clicked OK to generate it, make sure to Ungroup it (CTRL + SHIFT + G) several times to unlock all of the individual elements of the design.
Potential Problems With Auto-Tracing
This method is far from perfect. As can be expected, there’s no way for the software to understand all of the nuances of a raster image and render them with flawless precision. If the PNG you’re looking to trace is a very simple graphic at a high resolution and only uses a handful of colors, this method may be a viable option for you.
However, if you’re using a more complex, detailed image (or a really small image) it’s likely not going to give you acceptable results.

Click to enlarge
As you can see, the Trace Bitmap function produces results that are quite rudimentary when applying it to a more detailed image. The gradient background of the original image resulted in lots of color banding in the tracing, and the finer details — like the lettering and shading of the character — were completely lost in translation. The same will also happen if you use an image that’s too small…
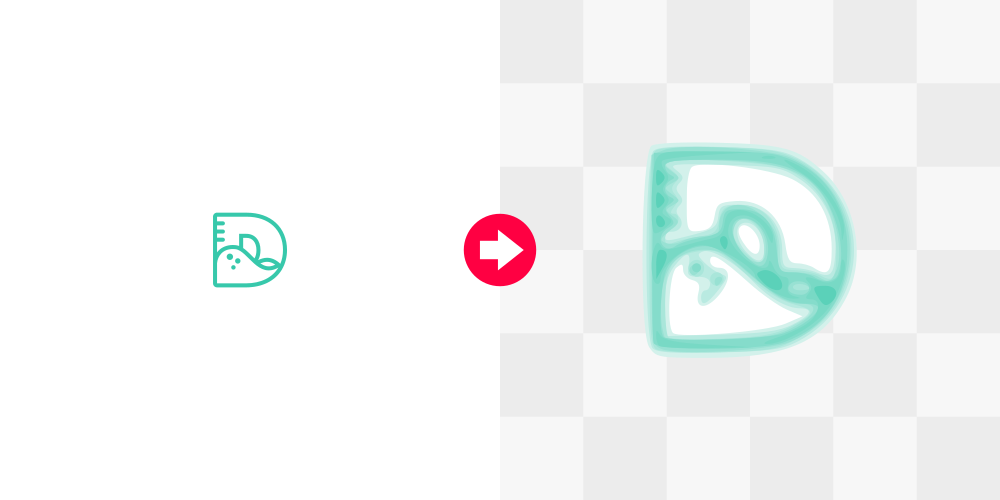
Click to enlarge
There’s simply not enough information for the software to process when working with such a small image, which results in a blurry image with lots of color banding.
If after experimenting with the extension you are unable to produce the result you want, it may be time to consider other options.
Method 2: Manual Tracing
As the title suggests, this is a method in which you manually trace over your image using various different shapes and the Bezier Pen. This may seem daunting upon first impression — especially if you’re new to the software — but it’s not something a first-time user couldn’t get the hang of within a relatively short period of time.
Why This Is My Preferred Method
As a professional designer I prefer the manual method because it simply produces the most professional results.
A manually-traced SVG will always be the best option
When you’re manually tracing an image, you’re in the driver’s seat — you are in complete control of the outcome. You get to dictate boundaries, lines, curves, shapes, colors, and every other aspect. The human element allows you to determine how to best handle those nuances that simply cannot be interpreted by automated software.
The auto-tracing method may get the job done, but if you want it done right and you want your tracing to have a professional appeal, I recommend tracing it manually.
Video Tutorial
Explaining this method through written text would take far longer than you’d care to read, so I put together a step-by-step video tutorial with voice narration that should set you off on the right path and have you manually tracing your PNG images in no time.
Potential Problems With Manual Tracing
As you would assume, one of the downsides to manual tracing is that it does include — albeit to a small degree — somewhat of a learning curve. You’re probably not going to knock it out of the park on your first try. It’ll take a bit of practice.
Another downside is that it can be quite time-consuming, depending on the image.
Learn To Master The SoftwareGain a complete understanding of your favorite design apps with my comprehensive collection of video courses. Each course grants access to our private community where you can ask questions and get help when needed.
|
||||||||||||||||||||||||||||||||


You might also like


16 comments
-
-
Nick Saporito
Hi Michael, the trace bitmap algorithm is far from perfect, so it’s going to auto-generate nodes even in straight lines. As for knowing how to curve lines with the pen tool, it’s one of those things that you just get a natural feel for with practice. Kind of like riding a bike. There’s actually a really useful exercise for familiarizing yourself with the pen tool located here: https://bezier.method.ac/
It teaches you the basics of how it works and lets you practice all you want.
-
-
-
Homer
WOW! This is the SINGLE BEST tip I’ve ever seen for Inkscape! Thanks so much!
I am by NO MEANS a professional or even semi-professional. I’m not a creative, I’m a technical engineer. But I help my wife with Cricut-making t-shirts and logos for various school/holiday projects.
-
Nick Saporito
Thanks for the feedback Homer. There’s plenty of room in graphic design for casual users and hobbyists.
-
-
-
Sara
Hi
I have designed a logo inside Inkscape, I downloaded to a png, and later thought it should be a vector that I should use.
If I do as you suggest, can I download it then as a vector file after doing the tracing?
thanks -
-
-
Gill Wray
Thank you so much for such a comprehensive tutorial. As a complete beginners with Inkscape, I found your video extremely easy to follow.
Learned so much, thank you -
Nick Saporito
You can click the “hire” link in the menu at the top of the page or just send me an email directly at nick (at) logosbynick.com
-
-
Nick Saporito
You can click the “hire” link in the menu at the top of the page or just send me an email directly at nick (at) logosbynick.com
-
-
Nick Saporito
I tried that but it caused issues with Google because bots were crawling my page and using the search function to generate thousands of soft 404 pages.
-
-
Nick Saporito
I tried that but it caused issues with Google because bots were crawling my page and using the search function to generate thousands of soft 404 pages.
-
Michael
Nick,
I’m working on coverting my PNG logo to SVG with Inkscape. I’ve played around with both Trace to Bitmap and also using the Bezier tool to create the path manually. One thing I haven’t seen discussed is anything about where to actually place path nodes. Are there rules or best practices on this? For example, I assume that to trace a straight line, you just need a beginning and an ending node. But for a curve (like an S shape or a circle), are there any rules about how many nodes or how they should be spaced?
When I use Trace to Bitmap, I get a huge number of nodes, even on straight lines. I think this might be due to irregularities in the resolution of the original image. And the nodes on circles are also high in number and irregular in spacing.
Can you offer any tips or guidance on this?
Thanks for your great lessons!