
How To Add A Pattern To A Shape In Illustrator
How To Add A Pattern To A Shape In Illustrator https://logosbynick.com/wp-content/uploads/2021/08/add-pattern-to-shape-illustrator-2.png 800 470 Nick Saporito https://secure.gravatar.com/avatar/8e31bf392f0ba8850f29a1a2e833cdd020909bfd44613c7e222072c40e031c34?s=96&d=mm&r=gIn previous tutorials we’ve gone over various ways to design your own pattern tiles in Illustrator. These pattern tiles allow you to create infinite seamless patterns when duplicated and stacked on top of each other. In this tutorial though I’ll be demonstrating how to add a pattern to a shape in Illustrator by using swatches and pattern fills.
In short, the way that you can add a pattern to a shape in Illustrator is by using the Swatches menu, as we’ve gone over in a previous lesson. However, instead of creating custom color palettes, this time we’ll be using the Swatches menu to add patterns to shapes and various objects.
Add A Pattern To A Shape In Illustrator
The following video tutorial will walk you through the entire process:
Continue on for the written instructions.
Table of ContentsHow To Apply A Pattern To Objects
Transforming Patterns In Illustrator |
How To Apply A Pattern To Objects
In the first part of this tutorial we’ll be going over how to use a pattern tile as a fill object. This is done using the Swatches menu and only takes a few clicks.
Step 1: Add your pattern to the swatches menu
The first thing we need to do is add the pattern design to the Swatches menu so we can use it as a fill object.
First, import your pattern tile. For this demonstration I will be using the pattern design that we created in our most recent tutorial:

This tile will make for a repeatable pattern once applied as a pattern swatch.
Go ahead an open the Swatches menu by navigating to:
Window > Swatches
You can add your pattern design to the swatches selection by simply clicking and dragging it into the menu.
Once added, you should see it indexed as a usable pattern swatch:

It may be difficult to see because of how small the Swatches menu is, but your pattern tile will be added as a pattern swatch once you click and drag it onto the menu.
Step 2: Select your shape and fill it with the pattern swatch
Now that you’ve added your pattern design as a swatch, go ahead an generate a shape or object on your canvas.
For this demonstration I will be using a star:
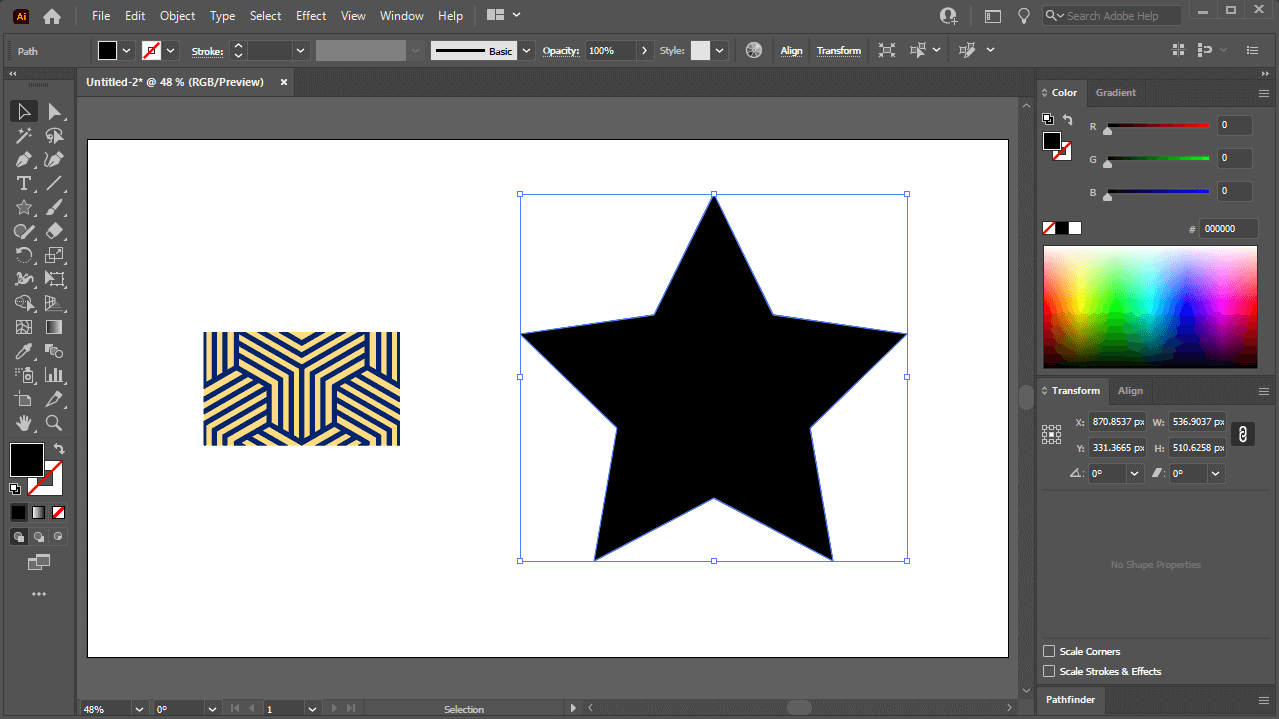
For this demonstration, the shape that I will be applying the pattern to is a star.
Now all you have to do to add a pattern to a shape in Illustrator is select the shape and click on the pattern swatch in the Swatches menu.
This will fill the shape with your pattern:

By default, the shape will be filled with the pattern at the original size it was when added to the Swatches menu.
Add it’s literally that simple!
Transforming Patterns In Illustrator
Once you’ve applied the pattern to your shape, you may be wondering how you can edit the pattern further.
Maybe you’ve like to scale the pattern, rotate it, or simply move its position relative to the shape. Let’s go over how you can transform your pattern further.
How To Scale The Pattern
Whenever you add a pattern to a shape in Illustrator, by default it will apply the pattern at its original size. You can change the size of the pattern irrespective of the shape by right-clicking it and navigating to:
Transform > Scale
This will open a transformation menu that you can use to scale your pattern:

The Scale menu will allow you to resize the pattern that you’ve added to your shape.
To scale only the pattern, deselect the following options in the menu:
- Scale corners
- Scale strokes & effects
- Transform objects
Make sure you have the Transform Patterns option enabled.
All you have to do now to scale your pattern in Illustrator is select Uniform, highlight the numerical value, and roll up and down on your mouse wheel:
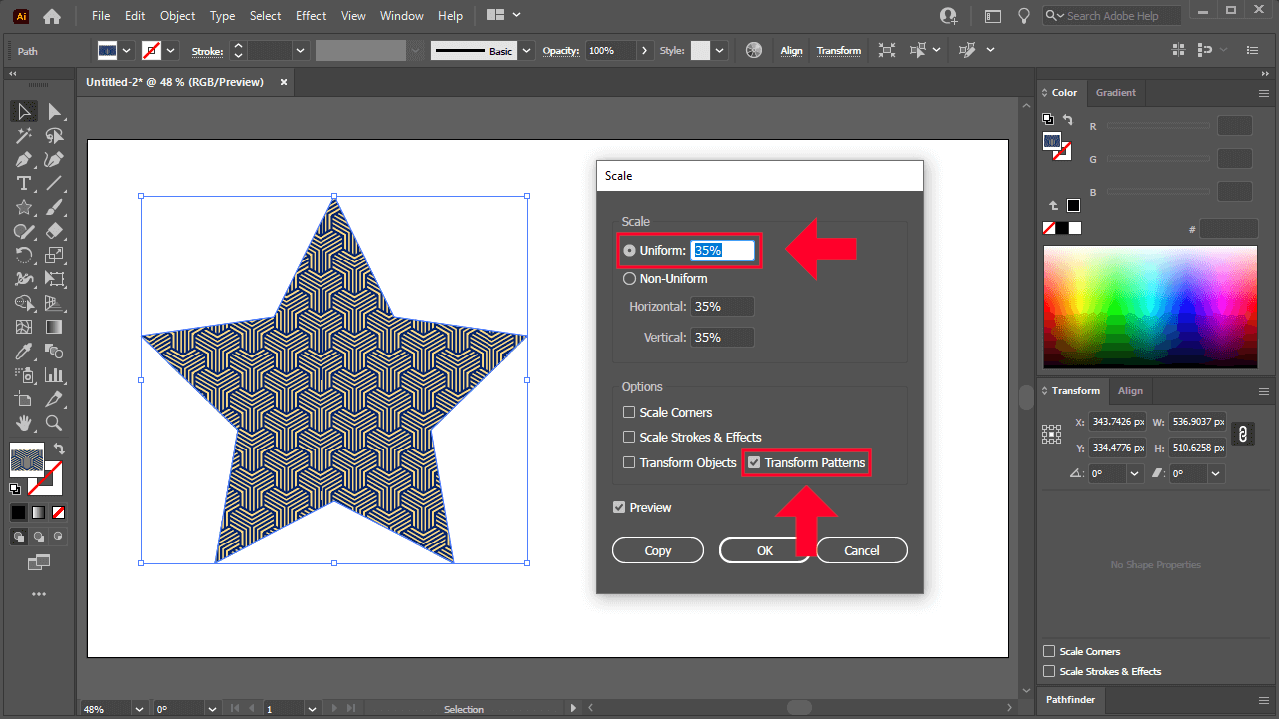
To scale only the pattern and not the shape as well, make sure your settings match those depicted in the diagram above.
Rolling up on the mouse wheel will increase the size of the pattern, whereas rolling down on the mouse wheel will decrease it. Just make sure to have Preview enabled or else you won’t be able to see the changes in real time.
Once you are finished, press OK to apply the changes or Cancel to disregard them.
How To Move The Pattern
Once you’ve applied a pattern to your shape, Illustrator will start the pattern in the center of the shape by default. If you’d like to change the position of the pattern, so can do so using the same transform process used for scaling the pattern.
Right-click on the shape and navigate to:
Transform > Move
Alternatively, you can also press Control + Shift + M on the keyboard.
This will open up the Move menu.
You can move the pattern by changing the Horizontal and Vertical values:
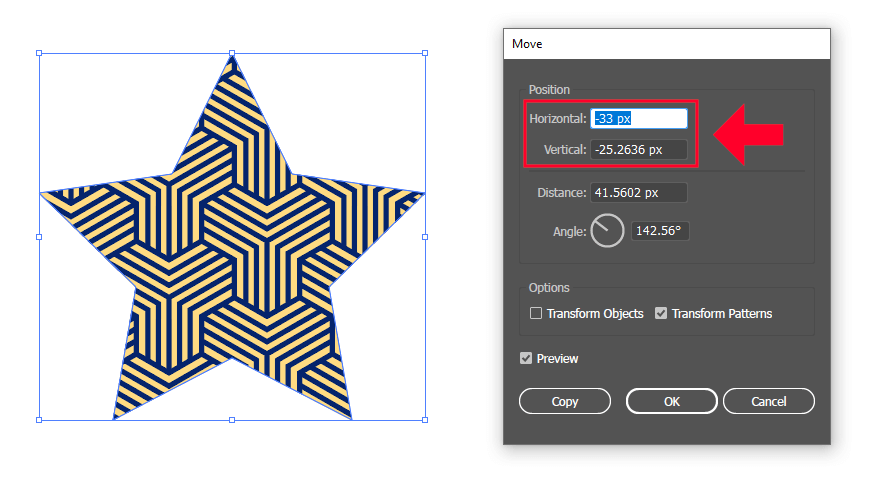
The Move menu allows you to change the position of your pattern relative to the shape.
Just make sure that you only have Transform Patterns selected in the Options menu. Having Transform Objects selected as well will move both the object and the pattern at the same time.
How To Rotate The Pattern
Another way that Illustrator lets you transform your patterns is by rotating them.
You can rotate a pattern in Illustrator by right-clicking the object that the pattern is applied to, then navigating to:
Transform > Rotate
This will bring up the Rotate menu, which will allow you to rotate your pattern based on a numerical input in degrees:

Make sure you only have “Transform Patterns” selected if you want to rotate your pattern and not the shape as well.
You can see the changes in real time by having the Preview option enabled.
How To Shear The Pattern
The final pattern transformation we’ll be covering in this lesson is shearing your pattern.
If you’d like to shear your pattern, you can do so using the same process used for the other transformations. Navigate to:
Transform > Shear
You can shear the pattern based on the horizontal or vertical axis, which can be selected in the Axis section of the menu.
Once you’ve selected your axis, change the numerical value of the Shear Angle section, or click and drag the wheel to change the angle of the shear:
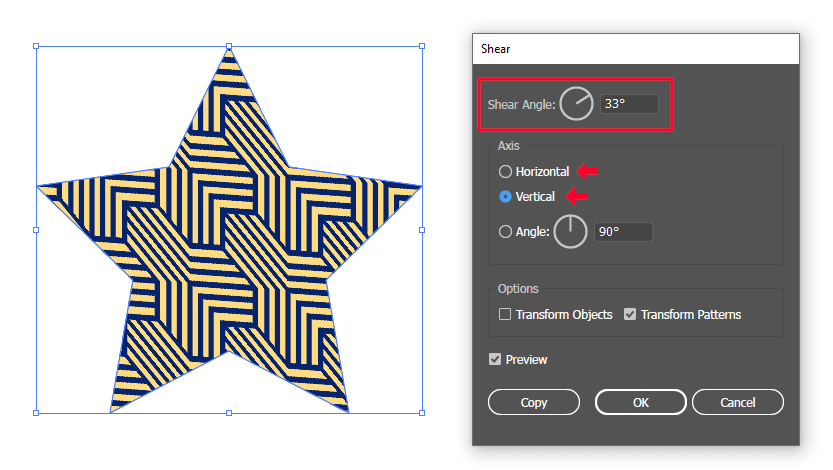
Selecting Horizontal will shear the pattern to the left and right. Selecting Vertical will shear the pattern up and down.
Once you are finished, press OK to apply the changes or Cancel to disregard them.
Conclusion
Knowing how to add a pattern to a shape in Illustrator can be a tricky process to figure out. Unfortunately, it’s not as straightforward as it is in other applications, such as Affinity Designer.
What’s more, transforming your pattern once it’s applied is also a tricky process because you have to access menus that are somewhat hidden first. It would be ideal if Illustrator implemented a system more along the lines of Inkscape, which lets you transform patterns directly on the canvas.
If you have any questions or need clarification for any of the steps taken in this lesson simply leave a comment below.
Learn To Master The SoftwareGain a complete understanding of your favorite design apps with my comprehensive collection of video courses. Each course grants access to our private community where you can ask questions and get help when needed.
|
||||||||||||||||||||||||||||||||


