How To Switch RGB To CMYK In Photoshop
How To Switch RGB To CMYK In Photoshop https://logosbynick.com/wp-content/uploads/2021/04/switch-rgb-to-cmyk-photoshop.png 800 470 Nick Saporito https://secure.gravatar.com/avatar/8e31bf392f0ba8850f29a1a2e833cdd020909bfd44613c7e222072c40e031c34?s=96&d=mm&r=gDesigning for print requires a different approach than when you design something that will only be used on digital displays, particularly when it comes to color profiles. In order to ensure that your designs will look the same in print as they do on your screen, you’ll have to use a CMYK color profile instead of RGB. In this tutorial we’ll be going over how to switch RGB to CMYK in Photoshop so that your designs can have the proper color profile for print.
| To switch RGB to CMYK in Photoshop, navigate to Edit and select Convert to Profile. From the dropdown menu, select “Working CMYK – U.S. Web Coated (SWOP) v2” and click OK. |
First, let’s go over why you would need to convert RGB to CMYK in more detail. Understanding what color profiles are and how they work is a fundamental of graphic design. Having this knowledge beforehand can save you a lot of time and frustration.
Table Of Contents |
Color Profiles
Whenever you create something with a piece of design software, the document you’re working in is assigned an ICC color profile.
In short, color profiles are used to generate colors on your screen, and the color profile you use will dictate the spectrum of colors available to you.
As you’ll see momentarily, Adobe Photoshop comes with many different color profiles to choose from, but in this tutorial we’ll be focusing on the two primary types of color profiles, which are RGB and CMYK.
RGB
RGB — which stands for “red, green, blue” — is a subtractive color model that uses some combination of red, green and blue to generate every color within its spectrum (otherwise known as a gamut.)
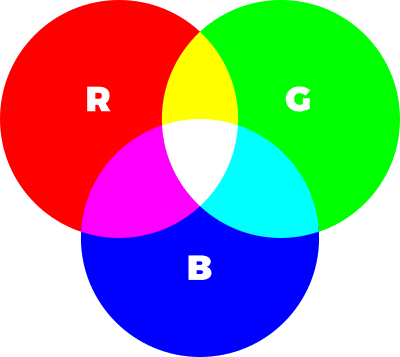
In an RGB color model, some combination of red, green and blue are used to generate every other color in the spectrum.
Since the RGB color model uses light to generate its colors, it provides for a more vibrant and robust spectrum to choose from than its CMYK counterpart.
RGB color profiles are primarily used when designing anything that will be displayed digitally on a screen. By default, Photoshop opens all new documents with an RGB color profile.
CMYK
CMYK — which stands for “cyan, magenta, yellow, and K (black)” — is an additive color model that uses some combination of those four colors to generate every color within its spectrum.
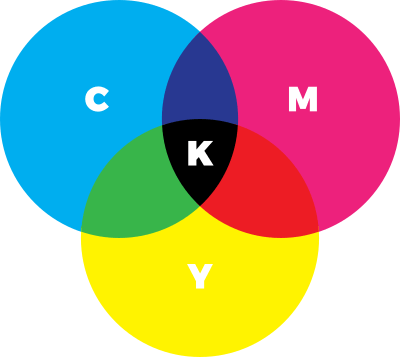
The CMYK color space combinations cyan, magenta, yellow, and black to render every color in its gamut.
Unlike RGB, which uses light to generate its colors, CMYK colors are produced by combining ink. This makes for a smaller gamut to sample from than its RGB counterpart.
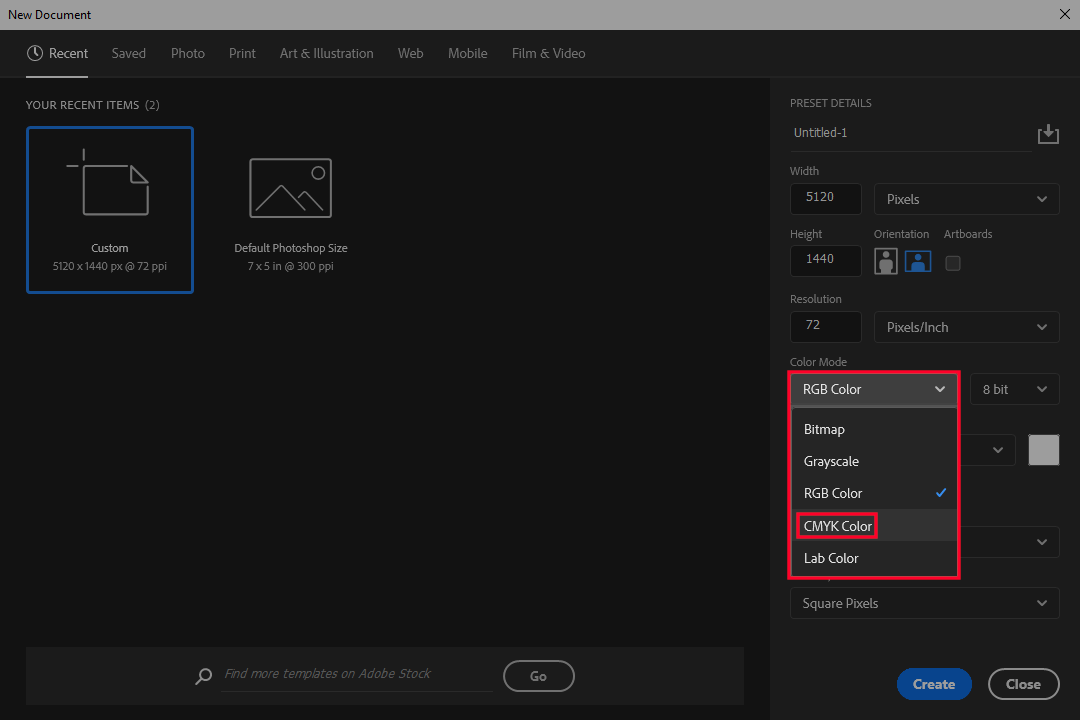
CMYK color profiles are primarily used when designing anything that will be printed using ink. In order to work within the CMYK color space in Photoshop, you’ll have to manually choose your color mode in the Color Mode submenu within the New Document menu:
To avoid having to switch RGB to CMYK in Photoshop, it is recommended that you choose a CMYK color profile from the start when opening a new document.
Why It Matters
Whenever you’re designing something for print, it’s important to ensure that you are using a CMYK color profile. If you’re using an RGB color profile, then it’s possible that you will be using colors that are outside of the range (or “out of gamut”) of what can be produced with ink.
The following chart illustrates the difference in color choice between the two color models:
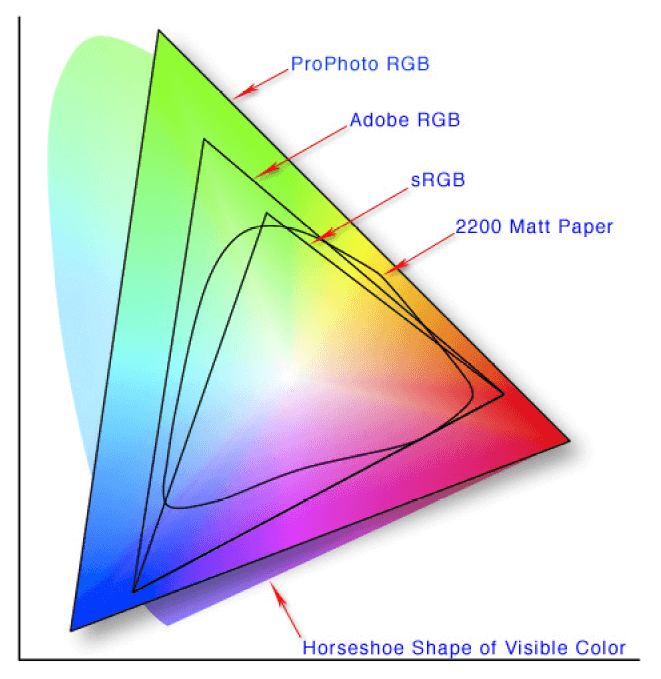
Source: https://en.wikipedia.org/wiki/Color_space
Printing a document with an RGB color profile often results in the colors appearing faded and muddy:

Source: https://en.wikipedia.org/wiki/File:RGB_and_CMYK_comparison.png
Often times a print shop will reject your uploaded document if it has an RGB color profile embedded. Otherwise, they’ll just make the spot conversion on their end, and the resulting document will not look the same in print as it did on your screen. This is why it’s important to ensure that you’re using an appropriate color profile for the type of work you’re doing.
Switch RGB To CMYK In Photoshop
Now that we’ve touched on the differences between the two color models, let’s go over how to switch RGB to CMYK in Photoshop if you’ve already created your design in the RGB space and need to change it.
Step 1: Save A Backup Of Your Work
Converting from one color profile to another can change the appearance of your work, so it’s important to save a backup copy of the original design beforehand, otherwise you may lose the ability to revert back later on.
Navigate to File > Save As and save your document as a CMYK alternative.
Once you’ve saved your work, it is safe to move on to the next step.
Step 2: Flatten All Layers
If you’re working with a document that has lots of layers, adjustments, smart objects, and various other effects, you’ll have to flatten your layers before switching to CMYK. If you don’t then there’s a possibility that switching color profiles will result in undesirable changes to your design.
To flatten your layers, navigate to Layer > Flatten Image. Then, have a look at your Layers panel to ensure that there is only a single, flattened layer:

Step 3: Change The Document Color Profile
To switch RGB to CMYK, all you have to do now is simply navigate to Edit > Convert to Profile to open the Convert to Profile menu:
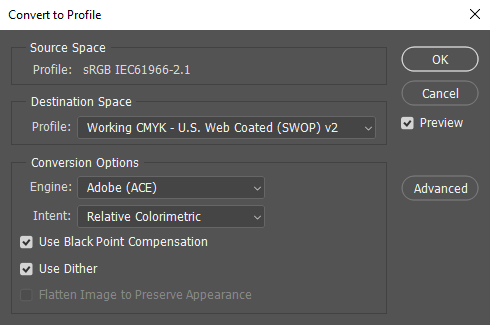
The Convert to Profile menu allows you to convert RGB to CMYK in Photoshop.
At the top of the Convert to Profile menu, you will see a section titled “Source Space”. This indicates the color profile that is currently assigned to your document. In this example, it is sRGB IEC61966-2.1.
The second menu item from the top — “Destination Space” — represents the color profile you’d like to switch to. Clicking on the dropdown menu will reveal a wide variety of color profiles to choose from:

If your print shop is requesting a specific color profile then make sure to select it. Otherwise, choose the default CMYK profile, which is titled “Working CMYK – U.S. Web Coated (SWOP) v2” and click OK to apply the changes.
Your Photoshop document will now have a CMYK color profile embedded, which can be verified in the document’s tab:
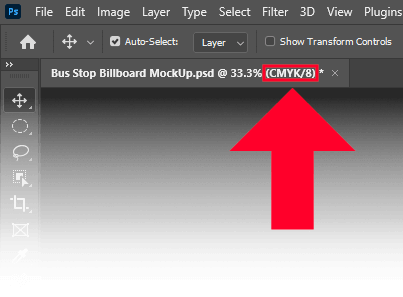
The title section of your document’s tab will tell you which color mode your document is using.
Precautions
It should be noted that whenever you switch RGB to CMYK in Photoshop, it is most likely going to change the appearance of your design. Unfortunately, there isn’t much you can do to remedy this aside from maybe adding some adjustment layers to tweak some of the colors.
The best way to avoid this problem is to set your document’s color mode to CMYK from the start. Having to do so retroactively will always result in undesirable changes in some capacity.
Conclusion
Converting RGB to CMYK in Photoshop isn’t much different than it is in Adobe Illustrator. It’s simply a matter of changing the document’s properties. However, this conversion tends to be more forgiving in Illustrator because of the nature of vector graphics, which allow you to go back and adjust the colors of individual elements to resemble the original as closely as possible. Unfortunately, when it comes to working with raster imagery (as is the case with Photoshop,) this is easier said than done.
If you have any questions, or if any part of this lesson was unclear, simply leave a comment below.
Learn To Master The SoftwareGain a complete understanding of your favorite design apps with my comprehensive collection of video courses. Each course grants access to our private community where you can ask questions and get help when needed.
|
||||||||||||||||||||||||||||||||


Can you do this in Photoshop Elements? I can’t find the selection you listed. Thx
Hi Sharon, I’ve never used Elements personally, but after a quick search it looks like it doesn’t support CMYK.