
How To Replace A Color In GIMP | The Correct Way
How To Replace A Color In GIMP | The Correct Way https://logosbynick.com/wp-content/uploads/2022/02/gimp-replace-color.png 800 470 Nick Saporito https://secure.gravatar.com/avatar/8e31bf392f0ba8850f29a1a2e833cdd020909bfd44613c7e222072c40e031c34?s=96&d=mm&r=gGIMP makes it possible for you to edit photos in virtually any way that you’d like. This includes color replacement, or selecting a color (or range of colors) in your image and replace it with another. In this tutorial we’ll be going over a simple workflow that will allow you to replace a color in GIMP with any color you’d like.
In short, the way to replace a color in GIMP is by creating a selection around that color using the Select By Color tool, then replace it using the Colorize feature. The Select By Color tool allows us to edit only a specific color in a given image by clicking on an area of an image that contains the desired color. The Colorize feature allows us to change the color of a given selection.
It’s a simple workflow, but it does require several steps and attention to detail regarding the tool’s settings. Let’s dig in!
Replace A Color In GIMP
The following video tutorial will walk you through the entire process, step-by-step:
Continue on for the written tutorial.
Table of Contents |
Step 1: Grab the Select By Color tool and adjust the tool settings accordingly
To replace a color in GIMP we will first have to designate a color in the image to be replaced. Or in other words, we will have to “select” it. The way we’ll be selecting a color to replace is by using the Select By Color tool.
The tool can be accessed in the tools menu on the left-hand side of your screen:

We will be using the Select By Color tool to create a selection around the color to be replaced.
Alternatively, you can access it using the keyboard shortcut: Shift + C
This tool allows you to create a selection on your image based on color(s) of your choosing. Once selected, you’ll be able to make common color transformations, and since the target selection only includes pixels that are a color of your designation, the transformations will be confined only to those pixels.
The best part about the Select By Color tool? It allows you to select a single color or multiple variations of the same shade. This will be incredibly useful based on your image and what exactly it is you’re trying to accomplish.
Next, reference the tool settings menu on the bottom-left portion of your screen:
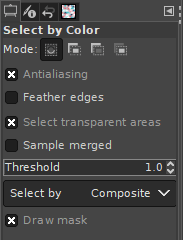
The tool settings for the Select By Color tool need to be adjusted before proceeding.
The settings are as follows:
- Antialiasing: this makes it so that your selection have clean edges that blend seamlessly. Without it enabled you till end up with hard, jagged edges, so it is recommended to leave it enabled.
- Feather Edges: this setting makes it so the edges of your selection will be softened, sort of like what you’d get after applying a Gaussian blur. Although this setting has its uses, it can be problematic when trying to replace a color in GIMP, so leave it disabled for this tutorial.
- Select Transparent Areas: this setting, when enabled, will allow you to select transparent areas of your image the same way you would select colors. This is irrelevant when looking to replace colors, so you can leave it disabled or enabled. It doesn’t matter either way.
- Sample Merged: will select colors on all layers in your document if enabled. This is only relevant if you’re working with an image that has multiple layers. If you are just looking to replace a color in a single image then chances are you do not have multiple layers and you can ignore this setting.
- Threshold: this represents the number of colors to be selected. If set to 1, only one color will be selected (the color you click on.) If you’d like to grab nearby pixels that may have a similar (but slightly off) shade, you can increase this slightly.
- Draw Mask: this setting, when enabled, will create a pink mask over the selection you create. This is not actually part of the design; it’s there for your reference. Since it makes it easier to see exactly what it is you’re selecting, it is recommended that you leave it enabled.
It is recommended that you leave the Threshold set at 1. If you need to grab additional colors, this can be accomplished while creating the selection in step 2. This approach will make it easier to eyeball what the threshold needs to be instead of guessing numbers.
Step 2: Click on an area of the image that contains the color you’d like to replace
Now it’s time to create a selection around the color you’d like to replace.
With the Select By Color tool enabled and the proper tool settings from step 1 in place, simply click on an area of your image that contains the color you’d like to replace:
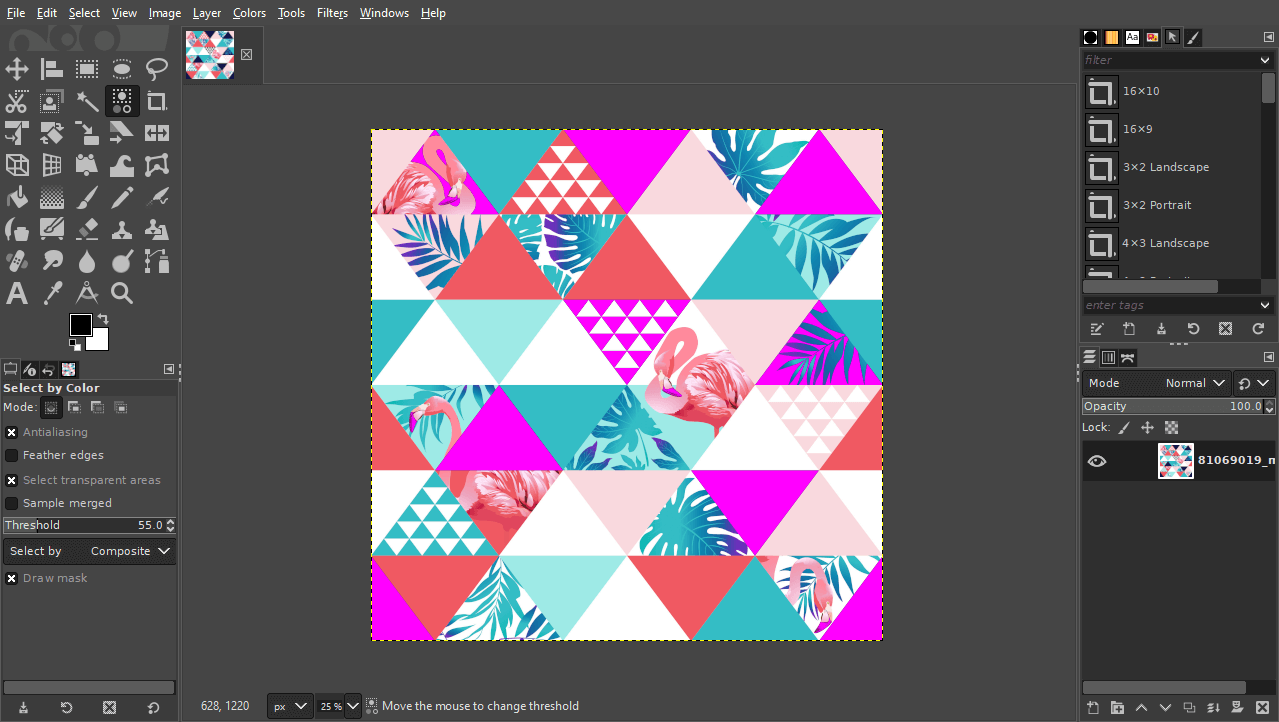
The pink mask indicates the pixels that are being selected.
You will notice a pink mask while holding the click, then you will notice a dotted marquee going around the selection once you release the click.
To select more colors, hold the click and slowly move your mouse towards the right. You will notice that the pink mask grows in size, indicating that you are grabbing more colors to replace:
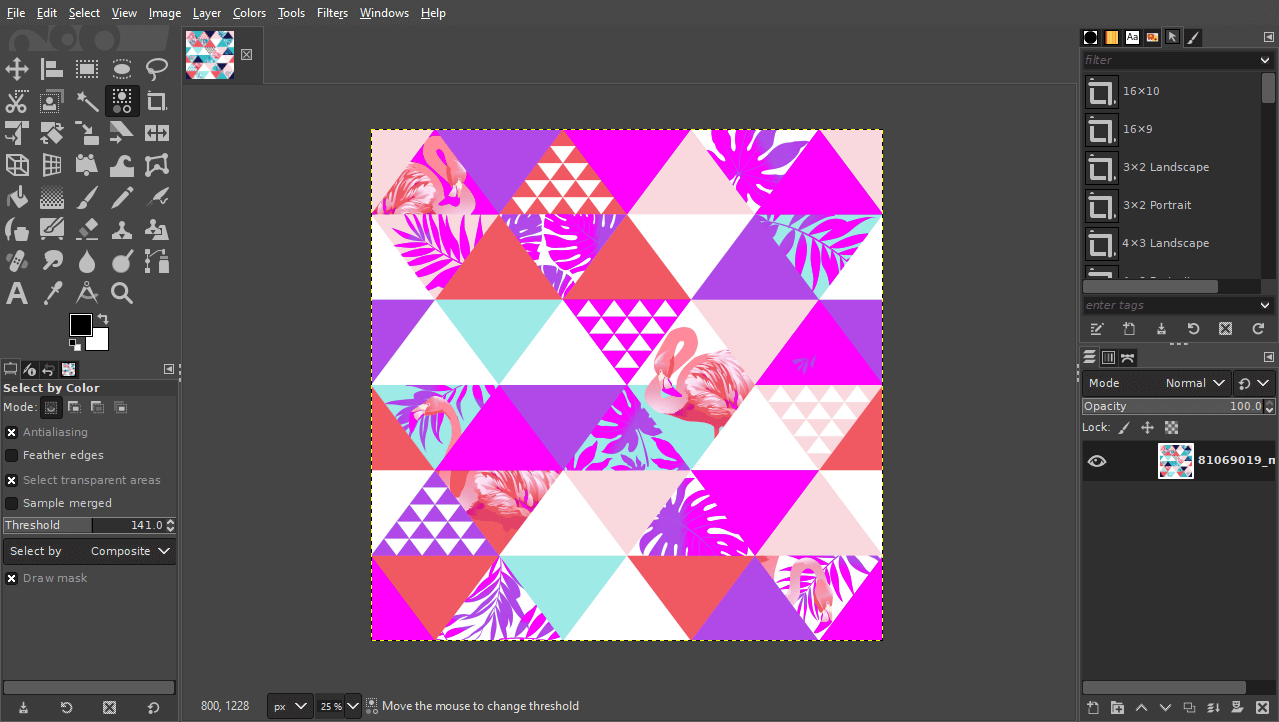
Moving your hand to the right will increase the threshold of colors selected, as indicated by the increased pink mask.
Moving your hand back towards the left will decrease the number of colors sampled. You can use this back and forth hand movement to manually adjust the threshold of the selection.
Once you have successfully selected all of the colors/shades you’d like to replace, you can release the click. The dotted marquee around around selection indicates that any alterations made moving forward will be confined to this area.
Step 3: Change the color using the Colorize menu
Now that we’ve isolated all of the pixels on the image that contain the color we’d like to replace, it’s time to change them.
There’s various different ways that you can change your colors, but for this tutorial we will be using the Colorize feature, which is recommended if you are only looking to replace a color in GIMP.
To access it, navigate to:
Colors > Colorize
The menu should look something like this:
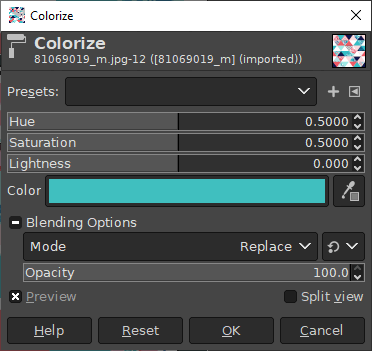
The Colorize menu allows you to change the colors of the selected pixels.
The menu settings function as follows:
- Hue: this represents the color being applied. Move this slider back and forth to cycle through different colors.
- Saturation: this represents the intensity of the color. Moving it towards the right will make the color more vibrant and noticeable, whereas moving it towards the left will make it duller.
- Lightness: this represents how bright or dark the color is. Adjust this slider as needed.
- Color: this is an indicator of the new color currently being applied.
Play around with these settings a bit to get the color change you’re seeking. Every image is different, so the settings you should use will depend entirely on the composition of your image and what exactly you are trying to achieve.
One of the benefits of using the Colorize feature to replace a color in GIMP is that it allows you to input a numerical code for a specific color you’d like to use.
If you’d like your replacement color to be a specific HEX or RGB value, simply click on the color bar within the menu to open up a color picker menu:
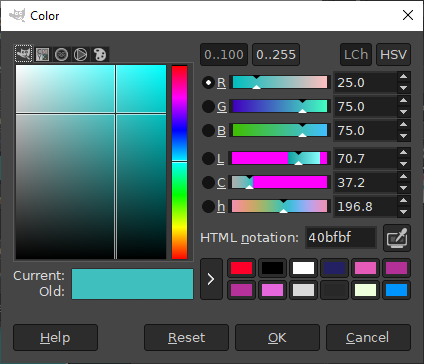
The color menu will allow you to replace a color based on a specific numerical color code of your choosing.
As you can see, you’ll be able to choose your color by any of the following values:
- RGB
- LCH
- HSV
- HEX/HTML Notation
Once you are finished choosing your replacement color, click the OK button to apply the changes.
Step 4: Release the selection
Once you are finished applying your replacement color, you should notice that the dotted marquee (or “selection”) is still active on the canvas.
The final step in this lesson is to remove the selection. This can be done by navigating to:
Select > None
Alternatively, you can use the following keyboard shortcut instead: Shift + Control + A
If done correctly, you will have successfully replaced a color in your image! Here’s the finished result of the demonstration, along with a before and after:

How the image looks after a color is replaced. For this example, the dark blue was replaced with yellow.
Conclusion
Knowing how to replace a color in GIMP can be a superpower once you know how it’s done. You can change the color of literally anything you want! Not happy with the color of your car, or your hair, or your shirt? Not a problem! GIMP can be used to make those alterations.
Unfortunately, it doesn’t handle this task as well as other applications (such as Illustrator) do, but it works well enough for a free and Open Source solution.
If you have any questions or need clarification on any of the steps taken in this lesson just leave a comment below.
Learn To Master The SoftwareGain a complete understanding of your favorite design apps with my comprehensive collection of video courses. Each course grants access to our private community where you can ask questions and get help when needed.
|
||||||||||||||||||||||||||||||||


It seems to me that all the functions in the “Color” menu don’t fix the recalculated color values, but rather change the functional dependency of their scope. If, after deselecting, we draw a line through this area with a colored brush, the color at the edge of the area will change. This means we won’t be able to continue painting normally in this area. Is there a way to “fix” the changes so that the area becomes normal?
I’m having a problem with this and I can’t find the cause online. When I try to colorize a selection, the color that actually shows up on the selection is darker than the one on the colorize panel. This seems to turn on and off at random. Any ideas as to how to fix this? Thanks
It’s hard to say for sure without seeing the file, but sometimes that’s just how Colorize works. It’s based on the composition of the image you’re applying it to. If the shade is off then I would use Levels or Hue-Saturation to adjust it a bit.
I experienced the same issue. Try Colors->Map->Color Exchange.
You enter the OLD and NEW color, and voila!
FYI that currently (Gimp 2.10.32), the “Select by Color” keyboard shortcut is now Shift + O. Not sure when it changed but just noticed it as I was going through this guide.
Thanks for all your great work and videos!