How To Remove A White Background From Text with Photoshop
How To Remove A White Background From Text with Photoshop https://logosbynick.com/wp-content/uploads/2021/05/remove-white-background-from-text-photoshop.png 800 470 Nick Saporito https://secure.gravatar.com/avatar/8e31bf392f0ba8850f29a1a2e833cdd020909bfd44613c7e222072c40e031c34?s=96&d=mm&r=gIn today’s tutorial I’ll be demonstrating how you can easily remove a white background from text with Photoshop. This sort of thing would be useful if you have an old JPEG sitting around and you want to use it on different background styles. Or maybe your logo designer only gave you JPEG copies of your logo and you can’t use them because of it (sounds crazy, but this actually happens a lot!) Either way, Logos By Nick has you covered.
In order to remove a white background we’re going to use the Magic Wand Tool, which allows you to create a selection around a particular color of your choosing. However, you’ll need to adjust the Tolerance setting of the tool in order to get the best result.
This is similar to a previous tutorial where I demonstrated how to remove a background from a logo with Photopea. In fact, it’s the same concept. Let’s get started.
Remove A White Background From Text with Photoshop
| To remove a white background from text with Photoshop, grab the Magic Wand Tool and click on the white area to create a selection around it. Then, press the Delete key to remove the white area. |
The following video tutorial will walk you through the entire process in less than 3 minutes:
This shouldn’t be too difficult of a process to follow along with though, so the written instructions will be sufficient if you prefer that format.
Table Of Contents |
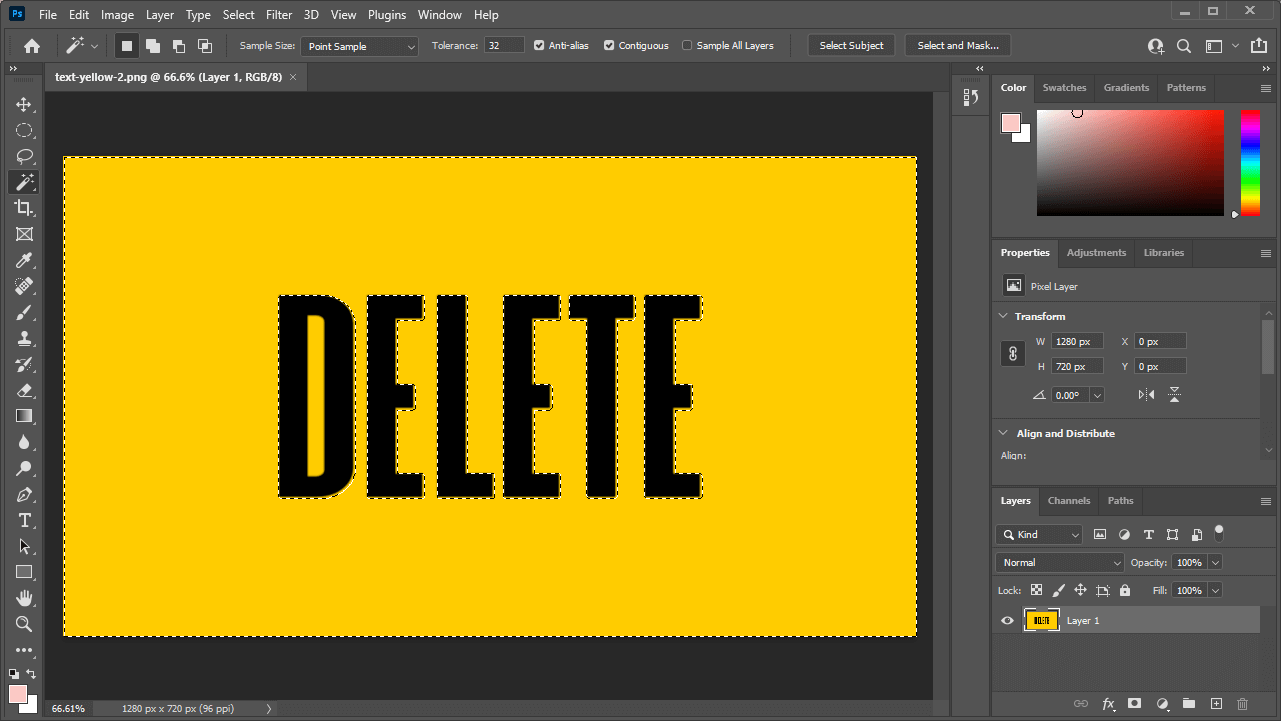
To get us started, I will be removing the background from the following example text:

Click to enlarge
I made the background yellow instead of white so I can better illustrate how this process works. Do not worry though, this process works the same regardless of the background color.
Step 1: Use the Magic Wand Tool to create a selection around your text
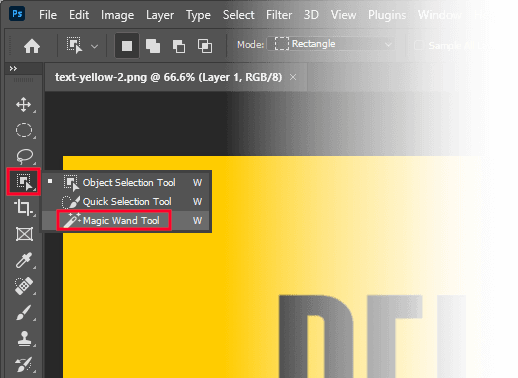
In order to remove a white background from text with Photoshop, we will need to use the Magic Wand Tool, which is located in the toolbar, under a submenu for the Object Selection Tool.
To access it, press W on your keyboard, then hold a click on the tool icon to bring up the submenu. The Magic Wand Tool is the very last tool at the bottom of the list:
Once you’ve select the Magic Wand Tool, click on the area of the image that you’d like to delete. In my example, it would be the yellow area. For you, it would be the white background of the text.
Clicking on it will create a selection going around the text, represented by a moving dotted line:
The selection is represented by a marquee, or a moving dotted line.
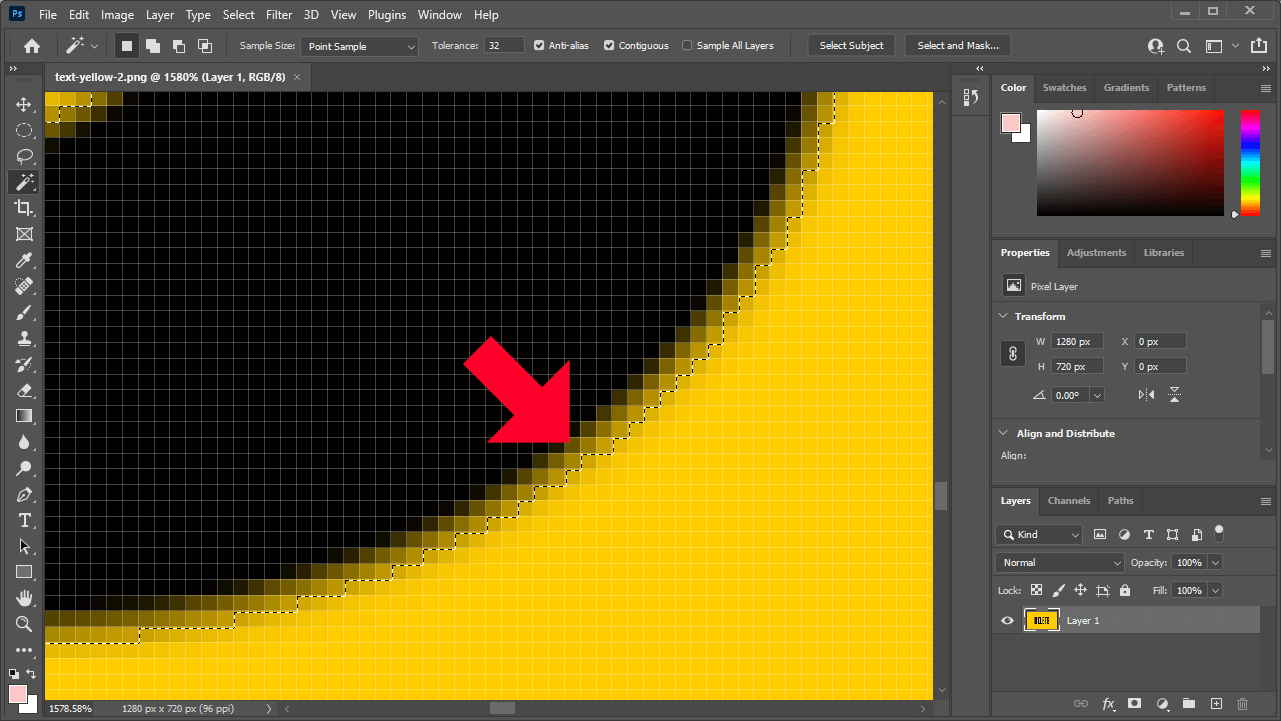
If any of your letters have negative space between them (like the letter D in my example) then create a selection around them as well by holding Shift and clicking on them.
If you don’t hold Shift then it will remove the first selection to made and replace it with a new selection around the negative space of the letters. Holding Shift allows us to add to the selection rather than replacing it:

If any of your letters have negative space within them, as is the case with the letter D in my example, then you’ll have to create a selection around them as well.
Step 2: Adjust the Tolerance setting to fit the selection to your text
Before we can delete the white background from the text to transparent, we first need to make sure that the selection is placed accurately around the text.
To verify, zoom in by holding Alt and rolling up on the mouse wheel.
As you can see in my example, the selection isn’t exactly flush against the text. There are some yellow pixels that slipped through the cracks:
To correct this, we’re going to adjust the Tolerance in the tool settings menu towards the top of the screen:
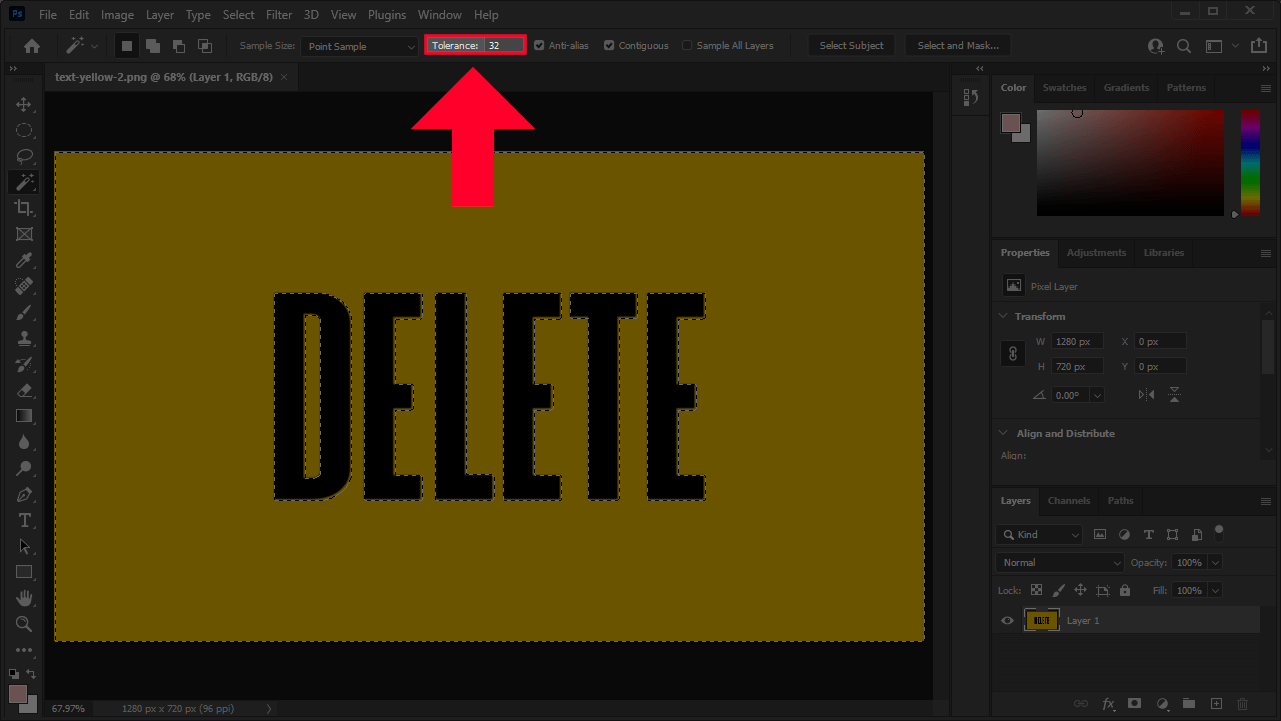
The Tolerance setting in located in the tool settings menu towards the top of the screen.
By default, the tolerance is set to 32. Increasing it will grow the selection closer to the text, whereas decreasing it will shrink it away from the text.
Remove the selection from your document by pressing Control + D, change the Tolerance according to your own image, then create a new selection (the same way we did in step 1) until it accurately fits around your text.
In my example, I need to increase the tolerance to bring it closer to the text. Increasing it to 125 makes the selection fit the text more accurately:
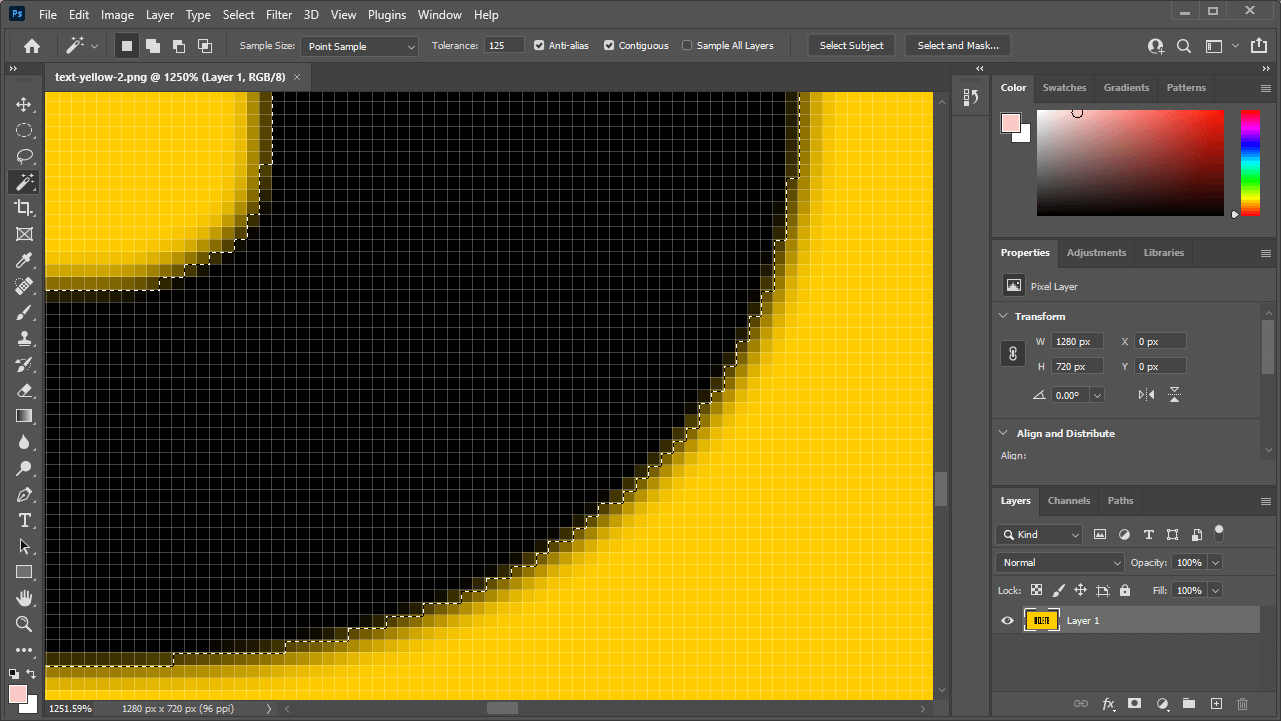
Increasing the Tolerance to 125 made the selection fit my text more accurately.
The Tolerance value you should use will depend on your image. What works for mine may not work for yours, so be sure to experiment a bit to see what gets the most accurate result.
Step 3: Remove the background using the Delete key
Once you have a selection around your text that fits it accurately, all you have to do now to remove a white background from text with Photoshop is press Delete on your keyboard, which will delete all of the pixels in your selection:
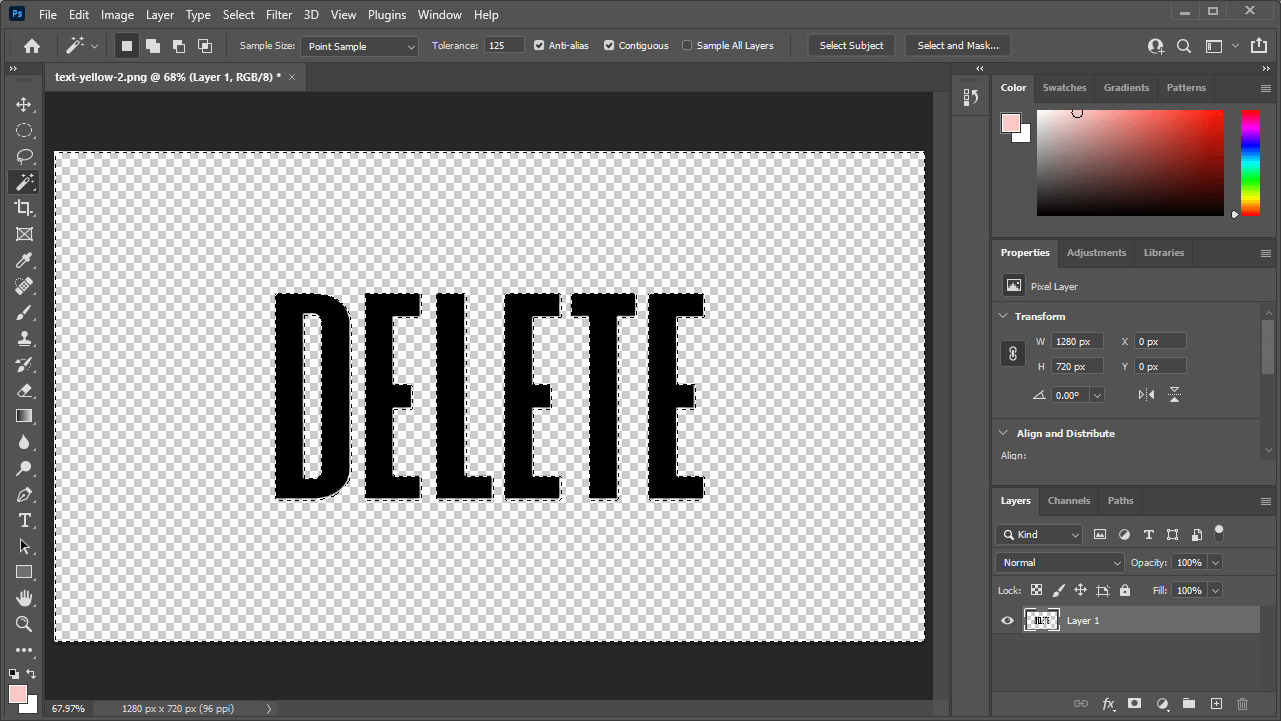
The background of the text has been deleted to transparent, as represented by the checkerboard pattern.
If you’re using a Mac then you won’t have a Delete key on your keyboard, so navigate to Edit > Clear instead.
Now you can clear the selection by simply pressing Control + D on your keyboard, and you’re done! You have successfully deleted your text’s background to transparent.
At this point you can crop your image so that the background fits the text if you’d like, and then you can export it as a PNG image. Bear in mind that if you want to retain the transparency of the background then you’ll have to export it as a .png file. Other formats, like JPEG, do not support transparency, so if you export it in that format then you’re going to end up with a white background again, which defeats the purpose of this entire lesson.
Conclusion
Thanks to the accuracy and ease-of-use of the Magic Wand Tool, knowing how to remove a white background from text with Photoshop boils down to a meager handful of clicks. This technique can also be used to delete backgrounds of all types, and from various other subjects (not just text.)
If you have any questions, or if any part of this lesson was unclear, feel free to leave a comment below.
Learn To Master The SoftwareGain a complete understanding of your favorite design apps with my comprehensive collection of video courses. Each course grants access to our private community where you can ask questions and get help when needed.
|
||||||||||||||||||||||||||||||||