
Layer Masks In Procreate: The Complete Guide
Layer Masks In Procreate: The Complete Guide https://logosbynick.com/wp-content/uploads/2022/09/layer-masks-procreate.png 800 470 Nick Saporito https://secure.gravatar.com/avatar/8e31bf392f0ba8850f29a1a2e833cdd020909bfd44613c7e222072c40e031c34?s=96&d=mm&r=gLayer masking is somewhat of an advanced concept in graphic design, but it’s also a really powerful tool to have in your arsenal. It works by letting you use grayscale shades to dictate areas of transparency and opacity on your image, which makes it handy for things like applying textures. In this tutorial we’ll be going over how you can apply layer masks in Procreate to allow for selective opacity controls.
Layer Masks Explained
Before we go over how to apply a layer mask in Procreate, let’s first briefly go over what a layer mask is and what it does.
Normally, when changing the opacity of a layer in Procreate, the changes are applied equally to the entire layer. What if you just want to change the opacity of a localized area and not the entire layer? This is where layer masks come in handy.
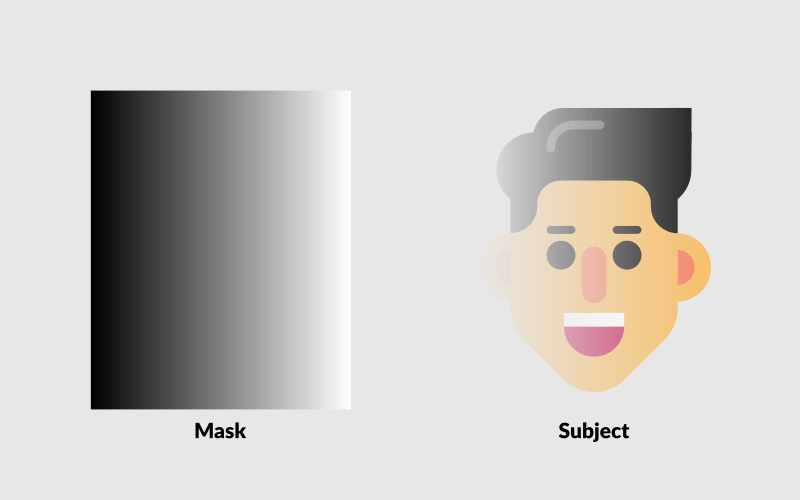
A layer mask is a non-destructive adjustment that can be made to the contents of a layer. It allows you to change areas of transparency on the layer by using a range of grayscale shades. Darker shades become more transparent, whereas lighter shades remain opaque:

So, if you were to apply a layer mask that consists of a gradient from black to white, the subject it is applied to will be fully transparent on the left-hand side and gradually fade to opaqueness towards the right:
Layer masks are also known as opacity masks in other applications.
Let’s go over how to accomplish this in Procreate.
Apply A Layer Mask In Procreate
The following video tutorial will walk you through the entire process in just a few minutes:
Continue on for the written tutorial.
Table of ContentsApplying A Layer Mask
Working With Layer Masks |
Applying A Layer Mask
Let’s first go over how to apply a layer mask in Procreate, then we’ll go over some of the ways in which you can edit and work with layer masks.
Step 1: Open the Layers menu
To get us started, open the Layers menu by tapping the icon in the top-right corner of your screen:
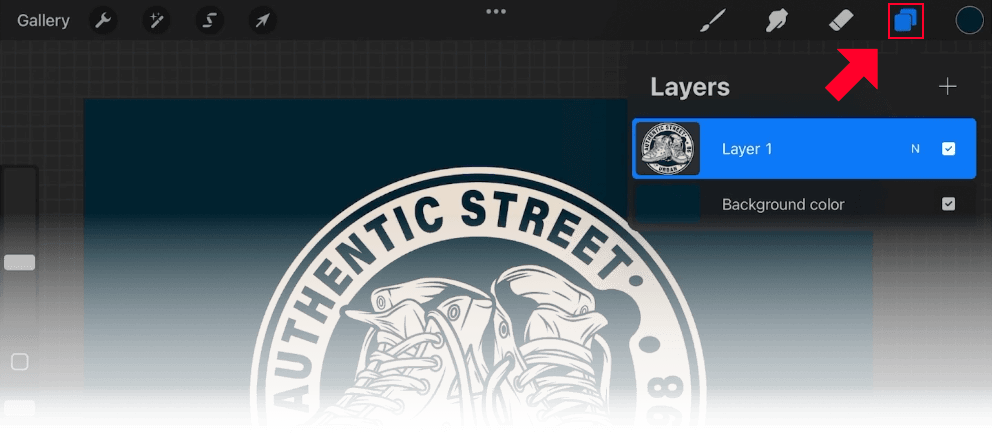
The Layers menu is located in the top-right corner of the screen.
Step 2: Select the layer you’d like to apply the mask to by tapping it
Now we are going to choose which layer to apply the mask to. Select your layer of choice by tapping it. The selected layer will be highlighted in blue.
If your layer is already highlighted in blue then that means it’s already selected and you do not have to tap it.
Step 3: Choose “Mask” from the layer options menu that populates
With your layer selected, tap on it again to populate the layer options menu:
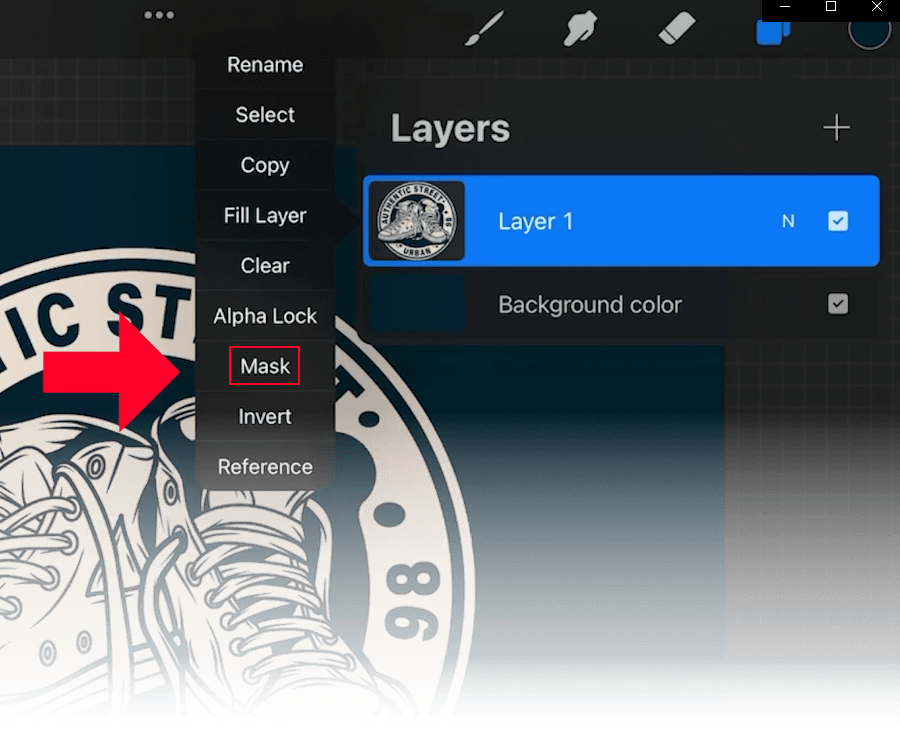
Select the Mask option from the list.
From the list, choose the Mask option. This will apply the mask as a new layer directly above the current layer:
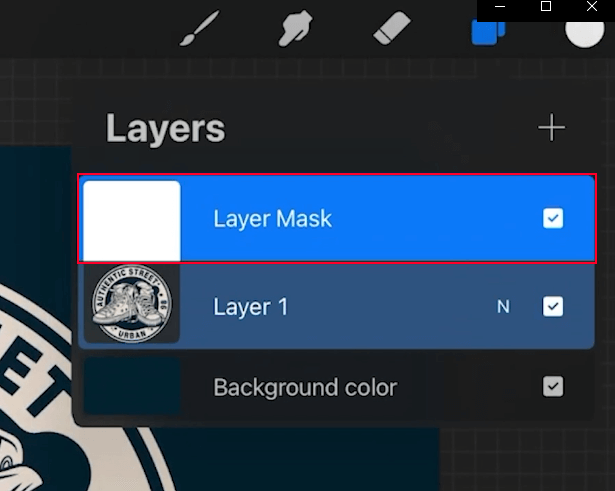
The mask layer, outlined in red above, is placed above the subject layer.
Step 4: Apply your alterations
Now that your layer mask is applied, you can begin making the necessary alterations. For example, you can paint with a black brush to create transparency on your layer, or you can paint with a white brush to preserve opacity. Everything in-between (grayscale shades) will render partial transparency based on how dark or light the shade is.
For this demonstration, a black and white texture image was used to apply a worn/aged look to the example logo design:
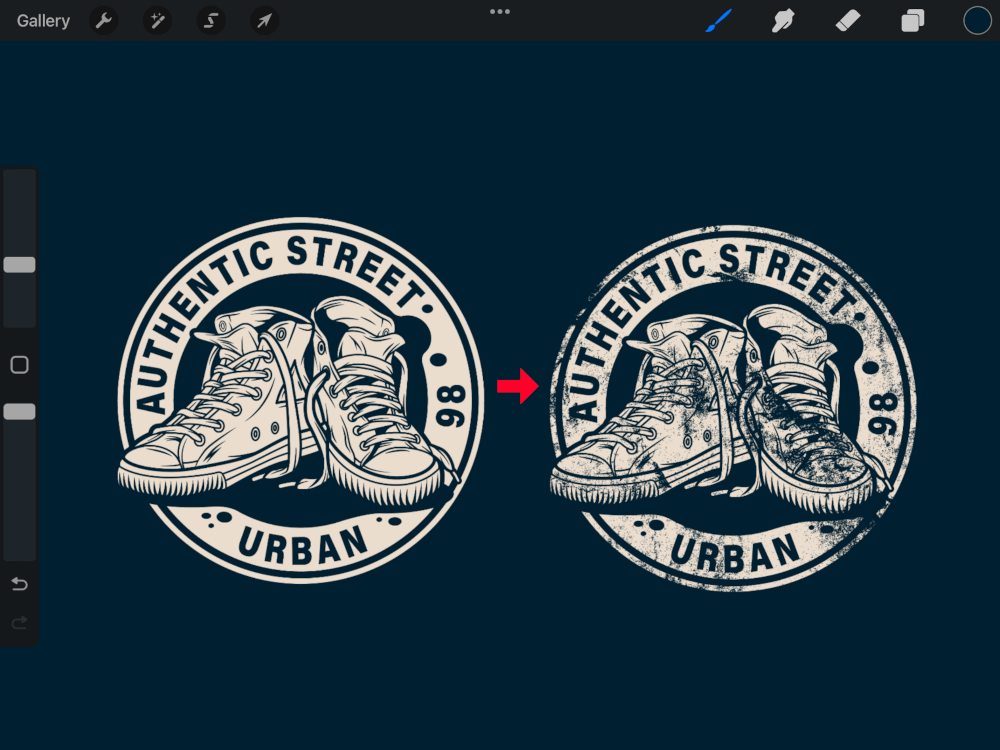
Applying the texture as a layer mask creates a worn vintage effect.
Watch the video tutorial above to see exactly how this is done.
Working With Layer Masks
Now that we’ve gone over creating layer masks in Procreate, let’s have a look at some of the ways you can work with the mask.
How to only edit the mask
To edit a layer mask in Procreate, all you have to do is open the Layers menu and ensure that only the mask layer is selected.
If the mask layer and the subject layer are both highlighted in blue then that means you have both of them selected. You must deselect the subject layer (the one on the bottom) if you want to edit only the layer mask.
As we went over in a previous tutorial about selecting multiple layers in Procreate, this can be done by simply swiping the layer to the right, which will deselect it.
If done correctly, only the mask layer should be selected:

This means that you can now alter your layer mask as needed, without applying any of the changes to the layer that the mask is applied to. You can now:
- Resize your mask
- Scale, rotate and shear it
- Add or remove areas of opacity and transparency using color
- Move/reposition it on your canvas
And more.
How to only edit the subject
If you’d like to edit the subject layer that the mask is applied to, and not the mask itself, then this can be accomplished in a similar fashion. Instead of selecting the layer mask, however, select only the subject layer.
You can deselect your layer mask by swiping it to the right. If done correctly then only the layer itself should be selected, meaning any changes made will only be applied to the selected layer and not the mask.
How to edit the mask and the subject at the same time
Finally, if you’re like to edit both the layer mask and the subject layer at the same time, as if they were a unit, then this can be accomplished selecting both layers at the same time.
When you first apply a layer mask in Procreate, you should notice that both layers are selected in the Layers menu by default. If this is not the case, however, then you can ensure that they are both selected by simply swiping them to the right.
If both layers are highlighted in blue then that means they’re both selected and any changes made will be applied to each.
Conclusion
Working with layer masks in Procreate is a breeze. Thanks to the ease of use of the Layers menu, applying a mask is just a matter of selecting it from a menu and then applying your changes as needed.
That said, if any part of this lessons was unclear, or if you have any questions, feel free to leave a comment below.
Learn To Master The SoftwareGain a complete understanding of your favorite design apps with my comprehensive collection of video courses. Each course grants access to our private community where you can ask questions and get help when needed.
|
||||||||||||||||||||||||||||||||


