Affinity Designer T Shirt Design Tutorial | Step By Step Beginner Lesson
Affinity Designer T Shirt Design Tutorial | Step By Step Beginner Lesson https://logosbynick.com/wp-content/uploads/2021/07/affinity-designer-t-shirt-design-1.png 800 470 Nick Saporito https://secure.gravatar.com/avatar/8e31bf392f0ba8850f29a1a2e833cdd020909bfd44613c7e222072c40e031c34?s=96&d=mm&r=gIn past tutorials we’ve gone over various ways that Affinity Designer can be used. Whether it be to create logos, delete backgrounds, or crop images, there’s no shortage of ways in which Affinity Designer can assist you in your design needs. One such example would be for designing t shirts. For those seeking to make their own apparel, this Affinity Designer t shirt design tutorial will walk you through the entire process, step-by-step.
The completed Affinity Designer t shirt design will have complete transparency and can be uploaded to a print-on-demand service of your choosing, including Teespring.
Affinity Designer T Shirt Design
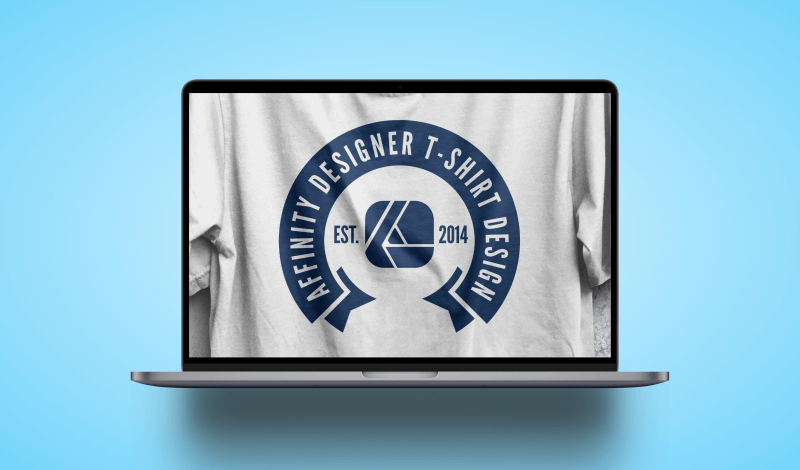
The design we’ll be creating in this lesson depicts a circular banner with text wrapping around it, using a technique we previously went over for curving text. In the middle of the design will consist of iconography of your choosing, along with some “EST” text. You can reference the header image at the top of the post for a preview of how the finished t shirt design looks.
For this demonstration I will be using the Affinity Designer logo as a depiction for the center of the design, but you can obviously use whatever depiction you’d like.
The font used for this design is called League Gothic, which is a free font that you can download and use however you’d like. You can use whatever font you’d like though.
Video Tutorial
The following video tutorial will walk you through the entire Affinity Designer t shirt design process step-by-step:
The following is simply a brief overview of the steps taken to create this t shirt design. Please watch the video tutorial for complete instructions.
Step 1: Create a circle and wrap your text around it
The first step in our Affinity Designer t shirt design tutorial will be to create a circle on the canvas, placed directly in the middle of the artboard:

The artboard will be sized at 1,000 by 1,000 px and the document’s DPI (or “dots per inch”) should be set to 300 dpi, which is standard for print design. It would also be a good idea to set the document’s color mode to CMYK, which is also ideal for print.
Next, we’ll be adding some text around the outside edge of the circle:

The text will then be converted to curves so that we can turn it into negative space within the banner later on.
Step 2: Create a circular banner for the text using strokes
Now that we’ve generated our text, the next step in creating our t shirt design is to create a circular banner for the text sit on.
This will be done using a series of strokes:

Although it may be difficult to see in this screenshot, the yellow outer ring will represent the banner of the t shirt design, whereas the pink inner ring will represent the folded ends of the banner.
Next, we’ll be using a touch of shape magic and geometry functions — otherwise known as Boolean operations — to make the circular banner have folded ends:

Then, we’ll be giving those folded ends some fish tails for a nice added touch:

This is a process that is a bit complicated to be conveyed through written text, so again, please watch the video tutorial above for complete instructions.
Once that’s done, we’ll be using the new Contour Tool to create an offset of the banner and subtract it from the folded ends:

This will work well in creating visually appealing negative space, which will translate nicely in a t shirt design. The fabric of the shirt will be showing through those negative space areas.
Speaking of which, we’ll then subtract the text from the banner to make the text into negative space within the banner:

And from there you can bring the opacity back up to 100% and make everything a single color, or black, as I did for this demonstration.
Step 3: Place your iconography and supplemental text
Now that we’re finished creating the banner text portion, the next step in our t shirt design tutorial is to place some contents in the center of the design:
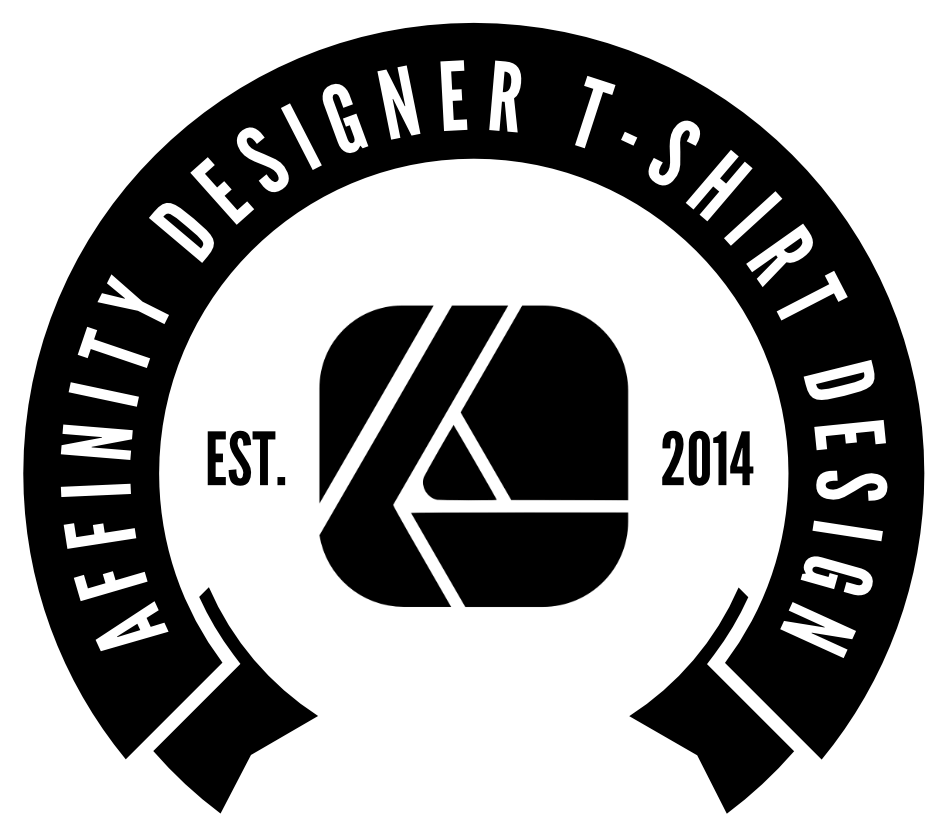
Finished t shirt design, created in Affinity Designer.
As you can see, I used the Affinity Designer logo along with some EST text on either side. The text reads “EST. 2014”, which is the year that Affinity Designer was founded.
Obviously, you can place your own iconography and text here.
And with that our Affinity Designer t shirt design is complete!
Step 4: Export your finished t shirt design
Now that the t shirt design is completed, we must export it in a usable format for upload to your print-on-demand service of choice.
To export your work, open the Export menu by navigating to:
File > Export
Alternatively, you can open the Export menu by pressing Control + Alt + Shift + S on your keyboard.
Once opened, the Export menu should look something like this:

You will have a variety of formats to export your work as, including:
- PNG
- JPG
- GIF
- TIFF
- And more
The file format you should choose will depend entirely on the print service you’re using.
The most commonly-used print-on-demand services are as follows:
- Teespring
- Spreadshirt
- Custom Ink
- VistaPrint
- And more
You can find out which formats each service prefers using a guide a wrote on best logo sizes for t shirts, which outlines each print services’ specs for print.
Generally speaking, it is recommended that you export your finished t shirt design in PNG format. This format will preserve the transparent elements of your design, as opposed to other formats, like JPEG, which do not retain transparency.
Conclusion
As we’ve gone over time after time, there’s no shortage of ways in which you can use Affinity Designer. With its vector creation tools combined with its raster image editing abilities, Affinity Designer is one of the most complete and versatile design tools on the market. This Affinity Designer t shirt design tutorial is just one of many ways in which this tool can come in handy.
If you have any questions or need clarification for any of the steps in this lesson, simply leave a comment below.
Learn To Master The SoftwareGain a complete understanding of your favorite design apps with my comprehensive collection of video courses. Each course grants access to our private community where you can ask questions and get help when needed.
|
||||||||||||||||||||||||||||||||


When setting up the file to create a design and export it for print to a product like a shirt, or mug, should you create the design in RGB and then export it as CMKY? Or what is the proper way to do that? So far what i’m doing seems okay, which is creating the design in cmky mode and exporting it that way, but im not sure if thats how its supposed to be done.
Hi Chris, I would only create the design in CMYK if it’s going directly to print
should you export in CMKY or RGB?
It depends on the print service you’re using but generally when designing for print it’s CMYK.
Are Affinity Designer and Inkscape the same? Also where would I find a CMYK color chart for safe colors on a black t-shirt?
AD and Inkscape are different brands of vector software. They carry out the same fundamental tasks, but they are different. As for your second question, I’m not exactly sure. You’d have to ask your print service for that.