
Working With Swatches In Affinity Designer | The Complete Guide
Working With Swatches In Affinity Designer | The Complete Guide https://logosbynick.com/wp-content/uploads/2021/05/affinity-designer-swatches.png 800 470 Nick Saporito https://secure.gravatar.com/avatar/8e31bf392f0ba8850f29a1a2e833cdd020909bfd44613c7e222072c40e031c34?s=96&d=mm&r=gOne of the many advantages you’ll enjoy as an Affinity Designer user is the ease of use when it comes to creating swatches, whether it be from images or custom selections. Not only that, but Affinity Designer allows you to save swatches, export swatches for use on other machines, and you can even import swatches from Adobe Illustrator. In this tutorial we’ll be going over how you can do all of these things.
In Affinity Designer, the Swatches tab allows you to work with custom color palettes that are comprised of colors of your choosing. The colors can be derived from photographs (like these color palettes from the 70s, for example) and saved as custom color palettes.
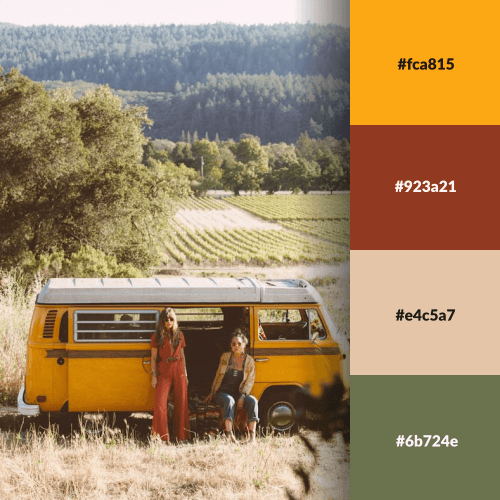
Credit: bohemiandiesel.com on Pinterest
This is really convenient if you’re designing something like a logo or a brand identity. Having a custom palette on hand can help you choose complementary colors much more efficiently than toying around with a color wheel or RGB sliders. And when it comes to choosing shades that pair well and abide by common design principles, the work is already done for you.
Color swatches in Affinity Designer function very similarly to how they do in Illustrator, but there are a few subtle differences you’ll need to be aware of before proceeding.
Working With Swatches In Affinity Designer
The following video tutorial will walk you through the process of creating swatches with Affinity Designer, exporting your swatches so you can save them, and importing swatches as well. I also go over the different types of swatches that Designer allows you to make:
Continue on for a more detailed explanation.
Table Of Contents |
How To Create Swatches In Affinity Designer
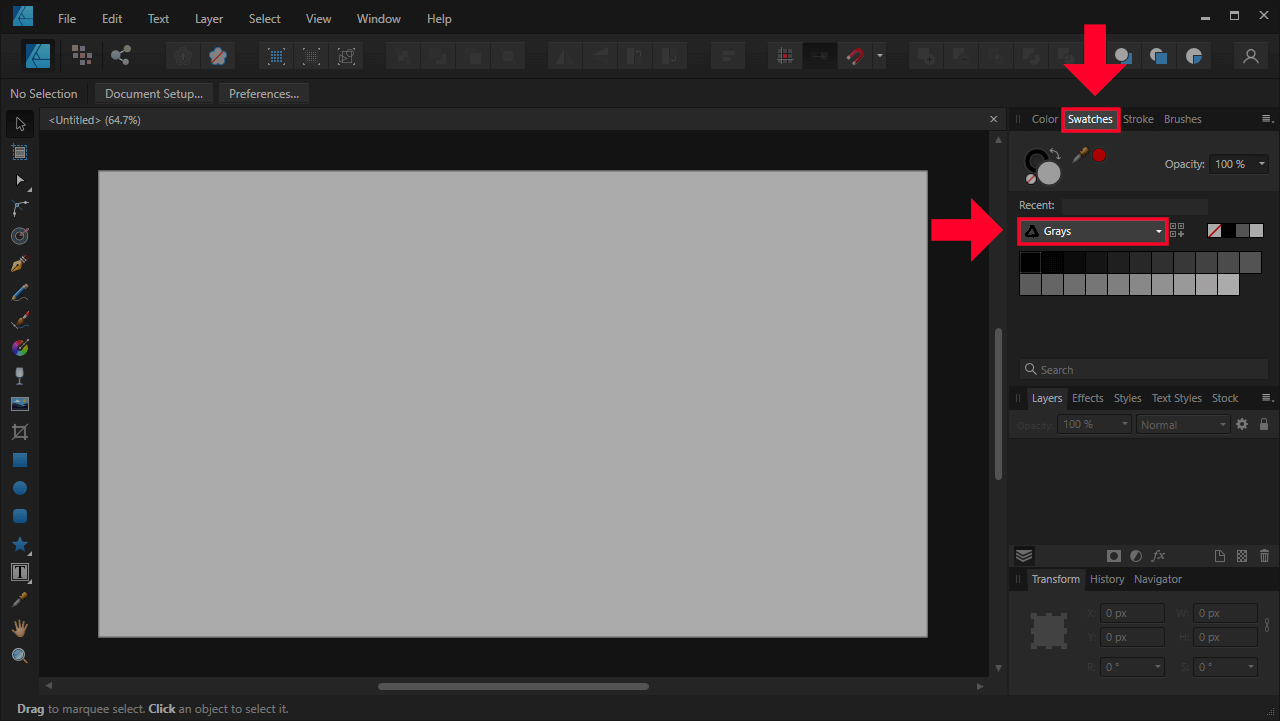
To create a swatch in Affinity Designer, navigate to the Swatches tab, which is located towards the top-right corner of your screen, next to the Colors tab:
Click to enlarge
You will see a dropdown menu in the Swatches tab. This is a list of all your palettes. By default, the Grays palette is selected.
You will also notice a little hamburger-style menu icon in the top-right corner of the Swatches tab. Opening this menu will display all of the ways in which you can work with swatches in Affinity Designer:
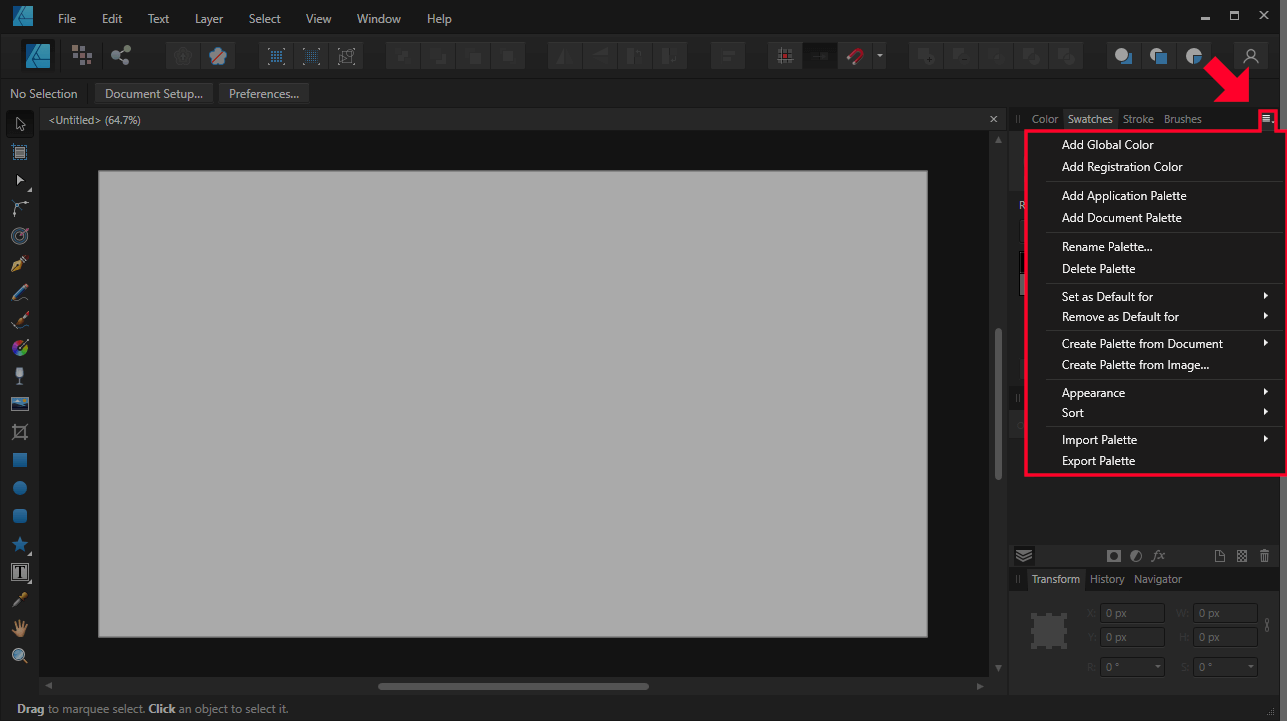
The menu icon is in the top-right corner, depicted as a hamburger-style menu. However, it is tiny and easy to miss.
Before we can create a swatch though, we first need to determine the type of swatch we’d like to create.
Step 1: Choose The Swatch Type
There are two different types of swatches in Affinity Designer:
- Document
- Application
Let’s go over each type.
Document
Document swatches are color palettes that are saved only in your document.
So, if you’d like to use this color palette in other documents, you won’t be able to. The saved swatch will on be embedded in the document you’re currently working in.
Application
Application swatches are saved within the Affinity Designer application.
This means that you’ll be able to load application swatches in other documents so you can use them elsewhere.
The type of swatch you should choose will depend entirely on your own preferences. If you’d like to use this palette over and over, save it as an Application palette. If you’re only using it for this document and don’t want it adding clutter to your Swatches library, choose a Document palette.
Step 2: Choose The Swatch Source
This is where the rubber meets the road. In this step you’ll be choosing the colors for your custom palette.
There’s three different sources that you can sample colors from for your swatches:
- Document: This will sample the colors of every object currently on your artboard, including images. So, if you’ve created an elaborate design and really like the colors you’ve chosen, you can easily same them as a custom palette.
- Image: This will sample the colors from an image of your choice. You will be prompted to choose an image from a location on your hard drive.
- Custom: Custom color palettes are comprised of individual colors of your choosing. So, if you want to hand-pick each individual color for your swatch, this is would be the setting to use.
Let’s go over how to work with each.
Document
To create a swatch in Affinity Designer that samples colors from all of the objects on your artboard, click the menu icon in the Swatches tab, navigate to Create Palette from Document and choose whether you’d like to create an Application palette or a Document palette:

Choose the type of palette you’d like to create.
Once selected, you will have an array of colors to choose from in your palette, all of which were derived from the contents of the document you’re currently working on.
In my example, a palette was created from the example image on my artboard:
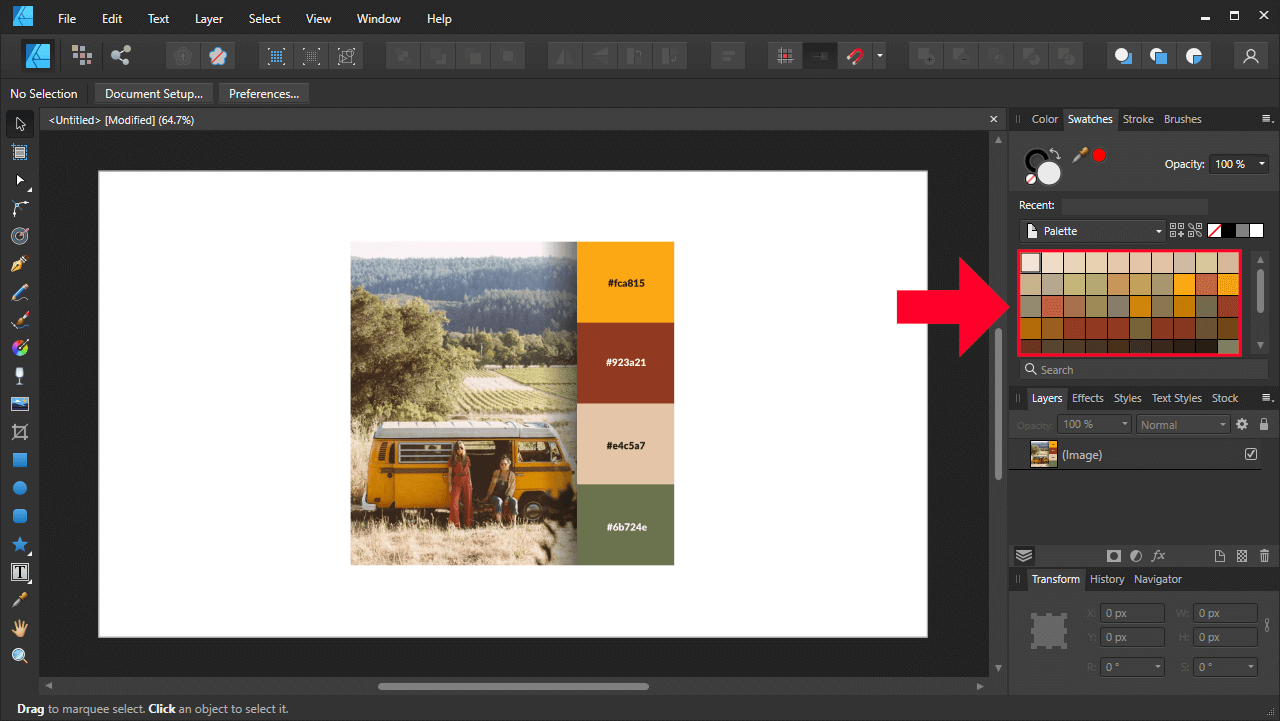
A color palette was made using colors from the image pasted onto my artboard.
Image
To create a swatch in Affinity Designer that is based on a specific image of your choosing, click the menu icon in the Swatches tab and navigate to Create Palette from Image:

Once selected, you will be prompted to choose an image file on your hard drive to create your custom swatch from.
Although both Document and Image palettes allow you to create palettes from an image, there is a distinct difference. Document palettes include everything in your document (not just the photo,) whereas image palettes sample only the image.
Custom
To create a custom swatch in Affinity Designer that is based on hand-picked colors of your choice, first create a new palette by navigating to the menu icon in the Swatches tab and selecting either Add Application Palette or Add Document Palette. Refer to the Swatch Type section above if you don’t know which one to choose.

Once selected, a new blank palette will be generated, and it will be titled as “Unnamed“.
To add colors to this palette, simply select an object on your document that is filled with the color you’d like to save, and click the Add current fill to palette button, which is located next to the palettes dropdown:

The icon is represented by 3 boxes and a plus (+) icon.
Your chosen color will then be added to the swatch.
You can also choose your colors by setting the Fill color in the Colors tab. You don’t necessarily need to have an object filled with that color.
Step 3: Rename Your Swatch
As previously mentioned, new swatches that you create in Affinity Designer will be titled “Unnamed” by default. You can rename your swatch by clicking the menu icon in the Swatches tab and navigating to Rename Palette.
You will then be prompted to enter a name for your palette.
How To Export Swatches In Affinity Designer
If you’d like to save a swatch that you’ve created in Affinity Designer, you can do so by clicking the menu icon in the Swatches tab and navigating to Export Palette. You will be prompted to enter a name and choose a location on your hard drive for your palette. Your swatch will be saved as a .afpalette file, which is a proprietary format of the Affinity suite.
Unfortunately, the only way you’ll be able to use this proprietary format is in other Affinity applications. So, if you’d like to import this palette into Adobe Illustrator, you won’t be able to do so. You will be able to use this palette on other devices that you may have Affinity software installed on though.
How To Import Swatches In Affinity Designer
To import a swatch into Affinity Designer, click the menu icon in the Swatches tab and navigate to Import Palette. You will be prompted to choose a file and location on your hard drive to be imported.
The formats that can be imported are as follows:
- .AFPALETTE
- .ASE
So, if you’d like to take a swatch that you’ve created in Adobe Illustrator and import it into Affinity Designer, you’ll have to make sure that you exported it in .ASE format, otherwise it won’t work.
Conclusion
Thanks to Affinity Designer’s clean and intuitive interface, working with swatches is a breeze. Despite the usefulness of working with swatches and custom color palettes though, it’s unfortunate that Affinity doesn’t allow you to use your exported palettes in other applications. Hopefully they’ll consider more consumer-friendly practices in the future.
If you have any questions, or if any part of this lesson was unclear, simply leave a comment below.
Learn To Master The SoftwareGain a complete understanding of your favorite design apps with my comprehensive collection of video courses. Each course grants access to our private community where you can ask questions and get help when needed.
|
||||||||||||||||||||||||||||||||


Is there a way to rename each individual color you create in your new palette? I have some shades of blue that are subtly different, for example, and would love to give them individual names to make it more obvious which is which.
Yes, you can right-click one of the swatches and go to “Rename Fill”
Nice tutorial – covered all of my questions about palettes in AD, bar two:
Once you’ve created a document palette, is there any way to convert it to an application palette (or should it be swatch? What’s the difference?!). Is there any way to tell if the palette is a ‘document’ or ‘application’ type, once it’s been created?
Hi Nick, thanks so much for this course! I have still a question: how can I import a colorpalette made in AF desktop, into AF for iPad? There is not an import feature in the swatch tab imo.
I’m not sure, I haven’t looked into this for the iPad app yet. I’ll get to it eventually though.
1. In the Designer Persona or Pixel Persona, select the Swatches panel.
2. From the Panel Preferences menu, select Import Palette, and then choose whether to import:
-As Application Palette—saved within your Affinity app and available to any document.
-As System Palette—saved to your operating system.
-As Document Palette—saved within the current document.
3. Browse to and select the .afpalette file you want to import.
4. Click Open.
I got this from Affinity’s help pages, specifically for the app.