
8 Ways In Which You Can Edit Photos In Inkscape
8 Ways In Which You Can Edit Photos In Inkscape https://logosbynick.com/wp-content/uploads/2021/05/inkscape-edit-photos.png 800 470 Nick Saporito https://secure.gravatar.com/avatar/8e31bf392f0ba8850f29a1a2e833cdd020909bfd44613c7e222072c40e031c34?s=96&d=mm&r=gAlthough Inkscape is meant for working with vector graphics, it does have some features and tools that allow you to make common edits to photographs and other rasterized images. And even though you’d be better off using proper photo editing software for this sort of thing, you may find yourself working in a vector environment once in a while and needing to just make a quick edit to an image. In these instances, launching yet another application can be an inconvenience. This is where Inkscape’s photo editing ability comes in handy, and in this post, we’ll be going over 8 different ways in which you can edit photos in Inkscape.
Edit Photos In Inkscape
The following video will walk you through all of the various ways that you can edit photos and rasterized images in Inkscape:
Continue on for a transcript of the video.
Table of Contents |
1. Cropping
The first way in which you can edit a photo in Inkscape is by cropping it.

To crop your photo, all you have to do is create a rectangle going over the portion of the photo you’d like to crop, and then create a clipping mask from it.
From there, you can just resize your document based on the cropped image by pressing Control + Shift + R, and then you can export your work as a PNG file. I made a tutorial about this here if you need more details.
2. Subject Extraction
Not only can clipping paths be used to crop photos in Inkscape, but they can also be used to extract subjects from photos.

This allows you to do all kinds of unique things, like create a photo pop-out effect, or remove a background from an image.
These extractions can be made by simply grabbing Bezier Pen and manually drawing a path around the subject you’d like to extract. Then, from there, you can create a clipping path from it by selecting both objects and navigating to Object > Clip > Set.
3. Opacity Adjustments
Another way that you can edit photos in Inkscape is by adjusting their opacity, and Inkscape allows you to change opacity values in a variety of different ways.
You can change the overall opacity of an image by selecting it and opening the Fill & Stroke menu. From there, grab the Opacity slider and adjust it to your liking.
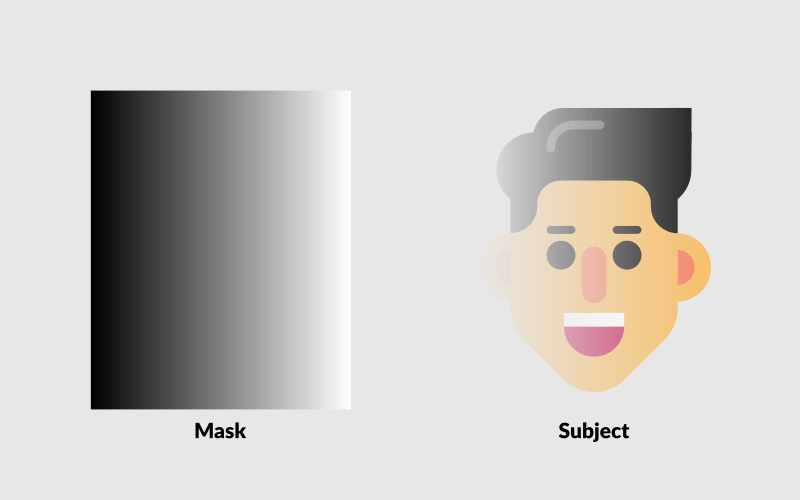
You can also give a photo partial transparency (or a gradient to transparency) by using layer masks. This makes it so that one side of an image is visible, but gradually tapers off to transparency.

This can be really useful when designing things like headers and posters, where you need to incorporate imagery with text and other vector elements.
Layer masking is somewhat of an advanced topic, but the gist of it is that you create an object with a black and white gradient, and then apply it over your image as a mask. The black areas create transparency in the photo, whereas the white areas remain opaque.
Opacity masks are also known as layer masks in other applications.
I have a tutorial for this here if you want a more in-depth explanation.
4. Basic Color Adjustments
Inkscape also allows you to make some common color adjustments to your photos.
For example, you can invert the colors of an image by selecting it and navigating to Filters > Colors > Invert.
You can also make your image black and white (or grayscale) by navigating to Filters > Color > Grayscale, and from there you can adjust the RGB values to your liking.
In fact, the Filters menu has lots of interesting and unique effects that can be applied to your images, so be sure to browse through there and experiment.
5. Advanced Color Adjustments
Speaking of color adjustments, Inkscape also allows you to make some more advanced color corrections, such as…
- Color channels
- Levels
- HSB Values
- And more
All you have to do to access these settings is navigate to Extensions > Raster. From there, you will have a wide array of raster effects that you can use to edit your photos in Inkscape.
6. Sharpen & Blur
Another common edit you may like to apply to your photos once in a while is to apply a blur, or maybe sharpen your image.
To apply a blur, open the Fill & Stroke menu by pressing Control + Shift + A on your keyboard, and from there you can use the Blur slider to apply a Gaussian blur to your liking.
To sharpen your image in Inkscape, simply navigate to Filters > Image Effects > Sharpen.
Unfortunately, there’s no way to adjust the threshold of the filter, but this can still be handy for a quick touch-up.
7. Removing White Backgrounds
As we went over earlier, you can use the Bezier Pen to manually draw shapes over subjects to extract them from their background. If the background you’d like to remove is white though, then you won’t need to go through all of that trouble. You can simply use the Trace Bitmap feature to generate a vector silhouette of your subject, then apply it as a clipping path.

It should be noted that this method is far from perfect. There are instances where the auto-trace feature won’t be able to make an accurate distinction between the foreground and the background, but when it does work, it can save you an incredible amount of time.
8. Blend Modes
The final method that you can deploy for editing photos in Inkscape is using layer blend modes. This is somewhat of a hidden feature in Inkscape that not a lot of users know about.
To access it, open your Layers menu by pressing Control + Shift + L.
From there, you can add a new layer on top of your image layer, and any of the contents placed on that layer can be blended into the image layer beneath it using the Blend Mode dropdown near the bottom of the menu.
Conclusion
As you could imagine, we’ve only begun to scratch the surface of all the different ways you can edit photos in Inkscape. Although these features may not be as robust or intuitive as a raster image editor like GIMP, they can still come in handy if you just need a quick and basic edit, and you don’t feel like launching another application.
Let me know in the comments if there’s any ways that you like to edit photos in Inkscape that I may not have gone over in this video. And as always, thanks for watching!
Learn To Master The SoftwareGain a complete understanding of your favorite design apps with my comprehensive collection of video courses. Each course grants access to our private community where you can ask questions and get help when needed.
|
||||||||||||||||||||||||||||||||


