How To Resize The Canvas In Affinity Photo for iPad
How To Resize The Canvas In Affinity Photo for iPad https://logosbynick.com/wp-content/uploads/2021/05/resize-canvas-affinity-photo-1.png 800 470 Nick Saporito https://secure.gravatar.com/avatar/8e31bf392f0ba8850f29a1a2e833cdd020909bfd44613c7e222072c40e031c34?s=96&d=mm&r=gIn today’s tutorial we’ll be going over how to resize the canvas in Affinity Photo for the iPad. This is useful to know if you’re working with a document and you want to change its dimensions, but without changing the sizing of the contents on the canvas.
In short, you can resize the canvas in Affinity Photo by using the Document icon in the top-left corner of the screen. From there, you’ll be prompted with a menu that will allow you to change some of the properties of your canvas, such as width and height, units of measurement, DPI, and more.
Resize The Canvas In Affinity Photo for iPad
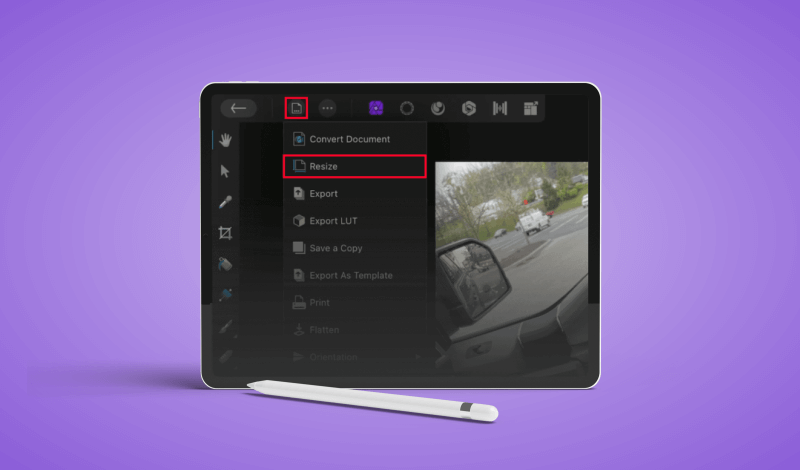
| To resize the canvas in Affinity Photo for the iPad, tap the Document button in the top-left corner of the screen and select Resize. You will then be prompted with a menu at the bottom of your screen that will let you input your desired width and height. |
The following video tutorial will walk you through the process of resizing your canvas:
To get us get us started, all you have to do is tap the Document icon in the top-left corner of the screen, represented by a depiction of a piece of paper (or “document”) with its corner folder:
In the iPad version of Affinity Photo, the Document icon is located in the top-left corner.
Towards the bottom of your screen you should see the Document menu appear:
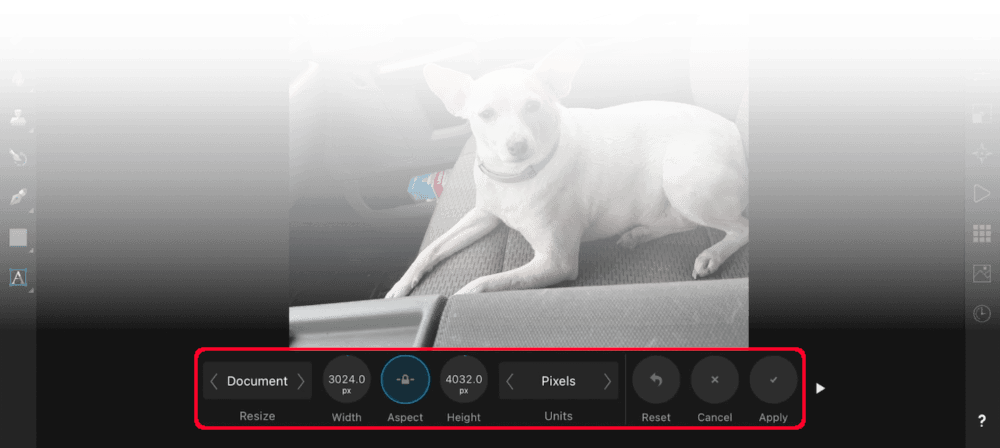
The Document menu that populates at the bottom of the screen will allow you to change your document’s properties, including its width and height.
Resize The Canvas
When resizing your canvas in Affinity Photo for the iPad, you’ll be asked if you want to resize the Document or the Canvas. The difference between the two are as follows:
- Document: Resizing the document will change the size of your canvas, but it will also resize the contents of your canvas (photos, designs, drawings, etc.) as well.
- Canvas: Resizing the canvas will only change the size of your canvas. The contents of your canvas will remain the same size.
If you only want to resize the canvas, all you have to do is choose Canvas from the Resize section, then input your desired Width and Height values.
You can do this by tapping on either value, which will prompt you to type in a numerical value; or you can hold a tap on the number and slide it left or right. Sliding to the right will increase the value, whereas sliding to the left will decrease it.
Once you are finished resizing your canvas, tap the Apply button on the right-hand side of the menu to apply the change.
Aspect Ratio
The lock icon between the width and the height represents the Aspect Ratio.
If enabled, the width and height of your document will scale proportionately so that you don’t distort your canvas. Disabling this preset will allow you to change the width and height of your canvas independent of each other.
Units Of Measurement
Within the Documents menu you’ll see a value titled Units. This option allows you to choose your preferred unit of measurement, including:
- Pixels
- Points
- Picas
- Inches
- Feet
- Yards
- Millimeters
- Centimeters
- Meters
Make sure to select your preferred unit of measurement before resizing your canvas.
Document DPI
The Document menu also allows you to change the DPI of your document, or the “dots per inch.”
DPI is a rather complex topic that warrants its own lesson, but it will have an impact on how you resize the canvas in Affinity Photo if you change it.
To change the DPI of your document in Affinity Photo, just tap on the arrow icon on the righthand side of the Document menu. It will reveal more properties that you can alter — one of which being the DPI:
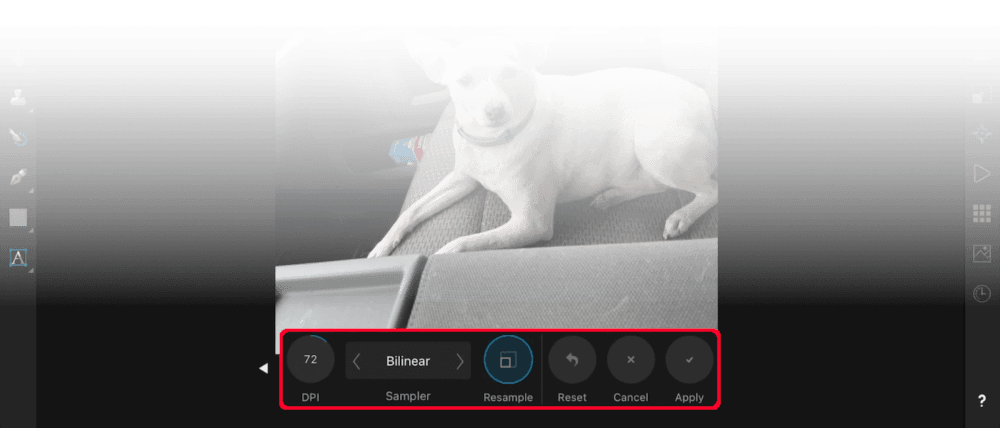
Changing the DPI will impact the size of your canvas. By default, it’s best to just leave it as-is, unless you need a specific DPI.
Input your desired DPI and tap Apply to apply your changes.
Undo/Cancel
If at any point you’d like to cancel the changes you made to the values in the Document menu, you can do so by pressing the Cancel button to the right of the menu.
If you’d like to reset the properties of your canvas to how they originally were, you can do that by pressing the Reset button on the righthand side of the canvas.
Conclusion
Knowing how to resize the canvas in Affinity Photo for the iPad is useful because it will allow you to create designs that need to be set at a specific size. This is a feature that is absolutely essentially for any professional design software. And thanks to some of the other properties that can be changed, like DPI, you’ll be able to create designs for print, like t shirts and stationery.
If you have any questions or need clarification on any of the steps taken in this tutorial, simply leave a comment below!
Learn To Master The SoftwareGain a complete understanding of your favorite design apps with my comprehensive collection of video courses. Each course grants access to our private community where you can ask questions and get help when needed.
|
||||||||||||||||||||||||||||||||


The arrow… the small arrow.
T H A N K Y O U ! !
it took me a while not to solve that DPI option, and finally you helped me !