How To Add An Outline To A Stroke In Illustrator
How To Add An Outline To A Stroke In Illustrator https://logosbynick.com/wp-content/uploads/2023/07/outline-a-stroke-illustrator.webp 1000 587 Nick Saporito https://secure.gravatar.com/avatar/8e31bf392f0ba8850f29a1a2e833cdd020909bfd44613c7e222072c40e031c34?s=96&d=mm&r=gAs you may have already known, you can apply outlines to objects in Illustrator by adding a stroke. But what if you wanted to outline an object that is already a stroke? There’s several ways this can be achieved, but in this tutorial we’ll be going over how you can outline a stroke in Illustrator by adding additional strokes.
Yes, you read that correct. You can actually add multiple strokes to objects in Illustrator, which allows you to apply as many outlines as you’d like. This can be accomplished using the Appearance menu. Let’s have a closer look.
Outline A Stroke In Illustrator
Window > Appearance). In the menu, click the box in the lower-left corner that says “Add New Stroke“. Now increase the size of the stroke at the bottom of the list and change its color. |
The following video tutorial will walk you through the entire process in roughly a minute:
Continue on for a step-by-step breakdown.
Table of Contents |
Step 1: Select the object and open the Appearance menu
To add an outline to a stroke we will be using the Appearance menu, so select your object and open the menu by navigating to:
Window > Appearance
It can also be accessed by pressing Shift + F6 on your keyboard.
The menu will populate on your screen. It serves as an index of the select object’s properties:

Click to enlarge.
As you can see in my example, the object has no fill and a black stroke that is 10 pt in size.
Step 2: Add a new stroke to the existing stroke
Now we are going to use the Appearance menu to outline the stroke by applying a new stroke.
Click the button in the bottom-left corner of the menu that reads “Add New Stroke” when you hover your cursor over it. Once clicked, a new stroke will be indexed on top of the original stroke in the Appearance menu:
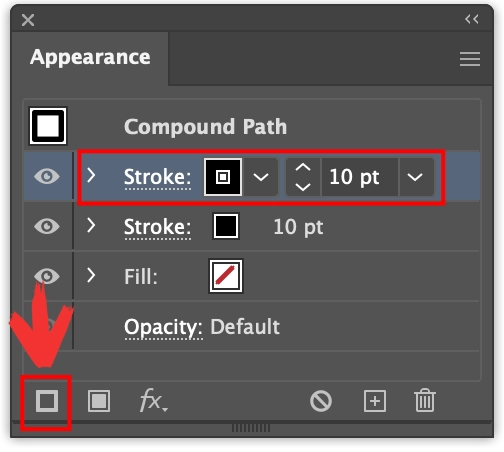
The new stroke is added on top in the stacking order.
Step 3: Change the stroke size and color
Now we are going to enlarge the stroke at the bottom of the stacking order and change its color so that it can serve as an outline.
Click on the second stroke listing in the menu to select it. Then, click the color box next to it to apply whichever color you’d like your outline to be.
Finally, increase the size of the stroke so that it protrudes from the original stroke:

Click to enlarge.
And your outline is complete! Both strokes are now functional and linked to the original path. And this process can be repeated to apply as many outlines as you’d like. You’ll just have to increase the size of each stroke more and more.
Learn To Master The SoftwareGain a complete understanding of your favorite design apps with my comprehensive collection of video courses. Each course grants access to our private community where you can ask questions and get help when needed.
|
||||||||||||||||||||||||||||||||


