
The Easiest Way To Make Curved Lines In Illustrator
The Easiest Way To Make Curved Lines In Illustrator https://logosbynick.com/wp-content/uploads/2022/01/curved-lines-illustrator.png 800 470 Nick Saporito https://secure.gravatar.com/avatar/8e31bf392f0ba8850f29a1a2e833cdd020909bfd44613c7e222072c40e031c34?s=96&d=mm&r=gOne of the many benefits of working with vector design software is that it provides tools that allow you to draw virtually anything you want. However, in order to do this you must first know how these tools work, and when it comes to drawing curved lines, things can get a little tricky. In this tutorial we’ll be going over how you can use the Curvature Tool to make curved lines in Illustrator.
In a previous tutorial we went over how to use the Pen Tool in Illustrator. The Pen Tool allows you to draw any kind of lines you’d like, but it comes with a bit of a learning curve — especially when it comes to drawing curved lines. Creating smooth, fluid curves that follow your desired path takes a lot of time and practice if you’re using the traditional pen tool.
Thankfully, there is an alternative. The Curvature Tool — a tool dedicated specifically to drawing curved lines — makes it incredibly easy to draw smooth, fluid lines that follow whatever path you’d like. Let’s have a closer look at how it works.
How To Make Curved Lines In Illustrator
The following video tutorial will walk you through the ins and outs of using the Curvature Tool to draw curved lines:
Continue on for the written tutorial.
Table of ContentsDrawing Curved Lines
Working with Curved Lines |
Step 1: Grab the Curvature Tool from the toolbox
For drawing lines you may traditionally use the Pen Tool, however Illustrator provides an alternative pen tool that is dedicated specifically for drawing curved lines — the Curvature Tool.
You can access it in your toolbox to the left of your screen:

The Curvature Tool is located in the toolbox and allows you to make curved lines.
Alternatively, you can also access it using the keyboard shortcut, which is: Shift + ~
Step 2: Click on your canvas to add anchor points in the direction you’d like the curve to flow
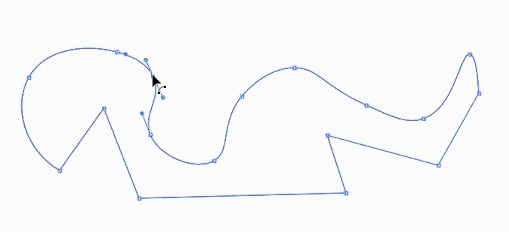
Once you have the Curvature Tool selected, all you have to do to make curved lines in Illustrator is begin clicking on your canvas to add anchor points:

Clicking to place anchor points on the canvas will generate a curved line between them.
A curved line will be generated between each anchor point your place, allowing you to draw fluid curved lines by simply placing anchor points around your canvas.
The line will be auto-generated in such a way that it forces the lines to be smooth, fluid curves without breaks or corners.
If at any point you’d like to draw straight lines with the Curvature Tool, you can do so by simply holding Alt on your keyboard while adding the anchor points:

Holding Alt on your keyboard allows you to draw straight lines with the Curvature Tool.
Once you release the Alt key the tool will resume drawing curved lines again.
Step 3: Finish the path by pressing Escape or by clicking the first anchor point to close it
Let’s go over how to finish making your curved lines.
Once you are satisfied with the lines you’ve drawn, you can end the path by pressing Escape on the keyboard, or you can close the path by clicking on the first anchor point that you placed at the beginning to close the path.
Edit Your Curved Lines
Despite the ease of use of the Curvature Tool, it may not always produce the desired result. This can be especially frustrating if you’re trying to make an exact tracing of a subject.
Now that we’ve gone over how to make curved lines in Illustrator, let’s have a look at how you can edit those lines and fine-tune them so that they’re more accurate.
If at any point you need to edit your curved lines, you can do so using the Direct Selection Tool, located in your toolbox to the left of your screen:

The Direct Selection Tool allows you to adjust the anchor points of your drawing.
Alternatively, you can also access this tool using the keyboard shortcut which is the letter A.
The Direct Selection Tool allows you to adjust the individual anchor points that you placed when drawing your curved lines. To use it, simply click on one of the anchor points:
You can adjust the position and contour of your anchor points.
You can move the location of the anchor point by clicking and dragging it. You can also edit the contour of the path by adjusting the handles associated with each anchor as depicted above.
Using the Direct Selection Tool will allow you to refine your curved lines further so that they’re more precise.
Examples Of When To Use The Curvature Tool
Let’s have a look at an example of when the Curvature Tool can come in handy.
In the example below I used the Curvature Tool to create a tracing over my subject:

In this example the Curvature Tool was used to create a curved shape around the subject and then used as a clipping mask.
I was then able to use the shape that I drew as a clipping mask to apply to the photo. This allowed me to extract the subject from its background.
Because of the shape of my subject, the Curvature Tool is preferable to the traditional Pen Tool because my subject has lots whimsical curves and contours around its edges.
The Pen Tool could’ve produced a more accurate tracing, but in order to do that it will have required countless hours of practice to be able to draw that well with it. With the Curvature Tool though, I was able to make a quicker tracing, and then edit the anchor points afterward to refine the tracing more.
Conclusion
Despite its ease of use, the Curvature Tool does require a little bit of practice in order to make curved lines in Illustrator that follow the exact path you’d like. Thankfully though, it’s not nearly as complicated as using the traditional Pen Tool. With a little bit of practice though you should be drawing picture-perfect curved lines in no time!
If you have any questions or need clarification on anything we’ve gone over in this tutorial, simply leave a comment below.
Learn To Master The SoftwareGain a complete understanding of your favorite design apps with my comprehensive collection of video courses. Each course grants access to our private community where you can ask questions and get help when needed.
|
||||||||||||||||||||||||||||||||


