How To Export With Transparency In Adobe Illustrator
How To Export With Transparency In Adobe Illustrator https://logosbynick.com/wp-content/uploads/2022/08/export-transparent-png-illustrator.png 800 470 Nick Saporito https://secure.gravatar.com/avatar/8e31bf392f0ba8850f29a1a2e833cdd020909bfd44613c7e222072c40e031c34?s=96&d=mm&r=gIt can be incredibly frustrating when you have the tools to produce something, but you don’t know how to utilize them effectively. This is certainly true if all you’re looking to do is save your work in a usable format that allows for transparency. As it turns out, the solution to this is quite simple. In this lesson we’ll be going over everything you need to do in order to export with transparency in Adobe Illustrator.
In short, the way to export with transparency in Adobe Illustrator is to use the PNG (“.png”) format, which is the only rasterized format that supports transparency. The JPEG format, by comparison, does not have the alpha channel required to render transparency, so any transparent areas of your artwork will default to white.
Let’s go over exactly how to do this in Adobe Illustrator.
Export With Transparency In Adobe Illustrator
The following video tutorial will briefly walk you through the entire process, step-by-step:
Continue on for the written lesson.
Table of Contents |
Step 1: Select your object using the Selection Tool
So to get us started, the first thing we will need to do is use the Selection Tool (keyboard shortcut: V) to select the object(s) we’d like to export with transparency.
Clicking on your object will select it. You’ll know you have it selected when you see the bounding box around it.
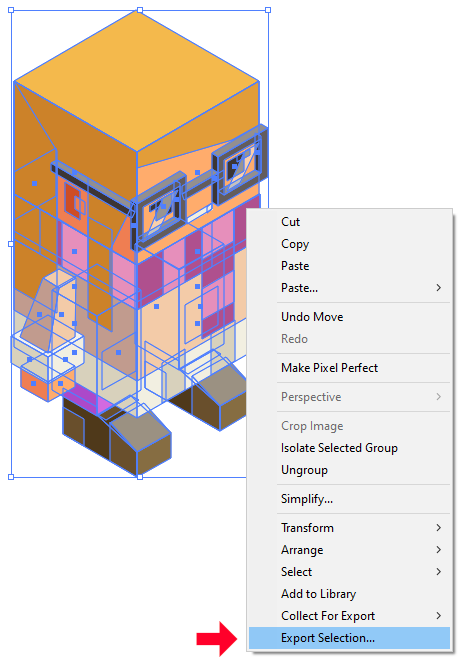
Step 2: Right-click the object and choose Export Selection
Next, right-click on the object and choose Export Selection from the menu:
This will open the Export For Screens menu.
Step 3: Use the menu interface to choose PNG from the format list
The Export for Screens menu should look something like this once opened:

The input values we’ll be paying attention to for this lesson are outlined in red above.
Name Your Document
Change the name in the box beneath the thumbnail preview that is labeled as Asset 1. This field represents the name of your document, so input whatever name you desire and press the Enter key to apply the changes.
Choose A Save Location
On the right-hand side of the menu you will see a section labeled Export To. This represents the location on your hard drive that you’d like to export your transparent image to.
Click the little folder icon to the right of the input box and choose a location to save your work to once prompted.
Select The PNG Format
On the lower right-hand side of the menu you will see the Formats selection. The format we will be exporting to is PNG as that is the format that allows for transparency. JPEG does not contain an alpha channel and therefore cannot render transparency.
Select PNG from the Format drop-down. Make sure the Suffix box is blank (erase any text that may currently be there) and set the Scale drop-down to 1x. If it is not set to 1x then the image will be exported at a different size than it currently is on your workspace.
If there are any other formats listed in the index, click the little X icons to the right of each to delete them. We only need to export a single PNG.
Step 4: Click the Export Asset button to export your work
Once your settings are in place all you have to do is click the Export Asset button and our quest to export with transparency in Adobe Illustrator will be complete.
There should be a green status bar that populates at the top of the page to indicate that your work as been successfully exported. Now navigate over to the location you exported to and open your file to ensure that everything worked as intended.
TIP: Opening your PNG with Photoshop or GIMP will place a checkerboard pattern where the transparent areas are, allowing you to see more clearly if you are indeed working with transparency.
Conclusion
In the end, exporting with transparency is simply a matter of choosing the correct file format. JPEG is great for large photos and detailed imagery, but if you need a usable raster copy for the web, PNG is the way to go.
Learn To Master The SoftwareGain a complete understanding of your favorite design apps with my comprehensive collection of video courses. Each course grants access to our private community where you can ask questions and get help when needed.
|
||||||||||||||||||||||||||||||||


Aman
I have learned many things from this article which are very important. Thanks for telling me these things.