
How To Create Animated GIFs With GIMP
How To Create Animated GIFs With GIMP https://logosbynick.com/wp-content/uploads/2021/01/create-animated-gif-gimp.png 800 470 Nick Saporito https://secure.gravatar.com/avatar/8e31bf392f0ba8850f29a1a2e833cdd020909bfd44613c7e222072c40e031c34?s=96&d=mm&r=gOne of the lesser known features of GIMP is its ability to create animations. In this tutorial I’ll be demonstrating how to create animated GIFs with GIMP so that you can create your own simple animations. This lessen in particular will be a demonstration of how you can create a simple loading spinner icon. However, once you understand the process for creating animations, you should be able to apply these principles to your own designs.
In a previous lesson I went over all of the ways in which you can edit a GIF with GIMP. Now, let’s go over how you can create your own GIF. In this tutorial you will learn how to create the following animated loading spinner:

The loading spinner — created with GIMP — loops infinitely.
The following is a written overview of the steps taken to create animated GIFs with GIMP. For complete step-by-step instructions, it is recommended that you watch the video tutorial below:
Create Animated GIFs with GIMP
| To create animated GIFs with GIMP, simply place each frame of your animation on its own layer, then export your work as a GIF file. |
The first step in our GIF creating process is to arrange a series of individual layers for each frame of the animation:
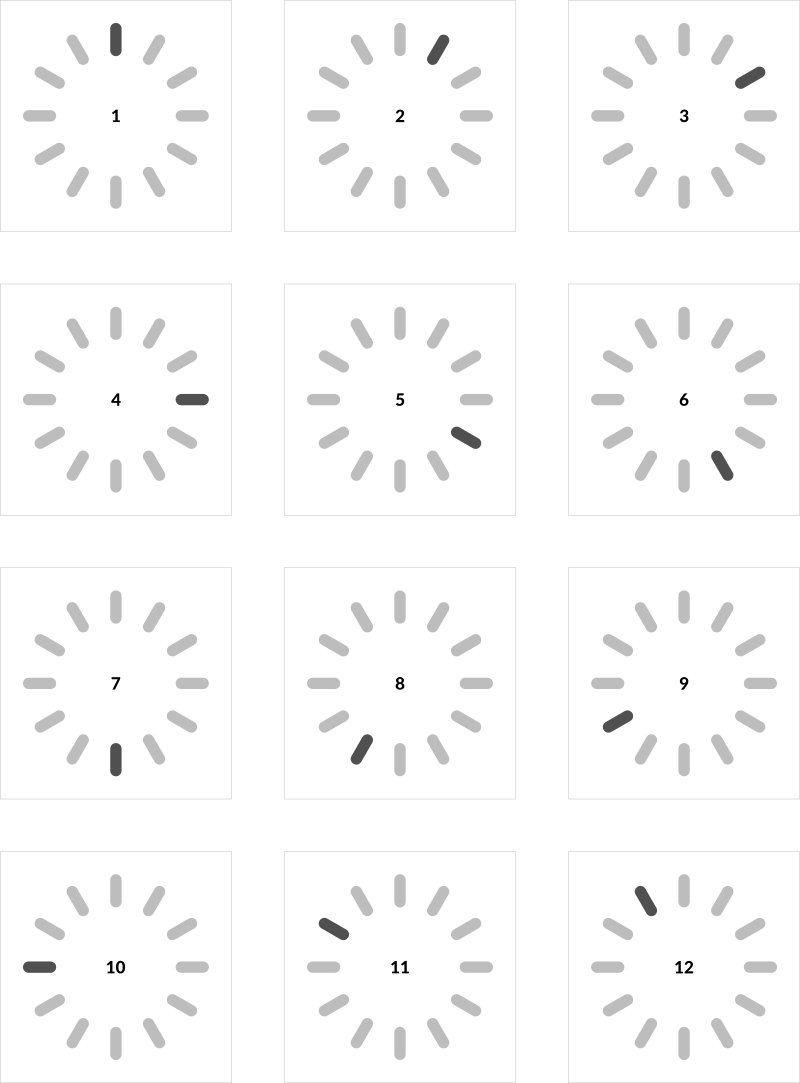
Each frame is designed independently and placed on its own layer.
To learn how to create this specific design, please refer to the video tutorial at the top of the page.
As you can see in the depiction above, the loading spinner is constructed with a series of individual illustrations where each frame has a different rectangle highlighted, and in clockwise order.
Each of these frames are placed on their own layers:
Each layer represents a frame in the animation.
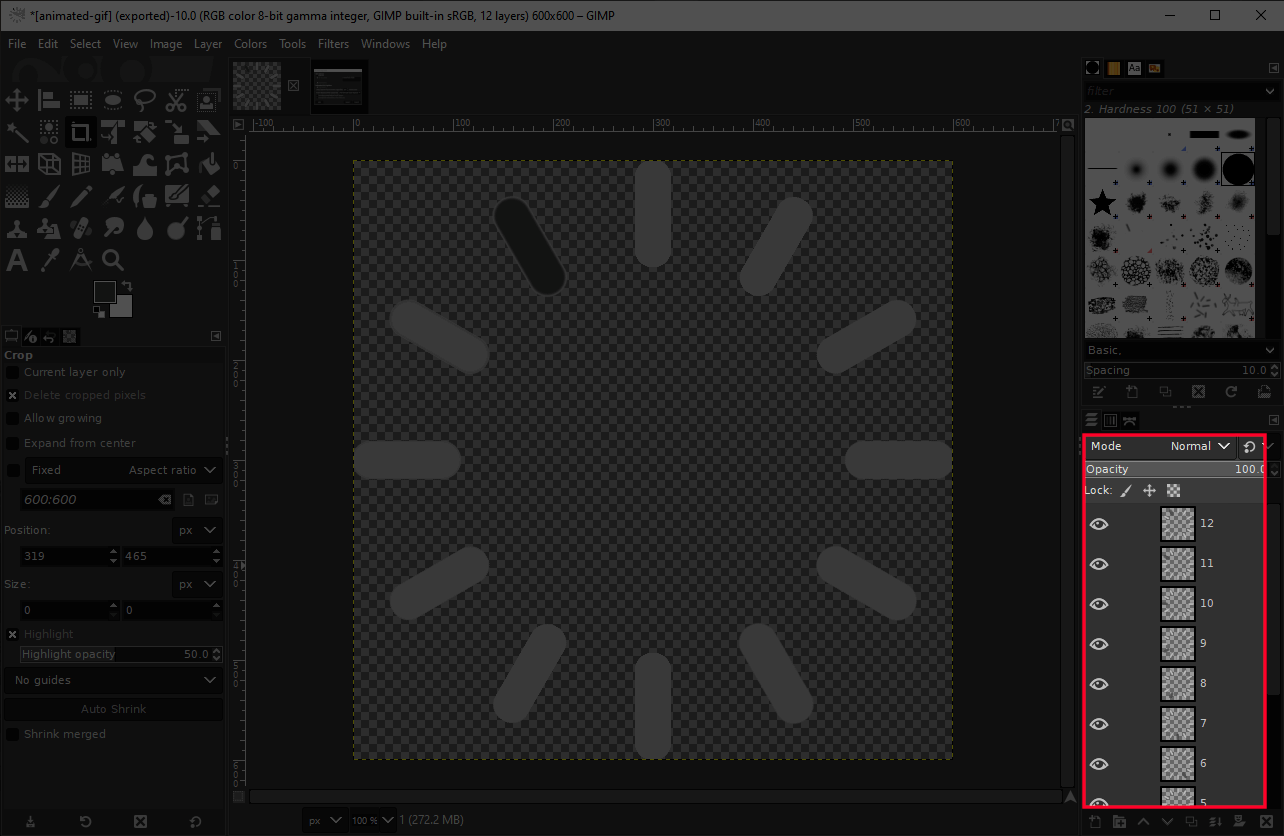
Once exported, GIMP will treat each layer as a frame in the animation. The layer on the bottom acts as the beginning frame, whereas the layer at the top acts as the end frame.
That being said, if you want your spinner to spin in a clockwise direction — like in my example — then you’ll have to arrange your frames in counter-clockwise order if working from top to bottom. If working from bottom to top, you can create them in clockwise order.
Previewing Your Animated GIF
Once you’ve arranged your layers and you’re ready to see how the animation looks, you can preview it before exporting by navigating to Filters > Animation > Playback. A window will populate allowing you to play your animation:

The Preview Animation window can give you a glimpse of how your animation will look once exported.
Make sure to pay attention to the settings at the bottom of the window. These settings allow you to dictate the frames per second (or “FPS” for short,) as well as the method for animating. For this particular design, I chose One frame per layer (replace) from the dropdown.
There’s also presets that allow you to zoom out, fast forward, rewind, and pause your animation. There’s also an indicator in the bottom-right corner of the menu that indicates which frame the animation is on as it progresses.
Exporting Your GIF
Once you’ve previewed your animated GIF and you’re happy with how it looks, it is time to save (or export) your work. This can be done by opening the Export Menu. Navigate to File > Export As or press Control + Shift + E on your keyboard.
In the export menu, be sure to select GIF Image from the Select File Type directory:
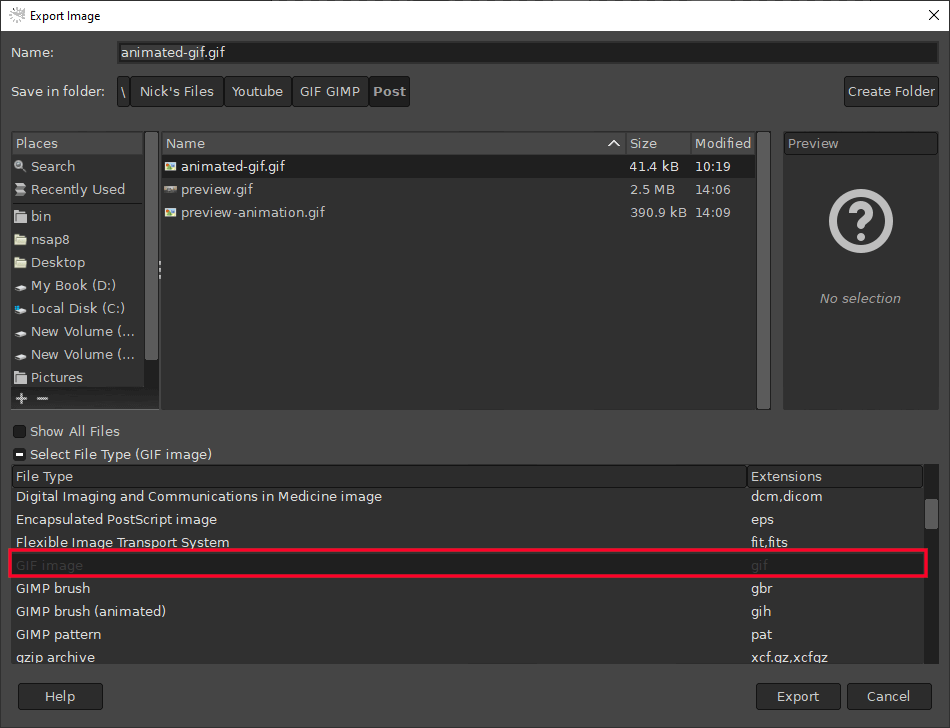
Make sure to choose GIF from the dropdown in the Export Menu.
Choose a location on your hard drive to save your work to, then click the Export button. The Export Image As GIF menu should populate:
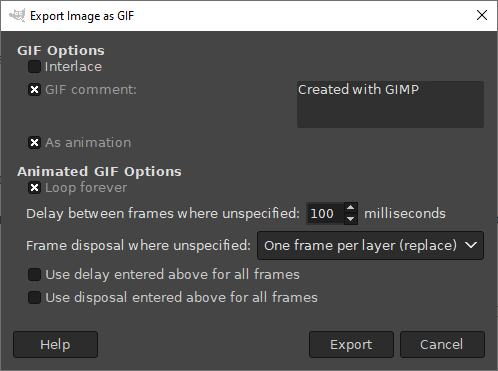
Pay special attention to the presets on the Export Image as GIF menu as it will dictate the behavior of your animated GIF once exported.
Make sure to choose the following presets:
- As animation: this will ensure that your GIF is exported as an animation, so make sure to enable this setting if you want to create animated GIFs with GIMP, otherwise your GIF will be static.
- Loop forever: leave this enabled if you’d like your GIF to loop infinitely. If left uncheck, the image will become static after its first cycle through the layers/frames.
- Delay between frames where unspecified: this dictates the speed of your animation. The lower the number, the faster the animation. The higher the number, the slower the animation. For this design I left it at 100 milliseconds.
- Frame disposal where unspecified: if you’d like each layer of your document to be its own independent frame, make sure to choose One frame per layer (replace) from the dropdown menu. Choosing Cumulative layers (combine) will make it so that each new frame is added to the previous frames, providing for a cumulative effect for your animation. For this demonstration, I left it at Replace.
The rest of the presets can be left as their defaults.
Once finished, go ahead and click Export to export your animated GIF.
How the animation looks once exported.
And that should do it for today’s tutorial. That is how you can easily create animated GIFs with GIMP. Feel free to let your imagination run wild and come up with your own unique animations!
Conclusion
Knowing how to create animated GIFs with GIMP is a simple process to understand, but it can be a bit tedious to put into application. You may find it mind numbing to have to manually draw each individual frame, which is why it’s best to take advantage of things like copy and pasting, and duplicating layers. Because of this, GIMP should probably only be used for very simple animations, like the loading spinner example. For more advanced animations you would be better served using something like Adobe After Effects or even Premiere Pro.
If you have any questions, or if any part of this lesson is unclear, simply leave a comment below. Thanks for stopping by!
Learn To Master The SoftwareGain a complete understanding of your favorite design apps with my comprehensive collection of video courses. Each course grants access to our private community where you can ask questions and get help when needed.
|
||||||||||||||||||||||||||||||||


