How To Add Brushes To Procreate In Just 3 Taps
How To Add Brushes To Procreate In Just 3 Taps https://logosbynick.com/wp-content/uploads/2021/08/how-to-add-brushes-to-procreate.png 800 470 Nick Saporito https://secure.gravatar.com/avatar/8e31bf392f0ba8850f29a1a2e833cdd020909bfd44613c7e222072c40e031c34?s=96&d=mm&r=gAs a Procreate user you may find that the stock library of brushes built in may not have everything that you’re looking for. That’s okay though, because you can easily install third-party brushes for use within the app — even if those brushes were meant for Photoshop! Knowing how to add brushes to Procreate is simply a matter of opening the Brushes menu, clicking the plus (+) icon, then choosing the Import option. In this tutorial I’ll be walking you through the entire process, step-by-step.
There are no shortage of third-party brushes available for download on the internet, whether they be free brushes or premium brushed that you need to pay for. Brush files typically come in .abr format — a file format originally intended for use in Photoshop. However, these brush files aren’t exclusive to Photoshop as they’ll work in other applications as well, such as Affinity Photo, GIMP, and even Procreate!
After completing this tutorial you will know exactly how to add brushes to Procreate, allowing you to expand your creativity by utilizing outside tools made available by other users.
How To Add Brushes To Procreate
The following video tutorial will walk you through the entire process, step by step, in less than 3 minutes:
Continue on for the written instructions.
Step 1: Download a brush that you’d like to install
In order to add brushes to Procreate we must first download a brush to install.
You can download free brushes from the following websites:
Just be sure to check the licensing information for each brush you download! Just because a brush is free to download, that doesn’t always mean you can use it however you’d like. Sometimes free assets, such as brushes, are only free under the condition that you use it for personal (and not commercial) use. Commercial use may require that you purchase a license.
If you’re looking for some high-end premium brushes then check out the following marketplaces:
Once you’ve found a brush that you’d like to add to Procreate, download it and navigate to the location on your hard drive in which you saved it.
The download will have come in one of two formats: either a .abr file or a .zip file.
Step 2: Unzip the folder the brush came in
Once you’ve downloaded your brush you must first make sure you have the correct file type before you can add it to Procreate.
If your download is a .abr file then you can process to step 3. If your download is a .zip file then tap on it to unzip it.
This will extract the zip folder:
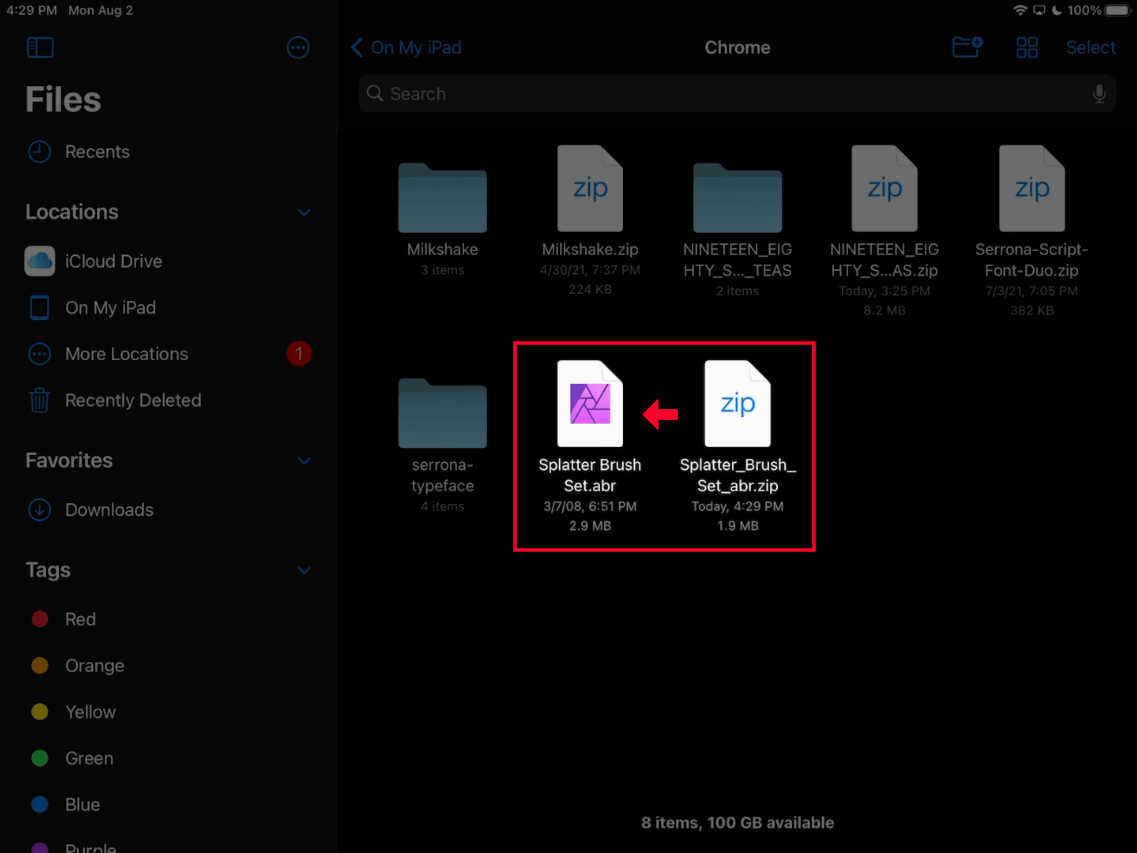
In many cases, your downloaded brush will come in a ZIP folder, in which case you’ll need to extract it before you can install the brush.
We will be navigating to this location in just a minute, so try to remember exactly where you have your brush saved.
Step 3: Open the Brushes menu in Procreate and tap the plus icon
With your newly-downloaded brush ready to be installed, it’s now time to add it to your Procreate library so you can draw with it.
In Procreate, open the Brushes menu by tapping the brush tool near the top-right of your screen:
The plus (+) icon in the top-right of the menu will allow you to add new brushes, whether it be to create your own brush or install third-party brushes you’ve downloaded.
Within the Brushes menu you should see a plus (+) icon towards the top-right of the menu. This is the button that you need to tap in order to add brushes to Procreate, so go ahead and tap it.
Step 4: Choose the Import option and locate the brush file on your hard drive
Once you’ve tapped the add brush icon, a menu will populate on your screen that allows you to create your own brush. However, seeing as how we’re looking to add a third-party brush rather than create our own, we’re going to disregard this menu and tap the Import button towards the top-right of the menu:
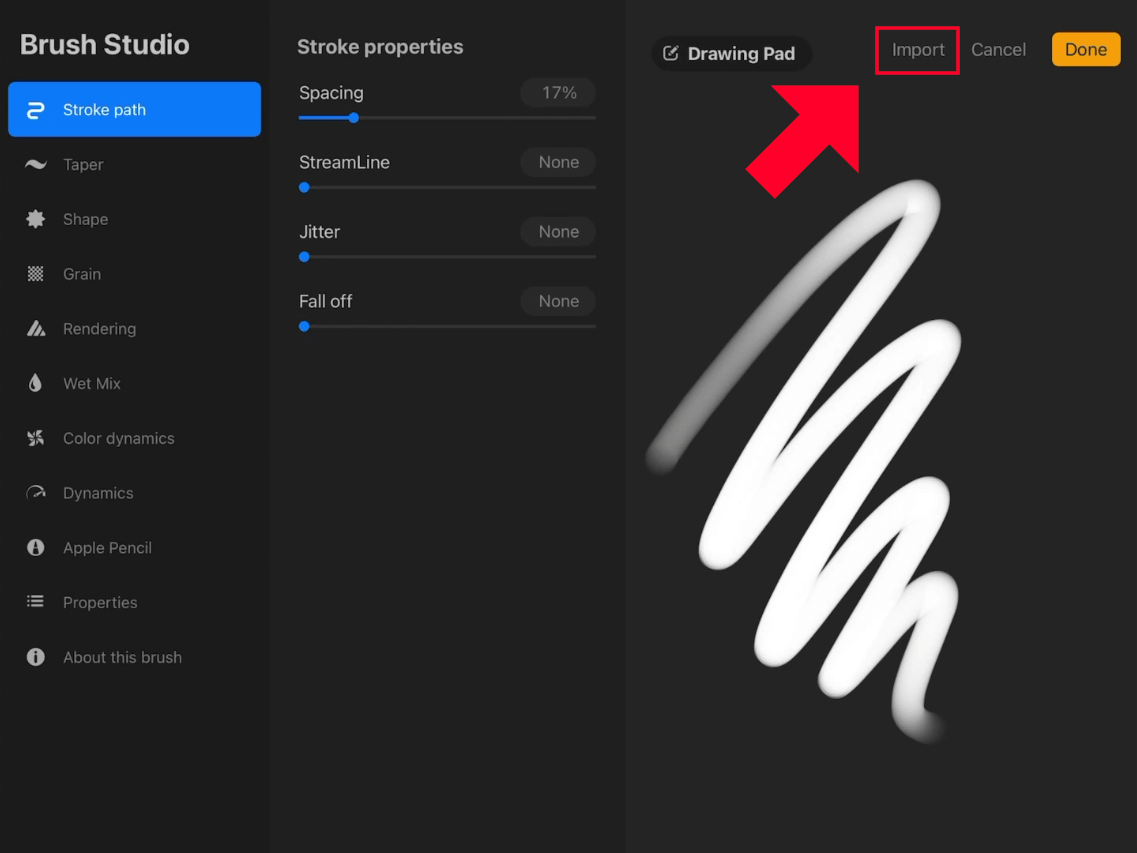
The Import text label near the top-right will allow you to import a brush into Procreate.
Once selected, you will be prompted to choose a file on your hard drive to install.
Navigate to the location that you saved your downloaded brush to and select it. Remember: you are looking for a .abr file.
It may take a few seconds for it to fully import, so give it a minute to do its thing.
Step 5: Check your Brushes library to confirm that the brush has been added to Procreate
Once your brush is finished importing, open your Brushes Library to confirm that your brush has been installed:
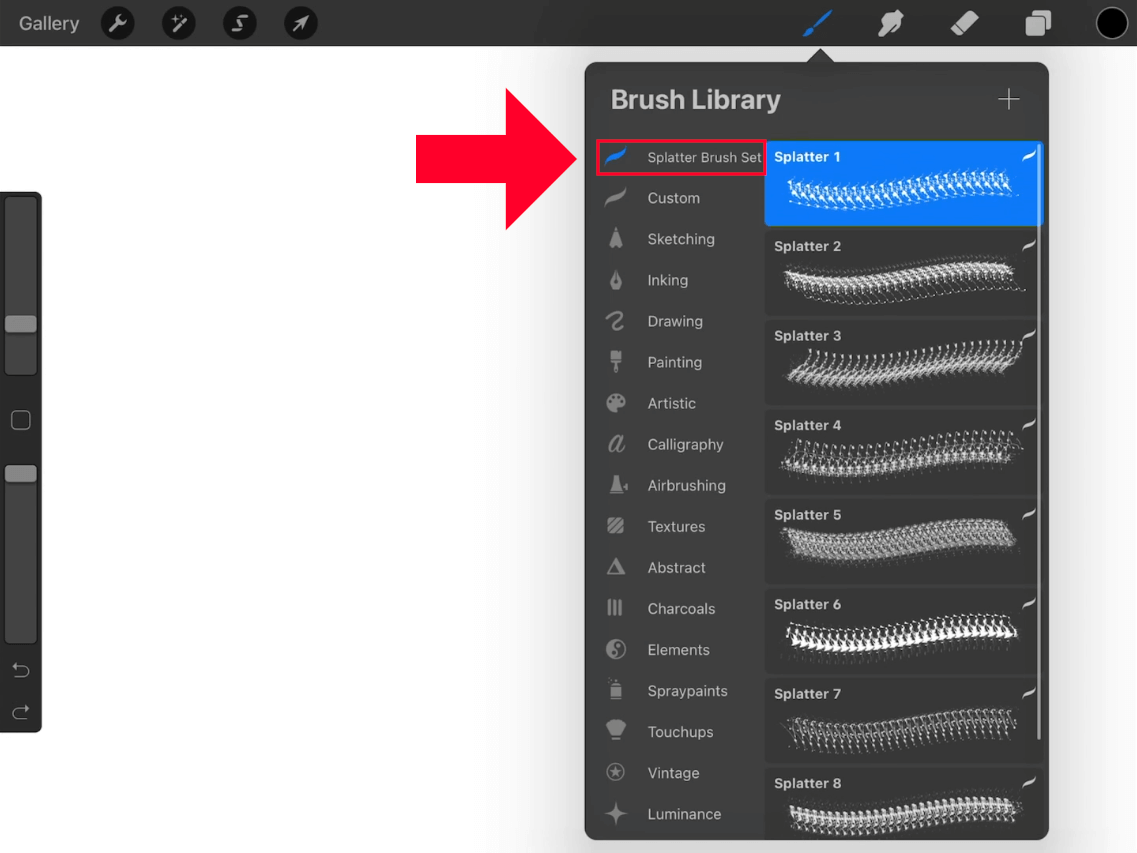
Your newly-installed brush will be indexed at the top of the Brush Library menu.
As you can see, the downloaded brush is located at the top of the list in the Brushes Library. It will have its own category in the library, and when you open the category, all of the individual brushes that may have been included are there for you to choose from.
You can now select any of them to begin drawing!
Tips & Precautions
There’s a few things you should keep in mind whenever you add brushes to Procreate. These tips and pointers will (hopefully) make this a smoother experience for you:
- The name of your brush file that you download will be the name that is displayed in your Brushes Library. So if the file name is something unsightly, like a string of random characters for example, then you may want to consider changing the name of the file for organization purposes.
- You can delete the brush file from your hard drive once you’ve installed it in Procreate. Once your brush is added to Procreate, a separate copy of it exists within the application. This means that you can go ahead and delete the original file you downloaded if you’d like to preserve disk space and keep your files neat and organized.
- Brushes come in a variety of formats. Although .abr is the most commonly-used file format for brushes, other formats — such as .brush and .gbr are also used at times. If you’re unsure whether or not a brush file format will work in Procreate, try installing anyway to see if it does.
How To Delete A Downloaded Brush
Now that we’ve gone over how to add brushes to Procreate from third-party sources, let’s go over how to delete those brushes in case you’re done with them and would rather they not be taking up disk space.
To delete a brush in Procreate, open the Brushes Library menu and tap (twice) on the brush you’d like removed.
A fly-out menu will populate. Simply tap the Delete option to remove that brush. You may have to tap the brush twice to make this menu appear.
It should be noted that this method can be used to delete individual brushes as well as entire categories of brushes. So if you want to remove it altogether then you will probably want to deleted the category from the index, which will then delete all of the individual brushes as well.
Conclusion
One of my favorite things about Procreate is how brilliantly simple it is. The menus and user interface are structured in such a way that makes it friendly to newcomers who may not be familiar with traditional design software. And when it comes to basic tasks, like knowing how to add brushes to Procreate, the process couldn’t be simpler.
Many other applications require that you manually install brushes by navigating through system files and placing them in a designated “brushes” folder that you have to search for. That isn’t the case with Procreate, though! You are always just 3 taps away from importing brushes of your choosing and letting your creativity run wild.
If you have any questions or need clarification for any of the steps taken in this lesson, simply leave a comment below.
Learn To Master The SoftwareGain a complete understanding of your favorite design apps with my comprehensive collection of video courses. Each course grants access to our private community where you can ask questions and get help when needed.
|
||||||||||||||||||||||||||||||||


