How To Add A Drop Shadow in Illustrator
How To Add A Drop Shadow in Illustrator https://logosbynick.com/wp-content/uploads/2021/04/drop-shadow-illustrator.png 800 470 Nick Saporito https://secure.gravatar.com/avatar/8e31bf392f0ba8850f29a1a2e833cdd020909bfd44613c7e222072c40e031c34?s=96&d=mm&r=gAdding drop shadows to your designs is a great way to give them some depth and make them appear as if they’re jumping off of the page. In this tutorial I’ll be demonstrating how you can add a drop shadow in Illustrator — whether it be to text, a shape, or multiple objects, so that you can give your designs a multi-dimensional look.
Adding drop shadows in Illustrator is simply a matter of selecting your object and navigating to Effect > Stylize > Drop Shadow and adjusting the settings to your liking. However, we’re also goin to go over tweaking your drop shadow further by adjusting things like the size and softness of the shadow, the color of the shadow, as well as its placement and direction. Finally, we’ll be going over how to edit convert the drop shadow to a vector path so that you’ll be able to work with it cross-platform.
Add A Drop Shadow In Illustrator
| To add a drop shadow in Illustrator, select your object and navigate to Effect, Stylize, and choose Drop Shadow. Use the Drop Shadow menu to adjust the settings to your preferences, then click OK to apply the changes. |
The following video tutorial will walk you through the process of adding, editing, and removing drop shadows in Adobe Illustrator:
Continue on for the written instructions.
Table Of Contents |
Add A Drop Shadow Using The Effects Menu
In order to add a drop shadow in Illustrator, we first need an object to apply it to. Illustrator lets you apply drop shadows to single objects or to multiple objects at once, and it works the same either way.
For this demonstration I will applying a drop shadow to the following avatar design, which consists of a series of multiple objects:

Click to enlarge
If you’d like to follow along with this lesson then you can grab a free copy of these vector avatars here.
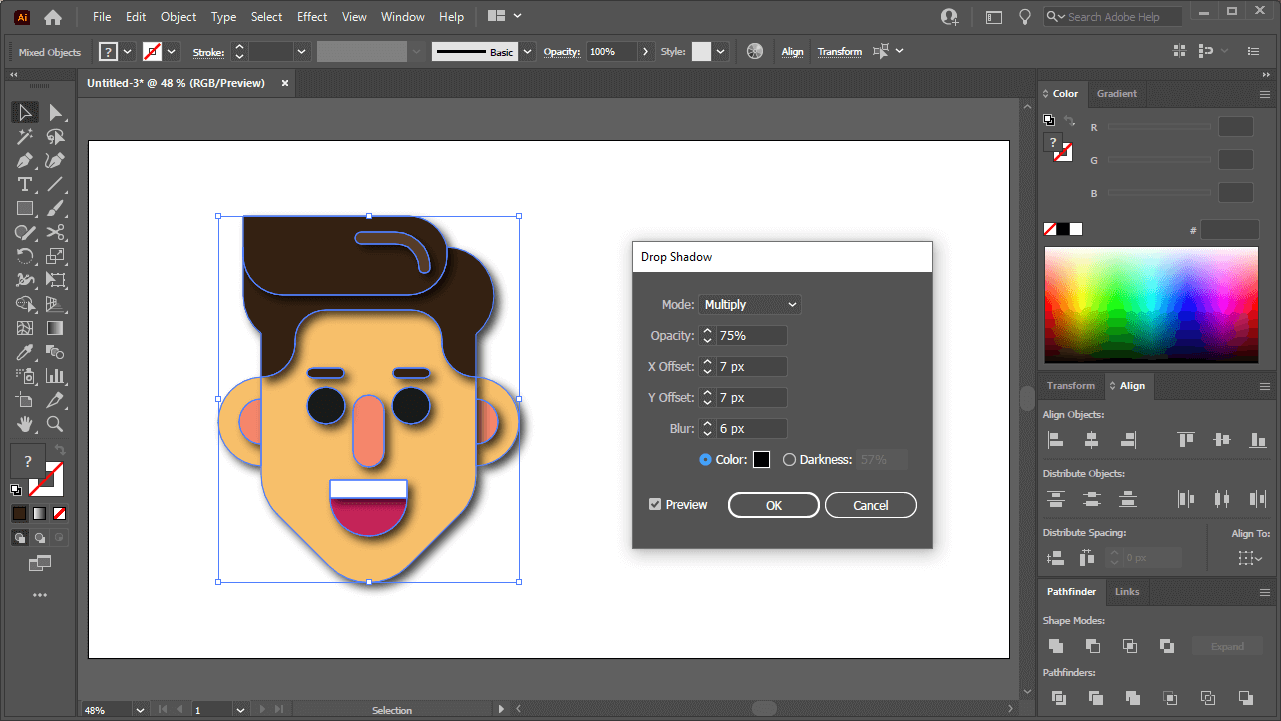
The shadow will be applied using the Effects menu, which can be located by navigating to Effect > Stylize > Drop Shadow.
The Drop Shadow menu will populate on your screen, and a preview rendering of how your shadow will look once applied will be generated as well:
The drop shadow applied to your selection is only a preview. It will not be applied until you click OK.
If you are satisfied with the look and feel of your drop shadow then you can press OK to apply it. To adjust its properties further, continue on to the next steps.
Adjust The Drop Shadow Properties
Within the Drop Shadow menu is an assortment of adjustments you can make to the appearance of your drop shadow. Let’s go over some of these properties.
Blend Modes
The Mode preset allows you to change the blend mode of your drop shadow. In short, blend modes dictate how an object interacts with another object that is positioned beneath it. You can learn more about all of the different types of blend modes here, or you can cycle through each blend mode yourself to see how it affects the appearance of your shadow.
By default, the blend mode used for drop shadows is Multiply, so we’ll be leaving that as is for this demonstration.
Opacity
The Opacity preset allows you to control how transparent or opaque your drop shadow is.
Increasing the opacity will make it so that the background does not show through your drop shadow, making it more defined. Decreasing it will reduce its transparency, allowing more of the background to show through.
X and Y Offset
Both the X Offset and Y Offset settings allow you to change the position of your drop shadow on the artboard.
Changing the X Offset will move your shadow left and right, whereas the Y Offset will move your shadow up and down.
Blur
The Blur setting controls the size, softness and definition of your drop shadow.
Increasing the blur will make your drop shadow larger, softer, and less visible. Decreasing it will make it smaller, more defined, and more visible.
Color
The Color preset allows you to change the color of your drop shadow in Illustrator. Clicking on it will open a color picker for you to choose your color:

In addition to the color picker, you can choose your drop shadow’s color based on any of the following properties:
- HSB
- RGB
- CMYK
- HEX(#)
You can also click the Color Swatches button to choose a color based on any saved swatches you may have.
Darkness
Finally, the Darkness preset is an alternative to the Color option. When selected, the color of your drop shadow will be based on a slightly darker shade of the selected object’s fill color. This can give your shadow a more realistic look.
How To Edit A Drop Shadow
Now that we’ve added a drop shadow in Illustrator, let’s go over how you can edit a drop shadow after it has already been applied.
To edit a drop shadow in Illustrator, select the object(s) that the shadow has been applied to, and open your Appearance menu by navigating to Window > Appearance.
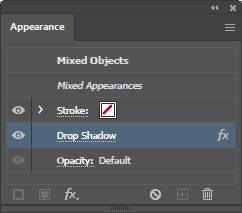
The Appearance menu is an index of all of your selected object’s style properties.
Within the Appearance menu, you should see a list item titled Drop Shadow. Clicking on the name will open the Drop Shadow menu so you can edit its properties the same way you did when you created it.
Once you are satisfied with your changes, click OK to apply them.
How To Delete A Drop Shadow
To delete a drop shadow in Illustrator, select the object that the shadow is applied to and open the Appearance menu by navigating to Window > Appearance.
Within the Appearance menu, you should see your drop shadow listed. Simply click on the layer to select it, then click the little trashcan icon in the bottom-right corner of the menu to delete it.
Convert A Drop Shadow To A Path
Drop Shadow is an Illustrator-specific effect, meaning it’s only usable in Illustrator. Converting your drop shadow to a vector path will allow you to save your artwork in various vector formats so it can be opened and worked on in other vector design applications.
To convert a drop shadow to a vector path in Illustrator, select the object that the shadow has been applied to and navigate to Object > Expand Appearance. Then, navigate to Object > Ungroup.
This will separate your drop shadow from the object it was applied to, making it an independent shape of its own.
Conclusion
Thanks to some of the Effects features, adding a drop shadow in Illustrator is a simple and convenient process. In other applications, this needs to be done manually by creating duplicates of objects, blurring them, and placing them beneath the original.
If you have any questions, or if any part of this lesson was unclear, simply leave a comment below.
Learn To Master The SoftwareGain a complete understanding of your favorite design apps with my comprehensive collection of video courses. Each course grants access to our private community where you can ask questions and get help when needed.
|
||||||||||||||||||||||||||||||||


Leave a Reply