How To Add Text In Procreate | The Complete Guide
How To Add Text In Procreate | The Complete Guide https://logosbynick.com/wp-content/uploads/2021/04/add-text-in-procreate.png 800 470 Nick Saporito https://secure.gravatar.com/avatar/8e31bf392f0ba8850f29a1a2e833cdd020909bfd44613c7e222072c40e031c34?s=96&d=mm&r=gGetting started in Procreate, one of the most essential functions you can learn is adding text to your images. In this tutorial I’ll be demonstrating how to add text in Procreate and edit its properties, such as font, style, size, color and more.
Adding text in Procreate is simply a matter of tapping the little wrench icon in the top-left corner of the screen, navigating to Add, and selecting Add Text from the list. However, if you’d like to change the style and properties of the text, there are more steps involved.
Working with Text In Procreate
| To add text in Procreate, tap the wrench icon in the top-left corner of the screen. Navigate to Add and select Add Text from the list. |
The following video tutorial will walk you through the process of adding text and editing text in Procreate:
Continue reading for the written instructions.
Table Of Contents |
How To Add Text In Procreate
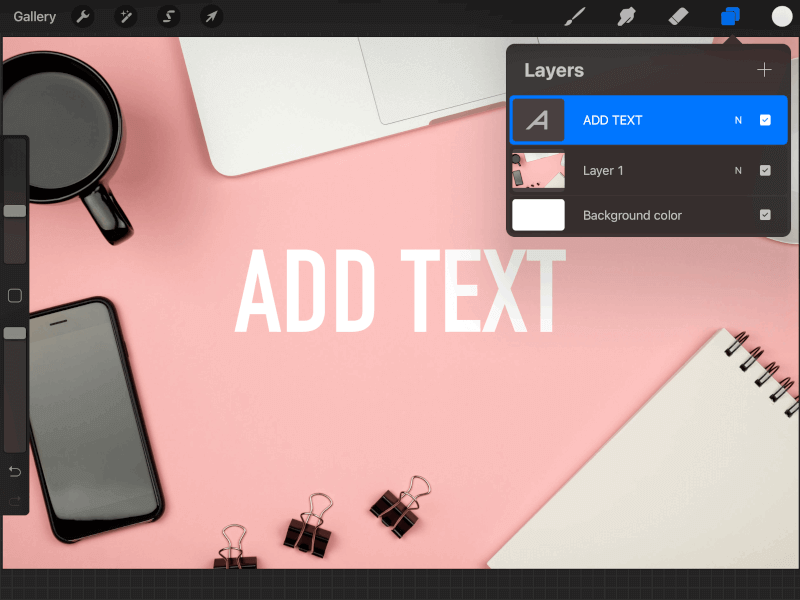
Let’s get started with adding text. In Procreate, each text object that you apply to your canvas is delegated to its own layer.
Add Text
To add text in Procreate, tap the wrench icon in the top-left corner of the screen, navigate to Add and select Add Text from the list:
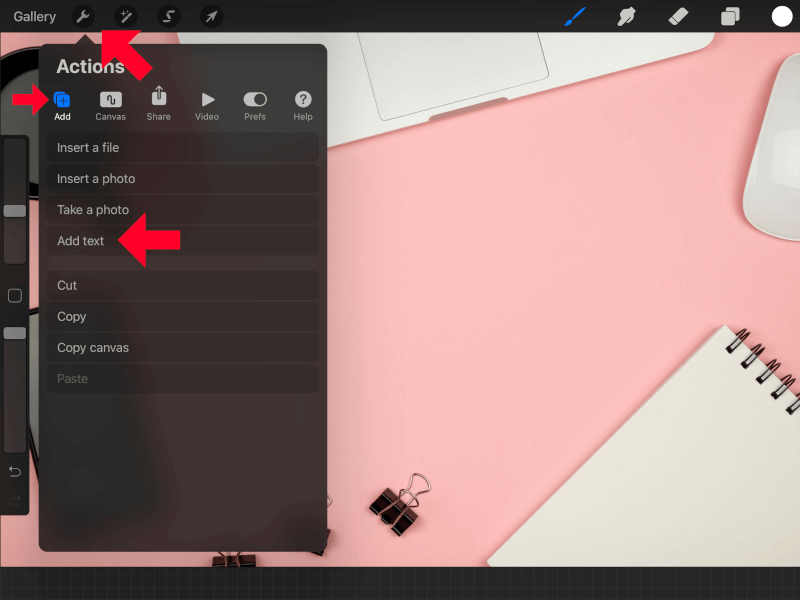
The location of the menu that allows you to add text is indicated with red arrows.
Placeholder text will be added to your document. Use the iPad’s keyboard to type in your text:

Change Text Color
By default, the color of your text will be determined by the color that is currently selected in the Color Panel. Upon startup, the default color is black. So, unless you change this color before adding your text, it will be black.
If you’d like to change the color of your text in Procreate, triple-tap the text to make sure you have it all selected. Then, open the Color Panel in the top-right corner of the screen to select your color:
You can choose the color of your text before adding it, or you can change the color after its been created by triple-tapping it to select all.
How To Move Text
To move your text to different positions of the canvas, simply tap and drag anywhere outside of the text’s bounding box. The location of the text will follow your hand movement:

Change The Bounding Box
The bounding box is a thin blue outline that wraps around your text item. This box represents the boundary that your text will be contained within.
To change the size of the text’s bounding box, use the handles on either side of it — represented as little blue circles. Tapping and dragging them will allow you to increase or decrease the width of the bounding box:
This can be useful for determining whether you’d like your text to be on one line or on multiple lines. It will also be necessary for you to increase the size of the bounding box if you’d like to make your text bigger.
How To Edit Text In Procreate
Now that we’ve gone over how to add text in Procreate, let’s work on editing the text further.
To edit text in Procreate, open the Layers menu in the top-right corner of the screen, tap on the text layer to select it, and close out of the Layers menu.
Selecting the text in the Layers menu will allow you to edit your text.
Once closed, you should be able to edit your text using the keyboard. Triple-tap on the text to make sure you have all of it selected before proceeding. Then, tap on the font name in the options menu that populates directly above your text:
This will open up the Edit Style menu:
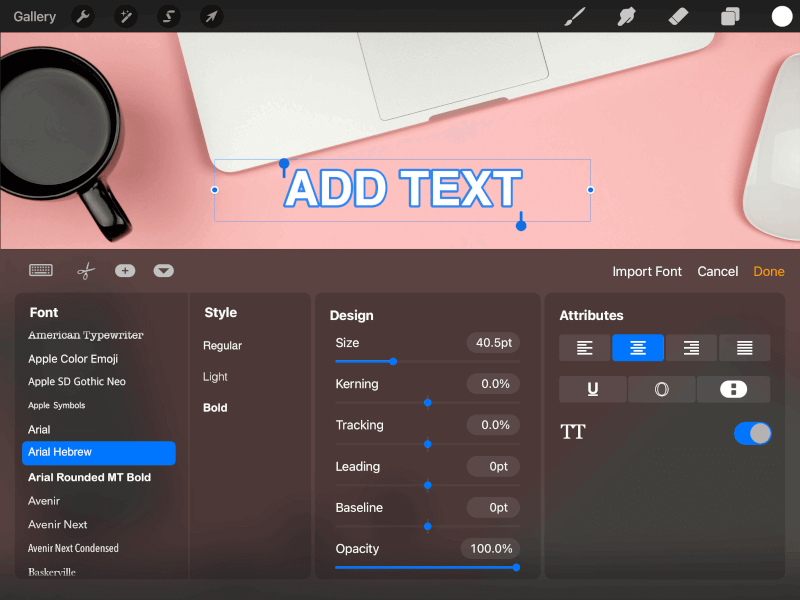
This is the menu that is used to edit all of your text’s properties.
Change Text Size
To make text bigger in Procreate, use the Size slider in the Edit Style menu. Sliding it to the right will enlarge your text, whereas sliding it to the left will make the text smaller.
It should be noted that when enlarging your text, you may need to increase the size of its bounding box in order to accommodate the increase in size.
Change Text Font
Whenever you add text in Procreate, a default font will be used. You can change the font of your text using the Font menu, contained within the left-hand side of the Edit Style menu.
In addition, you can also change the Style of the text by making it bold, light, regular, or italic. Of course, the ability to do this will depend on the font you’ve chosen and whether or not those variations have been included.
Change Text Style
To edit your text further, you can use the Design panel within the Edit Style menu to change the following properties of your text:
- Kerning: This allows you to increase or decrease the spacing between two letters. The letters affected will be determined by where your cursor is placed.
- Tracking: This allows you to increase or decrease the spacing between all of the letters.
- Leading: Leading represents the space between lines of text. So, if your text is on multiple lines, you can increase or decrease the spacing between each line of text using this setting.
- Baseline: Baseline represents the horizontal axis on which your text is placed.
- Opacity: This setting allows you to make your text transparent (or partially transparent.) Sliding it to the left will reduce the opacity, whereas sliding it to the right will increase it.
Finally, you can use the Attributes panel to make the following adjustments:
- Align/Justify: With this setting you can align your text to the left, to the center, to the right, or make it so that the text runs all the way to the edges of the bounding box.
- Underline: When enabled, an underline will be applied to your text.
- Outline: This setting allows you to outline text in Procreate. Enabling it will remove the solid fill from your text and make it into an outline instead.
- Vertical text: Enabling this setting will make it so your text is typed out vertically instead of horizontally.
- All caps: Enabling this setting will force your text to be in all caps. Disabling it will make the text be all lowercase.
Delete Text In Procreate
Finally, to delete your text in Procreate, open the Layers menu in the top-right corner of your screen.
Once opened, locate the layer that your text is located on and slide it to the left. This will reveal a menu of options:
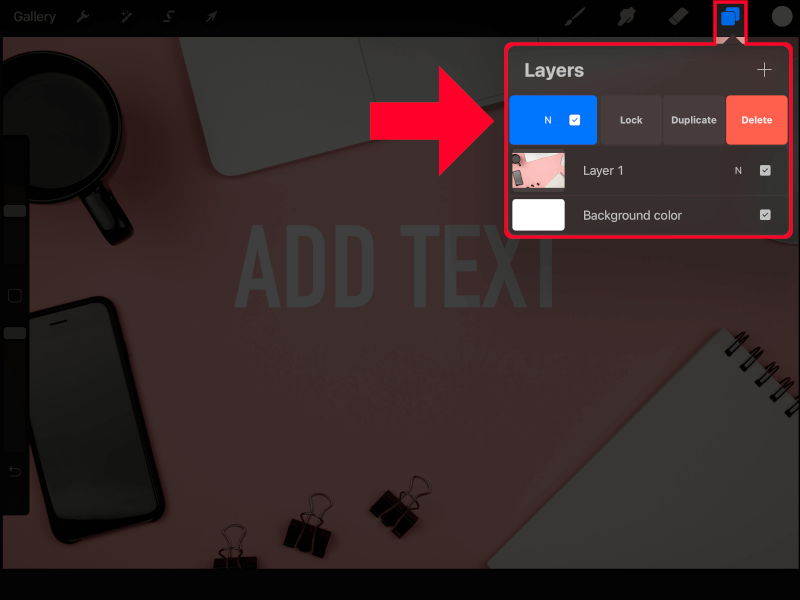
Tap the red Delete button to delete your text.
You can also use this menu to duplicate your text, as demonstrated in the video tutorial.
Conclusion
Thanks to the advancement of mobile design technology, we can now use applications like Procreate and Affinity Designer to make all kinds of neat alterations to images, like adding text. Knowing how to add text in Procreate is just the tip of the iceberg though. Thanks to some of the additional features in Procreate, we can do all kinds of neat things with text, such as: add drop shadows, change its perspective, fill it with an image, make a dripping paint effect, and more. Stay tuned for more Procreate tutorials if you’d like to learn how!
If you have any questions, or if any part of this lesson was unclear, simply leave a comment below.
Learn To Master The SoftwareGain a complete understanding of your favorite design apps with my comprehensive collection of video courses. Each course grants access to our private community where you can ask questions and get help when needed.
|
||||||||||||||||||||||||||||||||


