How To Trace An Image To Vector with Illustrator | Color and Monotone
How To Trace An Image To Vector with Illustrator | Color and Monotone https://logosbynick.com/wp-content/uploads/2020/08/trace-an-image-to-vector-with-illustrator.png 800 470 Nick Saporito https://secure.gravatar.com/avatar/8e31bf392f0ba8850f29a1a2e833cdd020909bfd44613c7e222072c40e031c34?s=96&d=mm&r=gIn this tutorial I’ll be demonstrating how to trace an image to vector with Illustrator, both in color and in monotone. For this lesson I’ll be using the Image Trace feature in Adobe Illustrator, which allows us to make auto tracings of images as opposed to manually tracing them with something like the Pen Tool.
The following is a written overview of the steps taken to create these automatically generated vector tracings. There’s a video tutorial below where I walk you through each step in case you find it easier to learn by watching rather than reading.
Post Contents
Here’s an outline of the tutorial in case you’d like to skip to specific segments.
Monotone Tracing
- Step 1: Remove saturation and increase contrast of the photo in Photoshop
- Step 2: Import the adjusted photo into Illustrator
- Step 3: Make a vector tracing of the photo using the Image Trace feature
- Step 4: Expand the image to finalize your vector tracing and edit it further
Color Tracing
- Step 1: Import your photo into Illustrator
- Step 2: Make a vector tracing of the photo, in color, using the Image Trace feature
- Step 3: Expand the image to finalize your vector tracing and edit it further
Trace An Image To Vector with Illustrator: Monotone Tracing
Let’s get started with a demonstration on how to trace an image to vector with Illustrator in a simple monotone, or black and white, format.
Step 1: Adjust Image in Photoshop
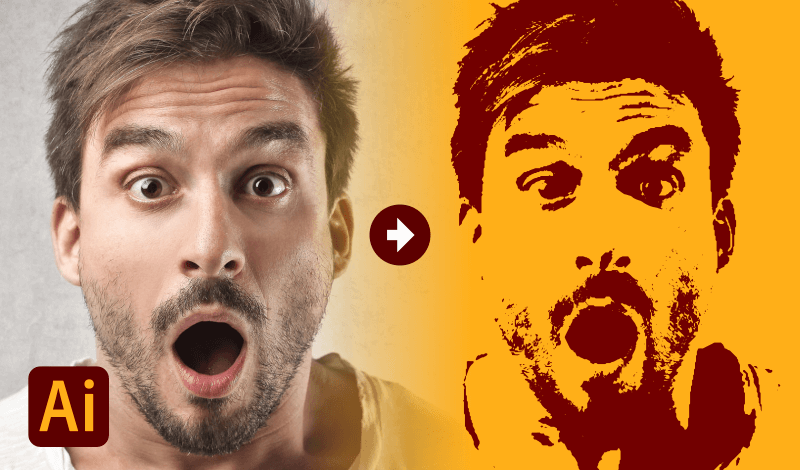
For this demonstration I’ll be using the following example image to create my vector tracing.

In order to get a more accurate tracing of my image, I’m first going to open the image with Photoshop so that I can do the following…
- Remove the saturation
- Increase the contrast between the dark and light areas
The reason why I’m doing this is so that I can get a more accurate tracing. The way that the Image Trace feature works in Illustrator is that it scans your image and references the dark and light areas to determine what to trace. If we’re able to help define those areas a little better, we’ll get a more accurate tracing.
I’d just like to note that this step is completely optional. If you’d rather just trace your image as-is, then feel free to skip to step 2. But if you’d like to get the most accurate tracing possible, read on.
Remove Saturation
Open your image with Photoshop and use the Hue/Saturation Adjustment layer to remove the saturation.
In the Hue/Saturation menu, take the Saturation slider and bring it all the way to the left. This will strip the color from your image and make it easier to separate the darker areas from the lighter areas.

Adjust Color Curves
Now we’re going to increase the contrast between the dark and light areas of the image by using the Curves adjustment.

In the Curves menu, take the node at the bottom-left and slide it to the right to increase the intensity of the dark areas in your image. Then, take the node to the top-right and slide it to the left to increase the intensity of the lighter areas of your image.
The degree to which you should make these adjustments will depend entirely on your image. What works for my example image won’t necessarily work for your image if it’s different, so be sure to experiment with it a bit.
Here’s how our adjusted image will look once finished.

This will help the Image Trace feature create a more accurate vector tracing of the photo. The image can now be exported and then imported into Illustrator.
Step 2: Import Image Into Illustrator
Now we’re going to import our image into Illustrator. To do so, go to File > Place. You will then be prompted to browse for an image to import into your document.
Step 3: Trace Image
To trace an image to vector with Illustrator, open up the Image Trace window by navigating to Window > Image Trace. If the menu interface is grayed out then just deselect your image and then select it again.
Toggle the Preview setting to get a preview of your vector tracing, then use the settings to adjust your tracing as needed.

The settings to adjust are as follows….
- Threshold
- Paths
- Corners
- Noise
Tweak all of these settings until you get a vector tracing you’re happy with. The settings you should use will vary by image. The settings I used in my example won’t necessarily work for you if you’re using a different image, so be sure to experiment with them a bit.
Once you’re happy with how your vector tracing looks, toggle off the Preview and click Trace to create your vector tracing.
Step 4: Expand Image
Now it’s time to finalize your vector tracing so that you can edit it and work with it further. To do so, select your tracing, then navigate to Object > Expand and click OK. Then, navigate to Object > Ungroup. Just a heads up: you will have to ungroup the tracing twice, so make sure to navigate to Ungroup a second time.
You will now have a vector tracing of your image that you can manipulate as if it were any other vector object.

These sorts of tracings can be used for logos, emblems, badges, and used as designs for merchandise like t shirts and hats.
Trace An Image To Vector with Illustrator: Color Tracing
Now let’s go over how to make a vector tracing of an image in color. This works very similarly to the monotone variation, only we don’t have to adjust the image in Photoshop first, and we’ll be using a different setting in the Image Trace feature.
Step 1: Import Image Into Illustrator
Import your image into Illustrator by navigating to File > Place. You will then be prompted to choose a file to import.
For this demonstration I’ll be using the same example image that I used for the previous demonstration.
Step 2: Trace Image
To create your vector tracing in color, select your image and navigate to Window > Image Trace. If the menu interface is grayed out then just deselect your image and then select it again.
To trace your image in color rather than black and white, make sure to choose the Auto-Color setting at the top of the menu. It’s the icon all the way to the left. Then click Preview to see how your tracing will look.

Just like we did in the previous demonstration, we’ll have to tweak the settings to our liking. The primary setting to pay attention to is Colors. The higher the number of colors, the more photo-realistic your vector tracing will look. The less colors, the more cartoon-ish it will look.
Adjusting these settings may freeze up your computer for a moment because of how CPU-intensive this is, so try to be patient.

Once you’re satisfied with the preview, you can create the tracing by deselecting Preview and clicking Trace.
Step 3: Expand Image
To finalize the design so that you can work with it further, navigate to Object > Expand and click OK. Then, navigate to Object > Ungroup. You will have to ungroup the image twice, so make sure to navigate to Ungroup a second time.
You will now be able to alter your color vector tracing however you’d like.
Conclusion
This concludes our tutorial on how to auto trace an image to vector with Illustrator, in both monotone and in color. In the future I will likely do a more advanced tutorial where I demonstrate how to make a manual tracing that provides for even more accuracy.
If you have any questions simply leave a comment below. As always, thanks for watching!
Learn To Master The SoftwareGain a complete understanding of your favorite design apps with my comprehensive collection of video courses. Each course grants access to our private community where you can ask questions and get help when needed.
|
||||||||||||||||||||||||||||||||


Leave a Reply