How To Separate An Image Into Layers In Inkscape
How To Separate An Image Into Layers In Inkscape https://logosbynick.com/wp-content/uploads/2022/03/inkscape-separate-into-layers.png 800 470 Nick Saporito https://secure.gravatar.com/avatar/8e31bf392f0ba8850f29a1a2e833cdd020909bfd44613c7e222072c40e031c34?s=96&d=mm&r=gLayering makes for an excellent way to organize your design elements when working on complex vector designs with lots of objects. What if you’re working in Inkscape and you’ve already created the entirety of your design on a single layer though? Unfortunately there is no direct way to separate an image into layers in Inkscape. That’s okay though, because this can be done manually using the cut and paste function. In this tutorial we’ll be going over a simple workflow for achieving this.
By comparison, Adobe Illustrator has a feature built in called Release To Layers which allows you to automatically separate all of the elements on your workspace into individual layers of their own. Inkscape has no such feature though, so we’ll have to do this manually using the cut and paste system function.
There is one small caveat though — “pasting” is not a suitable option if you need to ensure that your design elements remain in place and aren’t randomly repositioned on your canvas. Because of this we will use Paste In Place instead. Let’s get started!
Separate An Image Into Layers In Inkscape
The following video tutorial will walk you through the entire process, step by step:
If you’d like to follow along with what I’m doing in this tutorial then you can download the example design here: example-design.zip
Continue on for the written tutorial.
Table of Contents |
Step 1: Separate your design elements into groups
In order to separate an image into layers in Inkscape we must first determine which design elements are going to be place where.
You can choose to separate your elements individually, or you can make them into groups as I did for this demonstration:

Each of the design elements in this example design have been segmented into one of three groups. Each of these three groups will be cut and pasted into new layers that we will create in the next step.
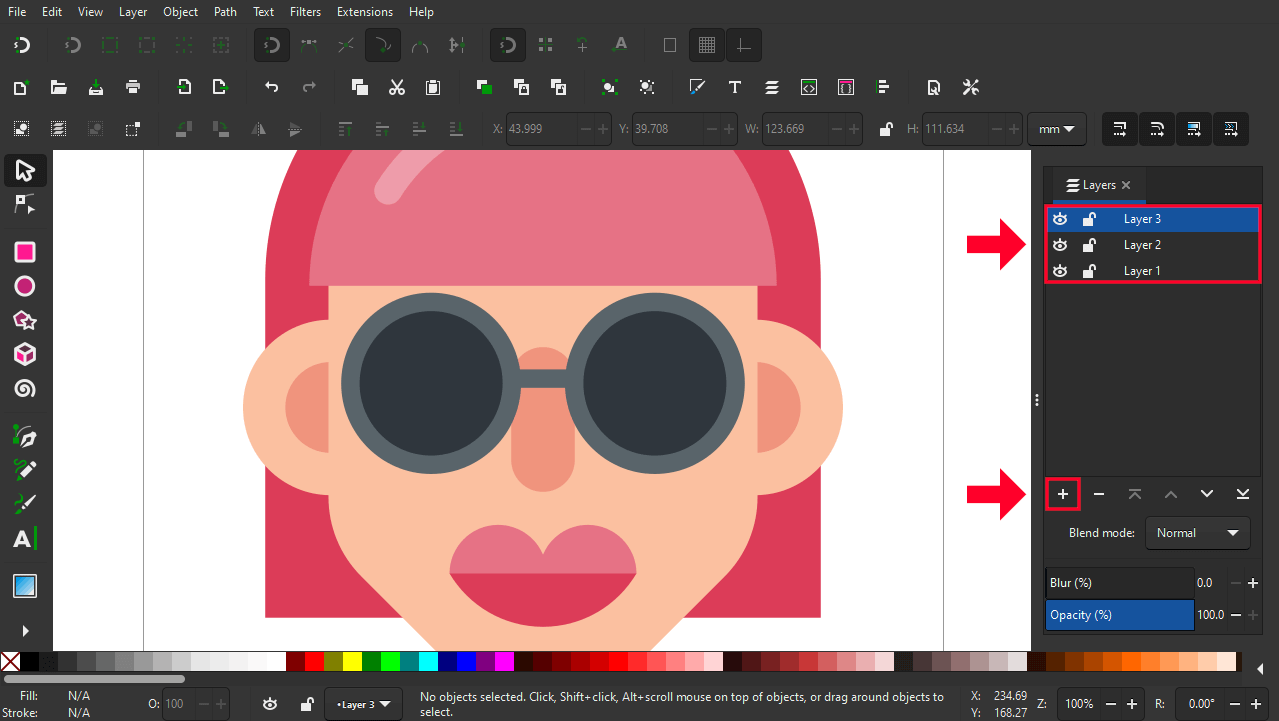
Step 2: Open the Layers menu and add as many new layers as needed
Once we’ve separated all of our design elements we can begin creating new layers.
Open the Layers menu by navigating to:
Layer > Layers
Alternatively, you can use the keyboard shortcut which is Control + Shift + L
With the Layers menu opened, click the plus icon (+) in the bottom-left corner of the menu to add a new layer. Name the layer and determine if you’d like to place it above or below the layer currently selected.
Each of my three groups of objects will be placed in one of three layers, so I have created three layers as depicted below:
If you’d like to learn more about how layers work in Inkscape check out my tutorial here.
Step 3: Cut and paste each group of objects into its corresponding layer
All we have to do now to separate an image into layers in Inkscape is cut and paste them into their respective layers.
Select one group of objects and cut it by going to:
Edit > Cut
The design element should disappear momentarily. This is normal, do not panic.
Next, select the layer you’d like to place it in by clicking on it in the Layers menu, then paste it in place by navigating to:
Edit > Paste In Place
It’s important that you choose “paste in place” over the standard “paste” option as pasting in place will ensure that the design element is not moved on the canvas. For whatever reason, choosing “paste” will place the element in a random location that is different than its original location relative to the document’s X and Y axis.
And that’s all you have to do! Simply repeat this process with the rest of the design elements on your canvas to place them in their own designated layers and you’re done!
Keyboard Shortcuts
Navigating back and forth through the menu system to repeatedly cut and paste design elements can get a bit tedious if you’re working with a lot of design elements that all need to be categorized into separate layers.
For this it is recommended that you use the keyboard shortcuts instead.
To cut, press Control + X on your keyboard.
To paste in place, press Control + Alt + V on your keyboard.
Alternative To Cutting & Pasting
A user in the comments pointed out that there is a “Move To Layer” function that can be used as an alternative to cutting and pasting. Simply right-click on an object (or group of objects) and select Move To Layer.
Once selected, you will be prompted to choose a layer to move it to:
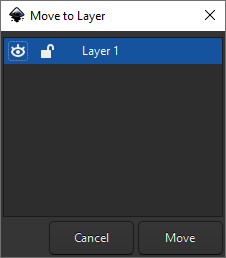
You will have to set up the new layers beforehand, of course, but this is certainly a good alternative and an appreciated contribution to the lesson!
Conclusion
Knowing how to separate an image into layers in Inkscape is simply a matter of setting up your layers and then manually moving them to their designated spot. This shouldn’t be too tiresome of a task if you’re not working with an overly complex design. However, a “release to layers” function (like that found in Illustrator) could make this a lot easier!
If you have any questions or need clarification on any of the steps taken in this lesson simply leave a comment below.
Learn To Master The SoftwareGain a complete understanding of your favorite design apps with my comprehensive collection of video courses. Each course grants access to our private community where you can ask questions and get help when needed.
|
||||||||||||||||||||||||||||||||


You might also like


7 comments
-
-
-
-
Mark
Erm, how about select item. Then Right Mouse Button and select [move to Layer…], a new box opens then you select which layer you want the item on. Coming from a AutoCAD background I love layers.
-
-
Karen from Silver Seams
Go to Object > Objects, and click the icons in the Type column (the third one) to toggle things between layer, group, and object.
(Yes, I also felt silly when the Ink/Stitch folks told me that. I had been doing so much work to break thread colors onto their own layers, when Ink/Stitch imports embroidery designs with them pre-grouped.)
-
Elaine
I am new to this and would LOVE to know how to create groups so that i can create layers.