How To Remove The Page Border in Inkscape
How To Remove The Page Border in Inkscape https://logosbynick.com/wp-content/uploads/2020/09/remove-page-border-inkscape.png 800 470 Nick Saporito https://secure.gravatar.com/avatar/8e31bf392f0ba8850f29a1a2e833cdd020909bfd44613c7e222072c40e031c34?s=96&d=mm&r=gThis post is for those of you who may be following along with an older Inkscape tutorial and want to remove the page border from the document. To remove the page border in Inkscape all you have to do is open the Document Properties menu and uncheck the “show page border” box. Let’s delve in to this.
| To remove the page border in Inkscape, open the Document Properties menu by pressing control + shift + d on your keyboard, then uncheck the box that says “Show page border.” |
The Default Page Border in Inkscape
Whenever you launch Inkscape, there will be page border visible on your screen by default. This is assuming that you haven’t changed your default startup file.
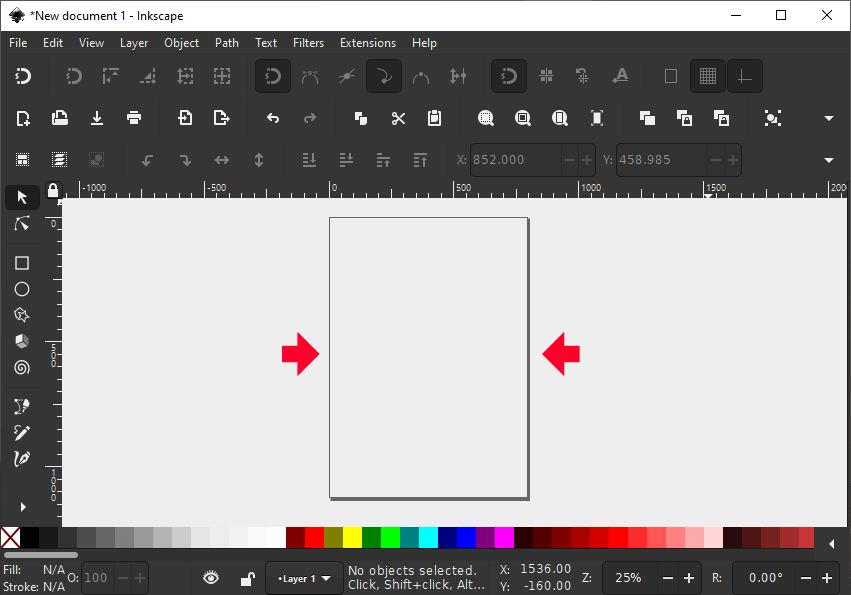
By default, Inkscape launches new documents in the A4 format with a visible page border on the canvas.
The default template that Inkscape loads upon launch is the A4 format, as indicated by the size of the border on the page.
In some of my Inkscape video tutorials, you may have noticed that there’s typically no page border visible on my screen. This is because I have manually removed it before I started recording. I prefer to work in open space when I’m designing, without page borders getting in my way.
This isn’t something that poses a significant problem in any way. It’s more a visual nuisance and personal preference than anything else.
If you’d like to do the same then read on.
Remove The Page Border in Inkscape
If you’re like me and find the page border to be a visual nuisance, then the good news is that it’s easy to disable. All you have to do is open the Document Properties menu by navigating to File > Document Properties, or by pressing control + shift + d on your keyboard.

The Document Properties menu allows you to change the settings of your document on a granular level, including the page border.
If you look towards the bottom-right of the Document Properties menu, you’ll see an option that reads “Show page border.” To remove the page border in Inkscape, all you have to do is uncheck that box and the page border will no longer be visible on your document.
It should be noted that although you have disabled the visibility of the page border, that doesn’t mean that the document doesn’t still have a page border. It’s still there, just not visible.
There’s no way to remove the existence of a page border altogether, but that is how you can remove its visibility. It’s also how I prepare my documents before I record tutorials.
The Document Properties menu allows you to change other properties of your page border as well, like its color, whether it displays above or below your designs, and the size of the border as well.
Hopefully this quick little write up has solved your problem. If not just leave a comment below. Thanks for reading!
Learn To Master The SoftwareGain a complete understanding of your favorite design apps with my comprehensive collection of video courses. Each course grants access to our private community where you can ask questions and get help when needed.
|
||||||||||||||||||||||||||||||||


You might also like


3 comments
-
-
Logos By Nick
Hi Azar, it doesn’t matter. The shadow isn’t actually part of the design, it’s just there for your reference. Personally, I like to disable it because I find it doesn’t help me in any way.
-
-
Darla
Hi, are you available for a short tutorial and if so what would you charge? I just get exhausted trying to comb through so many videos to find my solution which I imagine you could solve in a few minutes. I’m using Cricut to cut a simple shape which will be used as a book page. This is a castle and it has window cutouts. All I want to do is to create a mat for the page. I want to cut a shape out of patterned paper, and the same shape slightly larger out of black. First I tried just enlarging the shape, but of course that also messed with the cut-out shapes inside.
Google searching led me to believe that I could use inkscape to “easily” add a shadow and that seemed doable. Need to snip the image in Cricut and upload into inkscape which I did, remove the background which I did. But then I found that there is a line box around the image. It is not the “work canvas” box of Inkscape, it is a box that has somehow become part of the image, perhaps involving the snip tool. I tried ungrouping, that didn’t work. Anything I try to do to the image includes that outline.
The image itself was just a pattern on a PDF file that turned solid black when I imported into Cricut Cricut will let me mess with it to a certain extent, resizing and cutting window shapes out, but it will not let me change the color. So whatever property these images have, it means I can’t add a “bleed” as one video was showing. That would have been a perfect solution too. I am really just trying to complete a project and not trying to become a pro at inkscape. If you have time available for a brief tutorial on how to solve this, I would be grateful! Already spent hours combing through trying to find the exact answer online last night. Thanks for taking the time to read this!
Azər
Hi,dear LogosbyNick good night 👋🏻🤲.Thank you for,beautiful,interesting,important newsing 👋🏻👏🏻🤲.My question for you.While deleting show page border also, should we disable show border shadow? Or should it stay as it is?Thanks for you,dear LogosbyNick 👋🏻👏🏻🤲.