How To Offset A Path In Illustrator | The Complete Guide
How To Offset A Path In Illustrator | The Complete Guide https://logosbynick.com/wp-content/uploads/2021/06/offset-path-illustrator-3-1.png 800 470 Nick Saporito https://secure.gravatar.com/avatar/8e31bf392f0ba8850f29a1a2e833cdd020909bfd44613c7e222072c40e031c34?s=96&d=mm&r=gIn this tutorial we’ll be going over how to offset a path in Illustrator, which will allow you to add (or remove) an equal amount of space around an object’s edges.
What Is Path Offsetting?
| In short, path offsetting is a way of changing an object’s size by adding or removing space around its edges, as opposed to scaling its width and height. |
If you’ve ever tried to add space around the edges of an object in Adobe Illustrator, chances are that you attempted to do so by scaling the object rather than offsetting it. This doesn’t always work as expected though:
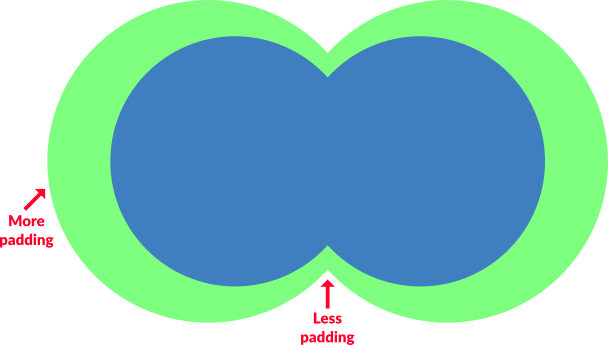
Scaling an object only affects its width and height, meaning there will be inconsistent spacing around the edges of the object if it isn’t perfectly symmetrical.
This is because scaling an object simply changes its width and height, and unless the object you’re trying to scale is both symmetrical and equal in width and height, scaling it will not work produce the desired result.
The way that you add an equal amount of space around an object is by offsetting it rather than scaling it:
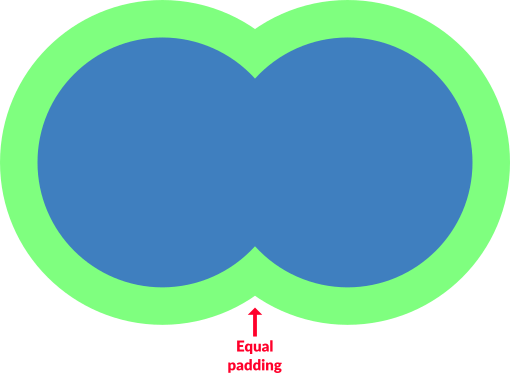
Offsetting a path allows you to change its size by adding or removing space from its edges instead of its overall width and height.
Why Not Just Use Strokes?
At first glance it may appear that you can get around this by simply applying a stroke to your object, which will also allow you to offset it. However, there’s a couple of problems with this approach:
- Strokes only allow you to increase the offset of a path. It will not allow you to decrease a path’s offset.
- Even if you only want to increase its offset, you’ll have to convert the stroke to an outline in order to continue working on it like any other path, adding an unnecessary step.
Offsetting the path in Illustrator is a much more efficient approach.
How To Offset A Path In Illustrator
| To offset a path in Illustrator, select the path and navigate to Object, Path, Offset Path. Use the Offset field to input the numerical value you’d like to offset your path by. Then, use the Joins filed to determine if you want the corners to be sharp, round, or squared. |
The following video tutorial will walk you through the process of offsetting a path in Illustrator:
To get started, select your path and use the menus to navigate to:
Object > Path > Offset Path
The following menu will populate on your screen:

For this demonstration it is recommended that you enabled the preview by ticking the box in the bottom-left corner labeled as Preview. This will allow you to see how your offset looks as you’re applying it.
There are three input fields in the Offset menu. Let’s go over each.
Offset
This field represents the size of your offset. Typing in a numerical value will change the size of the offset accordingly.
For example, making the offset 25 px will make your path larger by adding 25 pixels of space around the edges of your object:
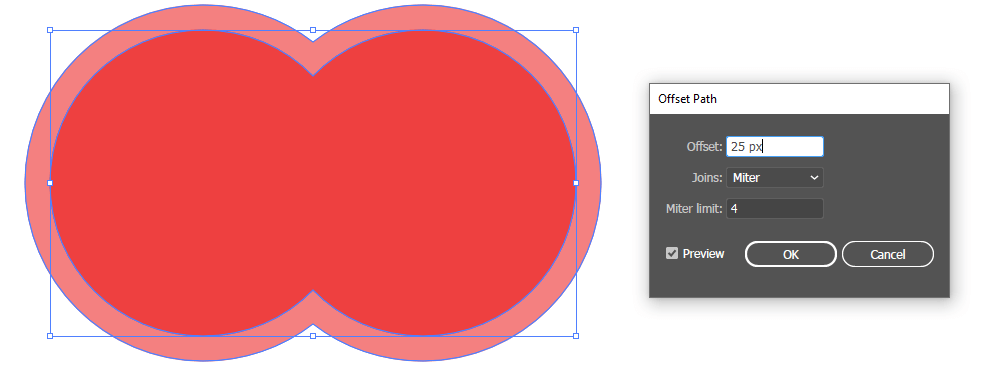
Click to enlarge.
Alternatively, you can decrease the offset by inputting a number with a negative value.
For example, making the offset -25 px will make your path smaller by removing 25 pixels of space around the edges of your object:
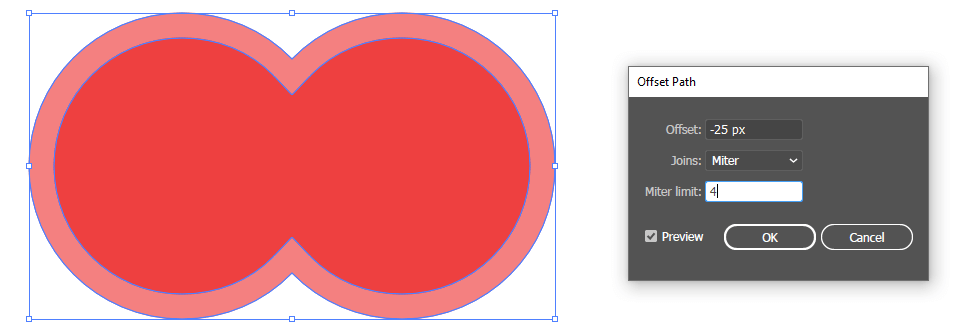
Click to enlarge.
By default, the unit of measure used for the offset field is pixels (px). However, can apply a different unit of measurement by simply typing it into the field after your number.
Units of measure you can apply are as follows:
- Inches (in)
- Centimeters (cm)
- Millimeters (mm)
- Points (pt)
Offset A Path Manually
If you’d like to offset a path in Illustrator using a freehand approach, as opposed to inputting a specific numerical value, you can do so by selecting numbers and rolling up and down on your mouse wheel:
You can manually adjust your offset by selecting all of the numbers in the Offset field and rolling up and down on your mouse wheel.
Rolling up the mouse wheel will increase the offset, whereas rolling down will decrease it.
This is particularly useful when you don’t have a specific measurement that you’d like to offset your path by and you just want to eyeball it.
Joins
The Joins field allows you to determine whether the corners of your offset are sharp, round, are square.
The choices are as follows:
- Miter: this setting makes it so that the corners of your offset will remain sharp if they were originally sharp.
- Round: this setting will make all of the corners of your offset rounded.
- Bevel: this setting will make all of the corners of your offset squared, or cut off in appearance.
The diagram below depicts the differences between the three settings:

The different kinds of joins you can apply to your offset.
Miter Limit
The final input field in the Offset menu would be the Miter Limit field. The miter limit represents the point in which a miter join transforms into a bevel join.
For example, if you were to set the miter limit to 10, this means that once a point reaches ten times its original weight, it transforms into a bevel join.
In most instances, this is a field you will not have to pay attention to. However, if you’re trying to offset a path in Illustrator and you’re finding that your corners (or joins) are not remaining sharp despite applying a miter join, you may have to adjust the miter limit to correct that.
Conclusion
Knowing how to offset a path in Illustrator will help you to create all kinds of unique designs and illustrations. I’ve found it to be particularly useful when designing things like logos and icons. Offsets allow you to easily add a border around your object without having to apply a stroke.
One of the downsides of using Illustrator for such a task is that the offset tool is obscured within a messy menu system and cannot be accessed with keyboard shortcuts. As I touched on in my post comparing Affinity Designer vs Illustrator, Affinity Designer has a dedicated tool for creating offsets that can be accessed directly within the toolbar, or by using a keyboard shortcut.
Not only that, but Designer’s tool also has a slider that you can manually adjust for freehand offsetting. It would be great to see Adobe implement something similar for Illustrator.
If you have any questions or need clarification on anything from this lesson, simply leave a comment below.
Learn To Master The SoftwareGain a complete understanding of your favorite design apps with my comprehensive collection of video courses. Each course grants access to our private community where you can ask questions and get help when needed.
|
||||||||||||||||||||||||||||||||


can we separate those in two oblect like we do in coral
Yes, just to go Object > Expand
After applying an offset path, is it possible to edit the parameters or said offset? If you return to the Object > Path > Offset Path, it applies the offset to the offset
Yes, if you go to the Nodes Tool (keyboard shortcut: N) it will allow you to edit the original offset, but only if you haven’t converted it to a path yet. Once it’s converted to a path the change is finalized.
Hi,
I used offset path multiple times on the same letter to decrease its outline ( making the letter thinner us ing a negative offset number) . How do I merge all of the offset paths afterward? Is it too late?
Hard to say since I can’t see exactly what you’re trying to do, but you can merge objects together using the Pathfinder/Boolean operations.