Create Custom Swatches in Inkscape
Create Custom Swatches in Inkscape https://logosbynick.com/wp-content/uploads/2018/08/gradient-color-palettes-inkscape-1-1024x601.png 1024 601 Nick Saporito https://secure.gravatar.com/avatar/8e31bf392f0ba8850f29a1a2e833cdd020909bfd44613c7e222072c40e031c34?s=96&d=mm&r=gIn today’s tutorial I’ll be demonstrating two things — first, how to create a gradient color palette between two different colors where it appears as if it’s a gradient, but it’s really just a series of individual colors. Then, I’ll be demonstrating how to create custom swatches within Inkscape from that same series of colors.
This is something that comes in handy if you’re coloring in a graphic and would like to use a specific theme, like in the following example…

Gradient Color Palettes
First, create two squares and color them in with the two different colors you’d like to create your palette from. For this example I’m using yellow and pink, but you can use whichever colors you’d like.

Next, we’re going to use the Interpolate extension (Extensions > Generate from path > Interpolate).
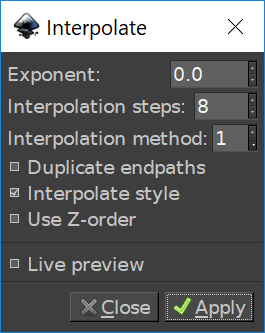
Set the values as depicted in the above image. Please note that the interpolation steps input reflects how many different colors you’d like in your palette + 2. For this example I’m creating a swatch with 10 colors, so I input 8. The reason for this is because two of those colors are defined by the two squares you’ve already created.
Once applied, a series of objects reflective of your simulated gradient will be generated…

Now it’s time to create our custom swatch.
Custom Swatches in Inkscape
To add a color to a swatch, simply select one of the squares, and in the Fill and Stroke panel, click the Swatch button.
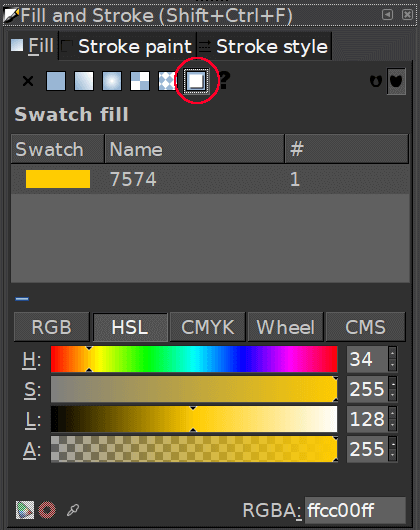
You won’t notice anything happen on your screen, but the color of the selected object will be added to your swatch. Now, go through the rest of the squares and do the same thing.
To view your custom swatch, simply open the Swatches menu by going to View > Swatches.
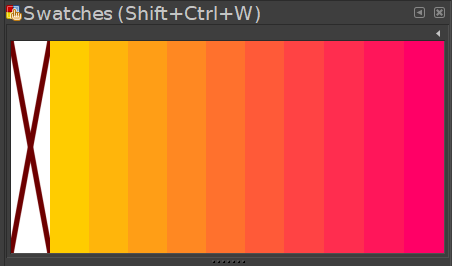
And there’s your newly-created gradient color palette! You can now use those colors to color in objects the same way you would using colors from Inkscape’s stock color menu.
Video Tutorial
For step-by-step instructions with voice narration, please watch the video tutorial below. If you have any questions, comments or concerns, simply leave a comment. As always, thanks for watching!
Learn To Master The SoftwareGain a complete understanding of your favorite design apps with my comprehensive collection of video courses. Each course grants access to our private community where you can ask questions and get help when needed.
|
||||||||||||||||||||||||||||||||


You might also like


16 comments
-
-
-
JJ
Hey! love the tutorial. Just one note of positive criticism. Your video instructions are much more detailed than your text instructions. I wasn’t able to do the swatch thing. almost gave up. then I saw your video at the bottom. i watched that and saw some details left out in the text. Once i saw it though, BOOM! this is a great tip and it expanded my knowledge of fill and swatches beyond your own tuturial. Thanks!
-
Kasia
Hi Nick,
Thanks for this tutorial, that’s really useful! Do you know if there is a way to save a once-created palette for future projects/ add it to options available at the bottom strip? Thanks!
-
George Mack
Is there a way to save Pantone or other spot colors as swatches for print output/spot separations?
-
-
Vicky
Hi Nick, thank you for your videos. They are really helpful.
Would you know how to change the order of the swatches once they’ve been added to the palette?
Thanks,
Vicky -
-
-
Nick Saporito
I never really used them myself but I’m sure I will now that I have a better understanding of how they work.
-
-
-
Nick Saporito
I never really used them myself but I’m sure I will now that I have a better understanding of how they work.
-
-
-
-
-
Philip
Thanks for this write-up.
Key information missing from the text instructions appears to be that after creating the squares they must be converted from objects to *paths*.
Unfortunately if the rectangles are objects of type “rectangle” instead of objects of type “path” the Interpolate extension will fail *silently* and give no indication why nothing is happening.
This requirement is mentioned in the Inkscape tutorial on the extension (https://inkscape.org/doc/tutorials/interpolate/tutorial-interpolate.html) but it’d be nice to get an error message too! 🙂