Make 3D Calligraphy Letters with Adobe Illustrator
Make 3D Calligraphy Letters with Adobe Illustrator https://logosbynick.com/wp-content/uploads/2020/05/blend-tool.png 800 470 Nick Saporito https://secure.gravatar.com/avatar/8e31bf392f0ba8850f29a1a2e833cdd020909bfd44613c7e222072c40e031c34?s=96&d=mm&r=gIn this tutorial I’ll be demonstrating how you can create 3D-style calligraphy letters using the Blend Tool in Adobe Illustrator. This is a really cool technique that you can let your creativity run wild with once you know how to do it.
The following is a written overview of the steps taken to create this effect. For complete step-by-step instructions, please watch the video tutorial at the top of the page.
Create 3D Calligraphy Letters
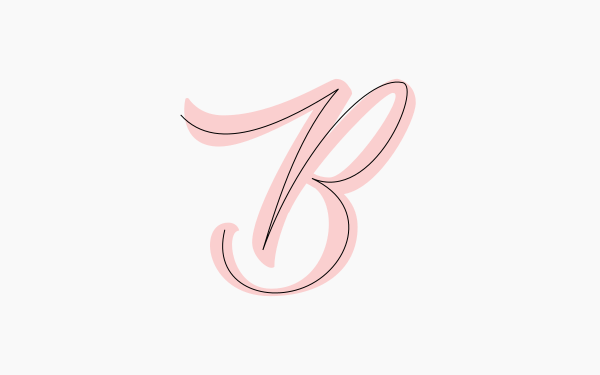
The first thing we have to do is pick out a font and lettering to apply this effect to. For this tutorial I used the Heather Oliver font in the letter B (for “Blend Tool”).

Now we’re going to grab the Pen Tool and create a single line tracing over the letter. Check out my tutorial about using the Pen Tool if you need more assistance with how to use it.
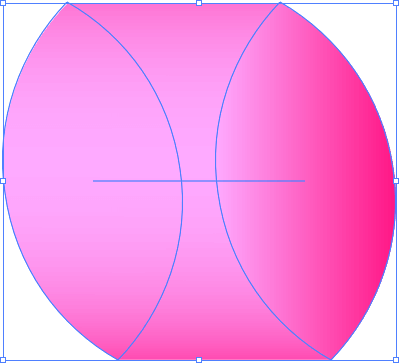
Once that’s finished we will create a custom shape to act as somewhat of a brush. For this demonstration we’ll be creating a calligraphy-pen-like shape from the intersection of two circles.

Now we’re going to rotate the object slightly in the counter-clockwise direction, then give it a linear gradient of light pink to dark pink. Then, make a duplicate copy and drag it off to the right.

Next, we’re make a Blend of these two objects using the Blend Tool. To accomplish this, select both objects and navigate to Objects > Blend > Blend Options, and set the Blend Options to the following presets…
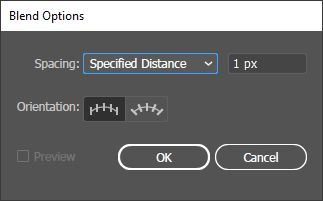
Choose “Specified Distance” for Spacing and set the distance to 1 px. Leave “Align to page” selected.
Go ahead and click Ok, then, select both objects again and navigate to Objects > Blend > Make. You should end up with something like the following shape…
We’re now going to use this object to apply to the line tracing of our letter we previously created.
Select both the object and the line, then navigate to Objects > Blend > Replace Spine. The result should be the following 3D-style effect…

And that should do it for this tutorial. That is how you can create 3D-style calligraphy letters with Illustrator! If you have any questions just leave a comment below. As always, thanks for watching!
Learn To Master The SoftwareGain a complete understanding of your favorite design apps with my comprehensive collection of video courses. Each course grants access to our private community where you can ask questions and get help when needed.
|
||||||||||||||||||||||||||||||||


