Turn Yourself Into a GTA Load Screen with GIMP
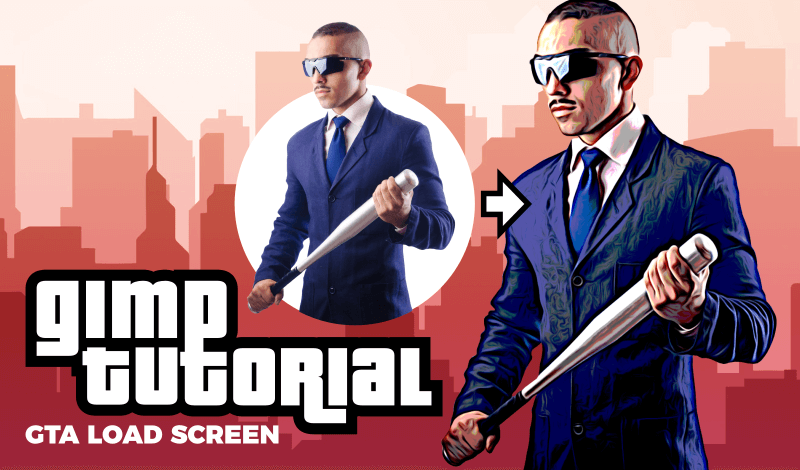
Turn Yourself Into a GTA Load Screen with GIMP https://logosbynick.com/wp-content/uploads/2020/07/gta-load-screen-gimp.png 800 470 Nick Saporito https://secure.gravatar.com/avatar/8e31bf392f0ba8850f29a1a2e833cdd020909bfd44613c7e222072c40e031c34?s=96&d=mm&r=gIn this tutorial I’ll be demonstrating how you can use GIMP to make a photo have a similar art style to the load screens from the Grand Theft Auto video game series. The style demonstrated in this tutorial is more like the load screens used in GTA4 rather than GTA5, but it still has that effect.
Before we get started, I’d just like to credit Davies Media Design for the inspiration for this video. Check out his video to see how to create a cartoon effect with GIMP.
In order to follow along with this tutorial you’ll need to install a couple of resources first.
Resources
First, you’ll need the G’MIC plugin, which we will be using for the Dream Smoothing effect. You can download G’MIC and follow the installation instructions here: https://gmic.eu/download.shtml
If you’d like to emulate the text effect from the GTA game series, you’ll also need to download a font known as Pricedown, which can be found here: https://www.dafont.com/pricedown.font
Create GTA Load Screens with GIMP
The following is just a written overview of what this tutorial entails. For the complete tutorial, please watch the video below:
For this demonstration I’ll be using the following example photo…

Image licensed from 123RF
I’ll also be using the following background design to place it on once I’m finished…

Image licensed from 123RF
To give our subject the desired illustrative look, I’m going to be applying a series of filters and effect. The filters used, in order, are as follows…
- Unsharp Mask
- Cartoon
- Noise Reduction
- Unsharp Mask
- Posterize
- Dream Smoothing
- Cartoon
Once applied, we should end up with the following result…

Image licensed from 123RF
Now we must remove the white background from the photo. Check out my tutorial on deleting backgrounds to transparent with GIMP for a variety of methods you can use to delete your background.
Here’s how the design looks once the subject has been pasted onto the background…

Now we just have to add some text. To do this, we’ll just create white text using the Pricedown font, then add a black outline to it.
Here’s how the finished design looks…

And that is how you can create a GTA load screen design using GIMP! If you have any questions leave a comment below. As always, thanks for watching!
Learn To Master The SoftwareGain a complete understanding of your favorite design apps with my comprehensive collection of video courses. Each course grants access to our private community where you can ask questions and get help when needed.
|
||||||||||||||||||||||||||||||||


Leave a Reply