How To Install GIMP Brushes On Windows, Mac and Ubuntu
How To Install GIMP Brushes On Windows, Mac and Ubuntu https://logosbynick.com/wp-content/uploads/2019/05/install-gimp-brushes-2-1024x602.jpg 1024 602 Nick Saporito https://secure.gravatar.com/avatar/8e31bf392f0ba8850f29a1a2e833cdd020909bfd44613c7e222072c40e031c34?s=96&d=mm&r=gIn today’s tutorial I’ll be outlining how to install GIMP brushes on the Windows, Mac and Ubuntu operating systems. The process is relatively similar across all three platforms, but there are subtle differences that I’ll be pointing out.
Download Your Brushes
The first step, assuming you haven’t done so already, is to locate some third-party brushes that you’d like to use in GIMP.
The wonderful thing about GIMP is that you’re not limited to GIMP brushes — you can also install Photoshop brushes in GIMP as well!
Accepted Brush Formats
According to GIMP’s documentation, the accepted brush formats are as follows…
- GBR – This is GIMP’s own format for standard brushes that allow for ordinary brushes usages, like sketching and coloring.
- GIH – Short for “Gimp Image Hose,” this is GIMP’s own format for animated brushes.
- VBR – This is the format used for brushes created using GIMP’s Brush Editor.
- MYB – These are MyPaint brushes — a third-party extension within GIMP that allows for more advanced brush usage.
- ABR – This is a Photoshop brush file. Although not stated in the GIMP documentation, Photoshop brushes will indeed work in GIMP the same way any of the aforementioned formats will.
Where To Find GIMP Brushes
If you’re looking for some quality brushes to use in GIMP, here’s a few sites I like to use personally…
- Brusheezy – A site dedicated specifically to free Photoshop brushes. Simply search for the type of brush you’re looking for or browse through some popular picks.
- DeviantArt – An online network for the art community in general. What I like to do is search for downloadable brushes using the search function on the site. DeviantArt encompasses art and design as a whole, so you’ll have to search for brushes specifically.
- Creative Market – An online marketplace for premium user-generated design products. Since these are premium products, brushes found on Creative Market will cost you.
You can also check out my 20 favorite free GIMP brushes here.
Once you have your brush file(s) ready to go, we can now install them on GIMP.
Install GIMP Brushes On Windows
![]()
Installing GIMP brushes in Windows is quite simple. Here’s a video tutorial I put together a couple of years ago…
This tutorial was created using an older version of GIMP, but the methodology still works for installing GIMP brushes on newer versions.
In summary…
Step 1: Open the Brushes Folder
To install GIMP brushes on Windows, first locate the folder where GIMP brushes are stored by following this pathway:
Local Disk (C:) > Program Files > GIMP 2 > Share > GIMP > 2.0 > Brushes

You are now in the designated location for installing GIMP brushes.
Step 2: Place The Brush File Into The Brushes Folder
Grab your brush file (make sure it’s one of the formats that I outlined previously and not the ZIP folder it came in) and either click and drag it into the Brushes folder or copy and paste it.
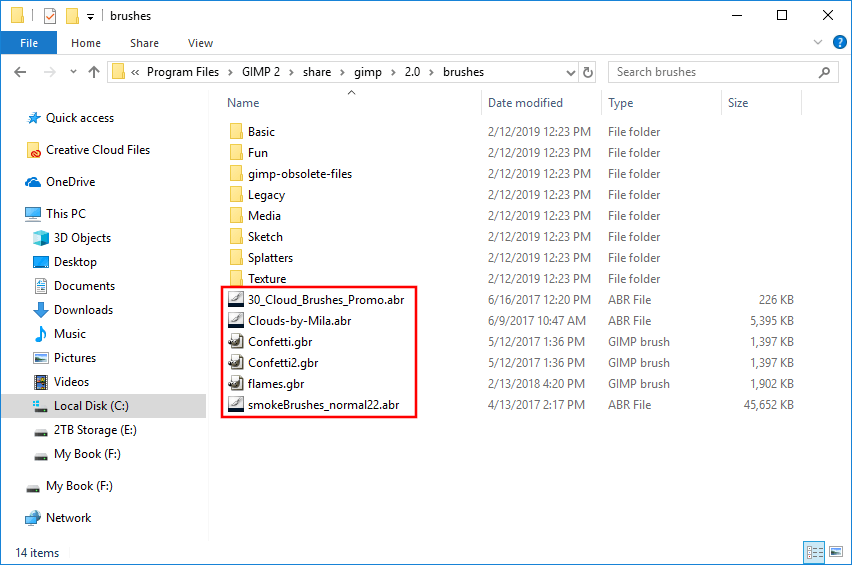
You can see the third-party GIMP brushes I’ve installed in the screenshot above.
Step 3: Refresh Your Brushes
Simply open up GIMP and refresh your brushes by clicking on the button that reads Refresh Brushes. It should be located on the right side of your screen, just beneath the Brush window.

If you don’t see a brushes window on your screen, go to Windows > Dockable Dialogs > Brushes.
The great part about this is that you don’t need to restart GIMP in order to activate your brushes! They should appear and be usable upon hitting the refresh button. You can keep GIMP running the entire time.
Install GIMP Brushes On Mac
![]()
Installing GIMP brushes on Mac works similarly as it does to Windows — the main difference is the pathway you follow to get there. Here’s a video outlining the steps…
In summary…
Step 1: Locate The Brushes Folder
Copy the brush file(s) you’d like to install by selecting them and press Command + C, then navigate to the following location:
User > Library > GIMP > 2.10 (or whatever version number you have installed) > Brushes

Credit: Photoshop Design and Photo editing Tutorials from HowTech on YouTube
It should look something like the screenshot taken above.
Step 2: Place Your Brushes Into The Folder
Once you’re in the brushes folder, go ahead and paste your brush file(s) by pressing Command + V on your keyboard.
Step 3: Refresh The Brushes Window
Simply open GIMP and refresh your brushes window by pressing the Refresh Brushes icon on the right-hand side of your screen.
If you don’t see a brushes window on your screen, go to Windows > Dockable Dialogs > Brushes.
Once you’ve done that, your GIMP brushes will be installed on your Mac and will be ready for use.
Install GIMP Brushes On Ubuntu
![]()
Installing GIMP brushes on Ubuntu operating systems is slightly different because some of the pathway is hidden. Here’s a video outlining the process…
Locate the brushes you’d like to install and copy them by pressing Control + C on your keyboard.
Step 1: Locate The Brushes Folder
Open the Home folder, then press Control + H to show the hidden folders. The hidden folders will now be visible, and .gimp-2.10 should be one of them. Go ahead and open the .gimp-2.10 folder.
Step 2: Paste The Brushes Into The Folder
Open the .gimp-2.10 folder. Once it’s open, you should see the Brushes folder. Open the brushes folder and paste your brush file(s)

Credit: Photoshop Design and Photo editing Tutorials from HowTech on YouTube
Step 3: Refresh Your Brushes in GIMP
Simply open GIMP and refresh your brushes window by pressing the Refresh Brushes icon on the right-hand side of your screen.
If you don’t see a brushes window on your screen, go to Windows > Dockable Dialogs > Brushes.
Your GIMP brushes are now ready for use in Ubuntu!
Learn To Master The SoftwareGain a complete understanding of your favorite design apps with my comprehensive collection of video courses. Each course grants access to our private community where you can ask questions and get help when needed.
|
||||||||||||||||||||||||||||||||


Marcia
Thanks for the instructions. Yours was the first I really understood where to go.