How To Zoom In GIMP | All 6 Methods Explained
How To Zoom In GIMP | All 6 Methods Explained https://logosbynick.com/wp-content/uploads/2022/02/gimp-zoom.png 800 470 Nick Saporito https://secure.gravatar.com/avatar/8e31bf392f0ba8850f29a1a2e833cdd020909bfd44613c7e222072c40e031c34?s=96&d=mm&r=gOne of the most important aspects of working in design software is having the ability to navigate around your canvas. This includes moving the canvas, rotating it, and zooming in and out. In this tutorial we’ll be going over how to zoom in GIMP using 6 different methods. The one you should choose depends entirely on what it is you’re working on at the moment, and to what degree you need to zoom in or out.
There are various different ways in which you can zoom in GIMP. Some methods allow you to zoom based on a numerical value (50% zoom, for example) whereas others allow you to zoom in just enough that the entirety of your canvas fits within your screen. Let’s learn how to zoom in GIMP by taking an in-depth look at each method.
How To Zoom In GIMP
The following video tutorial will walk you through all 6 methods for zooming in and out on your documents in GIMP:
Continue on for the written tutorial.
Table of Contents
|
Method 1: The Zoom Tool
The first and most obvious method for knowing how to zoom in GIMP is using the Zoom Tool — a tool dedicated specifically to zooming in and out on your canvas.
The Zoom Tool can be located near the bottom of the tools menu in GIMP:
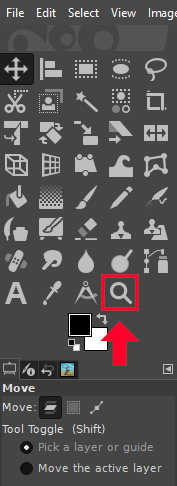
The Zoom Tool is outlined in red, represented as a magnifying glass icon.
You can also access using the keyboard shortcut, which is the letter Z.
With the Zoom Tool enabled, clicking once on your canvas will zoom your view of the canvas by 50%. So, if you are zoomed in at 100%, clicking once with the zoom tool will zoom you in to 150%.
To zoom out, all you have to do is hold the Control key while clicking. This also works in 50% increments. You can also switch back and forth between zooming in and out using the tool settings menu.
Another way in which you can zoom using the Zoom Tool is to simply click and drag to create a selection around the area that you’d like to zoom in on.
When To Use This Method
The Zoom Tool is best used when you need to zoom in such a way that you’d like to specify the exact area you’d like to zoom in on. It can help fill your view of the canvas with whatever portion of it you prefer.
Method 2: Keyboard shortcuts
Another way in which you can zoom in GIMP is by using the keyboard shortcuts, which are as follows:
- Too zoom in: hold Shift and press the plus (+) key on your keyboard
- To zoom out: press the minus (–) key on your keyboard
As is the case with the Zoom Tool, using the keyboard shortcuts will zoom you in and out at 50% increments.
In addition to the plus and minus keys, the following keys will allow you to zoom to specified percentages:
- 1: zoom to 100%
- 2: zoom to 200%
- 3: zoom to 400%
- 4: zoom to 800%
- 5: zoom to 1,600%
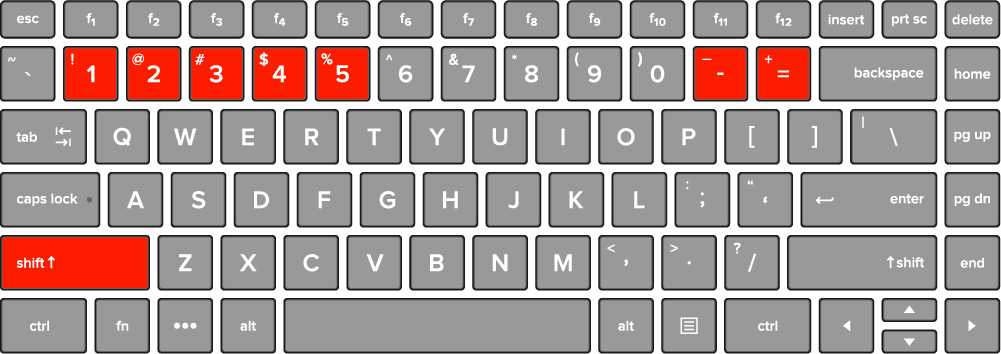
The keys highlighted in red are shortcuts for zooming in and out in GIMP.
When To Use This Method
The keyboard shortcuts are ideal when you’d like to zoom in and out without having to use dedicated tools, navigate through the menu system, or if you don’t have a mouse with a mouse wheel. It’s also useful if you need to zoom to 100% so you can see how your design work looks at its normal size.
Method 3: Using your mouse wheel
Quite possibly the most efficient way of knowing how to zoom in GIMP would be using your mouse wheel, assuming you have a mouse with a mouse wheel.
If you do, all you have to do to zoom in and out and simply hold Control on your keyboard and roll up and down on the mouse wheel.
Rolling up will zoom you in, whereas rolling down will zoom you out.
The reason why this is the most efficient method for zooming in GIMP is because it requires the least amount of clicks and hand movements. You can very easily zoom in and out at will and without having to switch tools or interrupt whatever else you may be working on.
When To Use This Method
Mouse wheel scrolling is best used when you just need to quickly zoom in and out while working on something and you don’t want to waste time grabbing tools, navigating through menu systems, or reaching for number keys.
Method 4: Using the View menu
Another way in which you can zoom in GIMP is by navigating the menu system.
Simply navigate to:
View > Zoom
Within the Zoom menu you will see the following options:

As I’m sure you can tell, many of these options are also accessible using the aforementioned methods. However, the menu system introduces additional zooming options:
- Fit Image in Window: this zoom you in or out just enough for the entire image to be visible on your display, although empty space can remain on one of the dimensions if the image isn’t the same size as your screen resolution
- Fill Window: this will zoom you in or out just enough for the image to fill the entirety of your display, even if one of the dimensions has to be excluded
All of the other predefined zoom percentages are also indexed here along with their respective keyboard shortcuts, just in case you forget.
When To Use This Method
Navigating through the menu system can be a clunky and inefficient way to work, so using this option for zooming in GIMP is only best when you need to zoom in such a way that none of the other methods offer, such as fitting the image to the window and filling the window.
Method 5: Using the Navigation menu
The next method for zooming in GIMP would be by using the Navigation menu — a tool designed specifically for navigating around your canvas in various ways, including zooming in and out.
The Navigation menu is hidden by default in GIMP, but you can access the it by navigating to:
Windows > Dockable Dialogs > Navigation
The menu should look something like this:
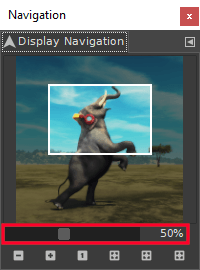
The zoom controls of the Navigation menu are outlined in red.
In short, this tool works by giving you a preview of how much you are currently zoomed in context to the rest of your image. Clicking the dragging the box within the menu will move your view of the canvas accordingly.
What’s more, the Navigation menu also allows you to zoom in GIMP by using the zoom slider towards the bottom of the menu, outlined in red in the screenshot above.
Moving the slider right will zoom in, whereas moving the slider left will zoom out.
When To Use This Method
This method for zooming doesn’t really bring anything new to the table, so the context in which it makes the most sense to use this option is if you’re already working with the Navigation menu to navigate your canvas.
Method 6: Using the View dropdown menu at the bottom of the screen
If you want to know how to zoom in GIMP by inputting a specific numerical value (in percentages,) then using the View dropdown towards the bottom of your screen will be your best bet.
The View dropdown is built into the UI and is always visible/accessible. It can be located towards the bottom-left of your screen:
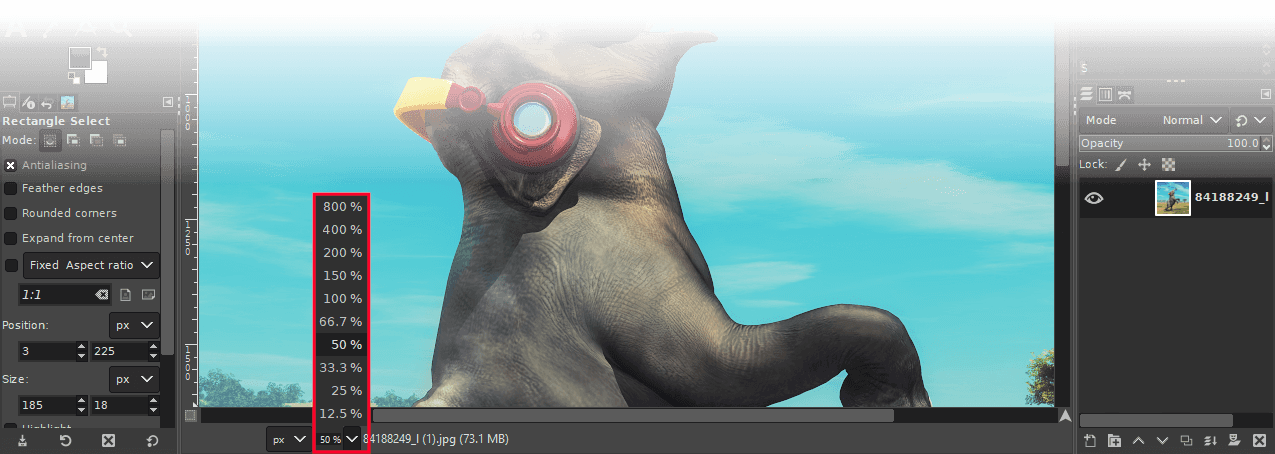
Clicking on the dropdown menu will populate an index of zoom presets, including:
- 100%
- 150%
- 200%
- 300%
- And more
What’s more, this is the only method that allows you to zoom to specified numerical value of your choosing. So let’s say that, for whatever reason, you need to zoom in to 56% specifically. You can do that by simply inputting 56 into the box and pressing the Enter key.
When To Use This Method
The View dropdown is best used when you need to zoom to a specific numerical value. It’s also a quicker and more efficient way of accessing zoom presets than the View menu method that we previously went over.
Conclusion
As we’ve demonstrated in this lesson, there’s no shortage of ways in which you can zoom in GIMP. In fact, knowing how to zoom in GIMP is only half the battle! Knowing which method to use based on your unique situation is an equally important question to address. Hopefully this tutorial has provided some clarity on the subject.
If you have any questions or need clarification on anything we’ve gone over in this lesson, simply leave a comment below.
Learn To Master The SoftwareGain a complete understanding of your favorite design apps with my comprehensive collection of video courses. Each course grants access to our private community where you can ask questions and get help when needed.
|
||||||||||||||||||||||||||||||||


Leave a Reply