
How To Reduce PNG File Size By 70% with GIMP
How To Reduce PNG File Size By 70% with GIMP https://logosbynick.com/wp-content/uploads/2018/07/gimp-reduce-file-size-png-1024x602.jpg 1024 602 Nick Saporito https://secure.gravatar.com/avatar/8e31bf392f0ba8850f29a1a2e833cdd020909bfd44613c7e222072c40e031c34?s=96&d=mm&r=gIn today’s tutorial I’ll be demonstrating how to use GIMP to reduce the file size of your PNG images by 70%, and without losing much quality.
Why Reduce File Size?
If you’ve ever created a website that you wanted to do well in Google Search, you probably already know that site speed is a significant factor. The size of your image files can drastically impact your site’s load time. As designers we have a tendency to be meticulous with things like clarity and resolution, and often sacrifice file size in favor of that. When it comes to creating graphics for the web, this is a problem.
Another reason you may need to reduce the file size of your PNGs is because you’re uploading them to a website that has file size limits. I ran into this problem myself when I was creating some banner ads for Google’s display network.
Third Party Services
![]()
There’s a variety of free online tools that you can use to reduce the size of your PNG files while maintaining respectable image quality. One tool in particular that I’ve used in the past is TinyPNG. If you’re using something like Inkscape or GIMP to create your graphics though, you don’t necessarily have to resort to using third party services to accomplish this. It can be done directly in GIMP before you export your image!
Using GIMP To Reduce PNG File Size
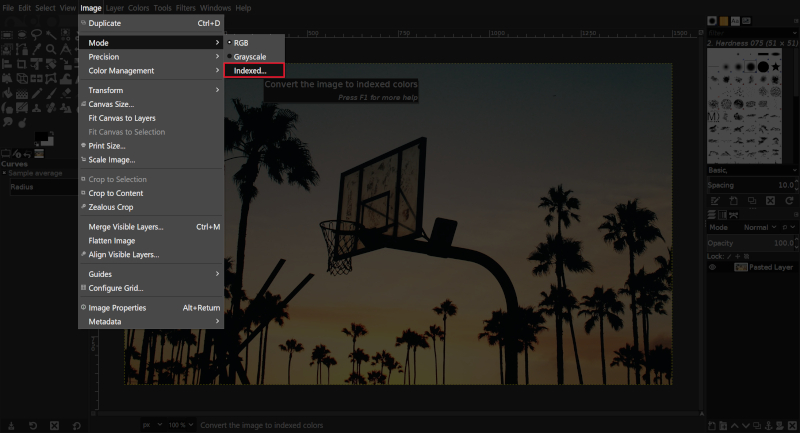
To get started, simply open up your image with GIMP and go to Image > Mode and select Index.
This will bring up the Indexed Color Conversion menu.
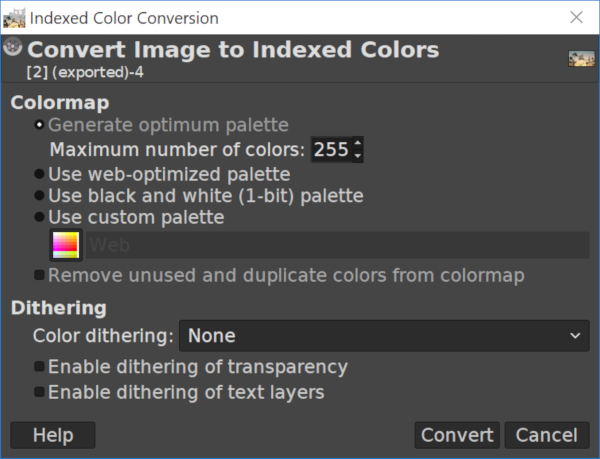
By default, “Generate optimum palette” will be selected and the maximum number of colors should be set to 255. Leave those values just as they are (or set those values if GIMP didn’t default to them) and click Convert.
Now, go ahead and export your image as a PNG file. Upon export, you’ll be prompted with the following export menu…

Open up the Advanced column and make sure you have unchecked absolutely everything listed in the entire menu. This is all useless information that needlessly takes up disk space. Don’t worry about preserving thumbnail or timestamp data. This information is automatically captured by your operating system anyway.
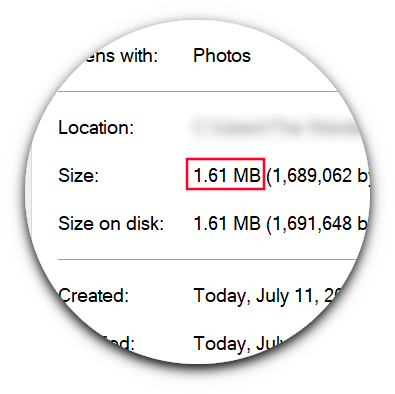
Once you’ve done that, go ahead and click Export and check the file size.
As you can see, stripping down the photo’s colors to just 255 reduced the PNG file size dramatically.
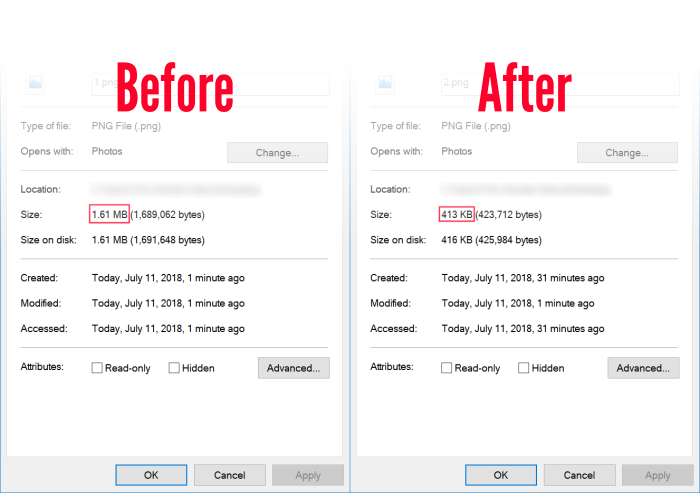
As for quality loss, here’s a before and after comparison…
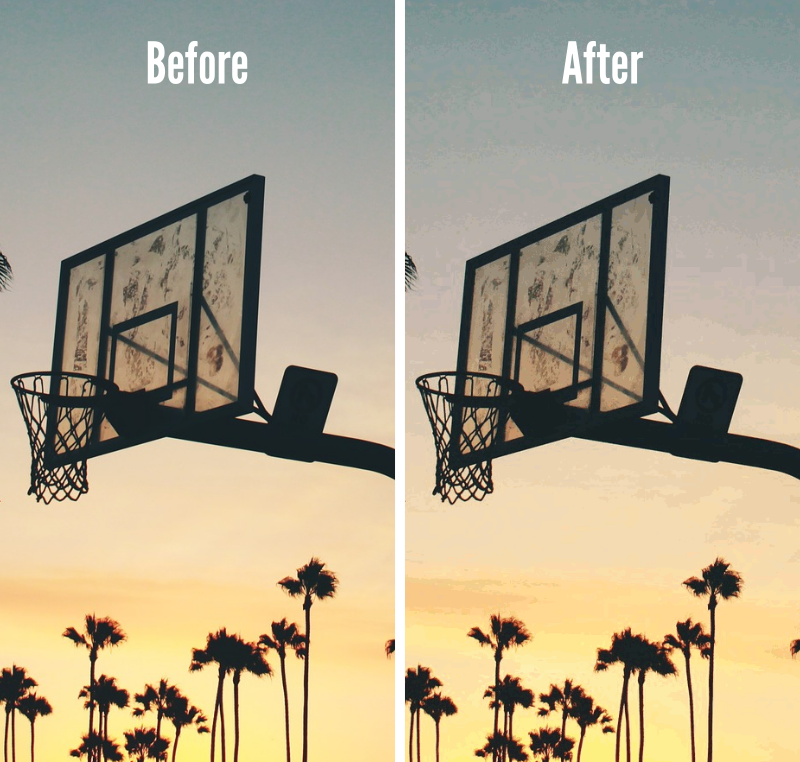
You’ll notice that the image on the right is slightly more pixelated than it originally was, but unfortunately this is the compromise we have to make when creating graphics for the web.
If you want your site to load quickly for users with slower internet speeds — and prevent them from bouncing from your page — you’ll have to make sure your site loads in a reasonable amount of time. There’s a variety of factors that impact this, but image file size is a factor that certainly should not be ignored.
Learn To Master The SoftwareGain a complete understanding of your favorite design apps with my comprehensive collection of video courses. Each course grants access to our private community where you can ask questions and get help when needed.
|
||||||||||||||||||||||||||||||||


You might also like


22 comments
-
-
Lance
The color mode alone is an incredible reduction, thanks so much. 10+ gimp user and I’ve been doing it wrong all along
-
-
-
Nick, But NOT Logos-By-Nick
Hey! Question!? All my work is created using a Specific Custom Colour Palette (graphics are meant for clothing, ABSOLUTE colour coordination is a MUST hahaha) I use colour management within Inkscape, GIMP, and on my laptop (I THINK I have it set up properly, they all are all set with the same sRGB ICC file?)
I digress…
Will this technique interfere with that?
Here’s my problem: I’m trying scale an image in GIMP meant for a duvet cover (13500×13500 px) and it tells me the image size will become over 3 GB! This will not do…
I created the image in Inkscape, so naturally I tried to just resize the image and export page in Inkscape (where I created the graphic) but nothing seems to work, the exports are blank!
Sorry for long comment, I tend to be overly thorough, not concise hahaha
-
Nick Saporito
Hi Nick, I’m not entirely sure what you’re asking. Are you concerned that switching to indexed will change the color profile of the document? If so, I do not believe that’s the case. I think it just reduces the number of colors used.
-
-
-
-
Paul
Thanks for the article. I just reduced my PNG image sizes by half in a few minutes! Much appreciated
-
-
-
-
-
-
-
Kay
Definately hleped da lot, thx 🙂
Although I don’t have this “advanced” menu that you were talking about.Oh and one thing: how do you reduce the filesize by more than 100%? It would already be 0 byte by then. What you meant is reduce the filesize by 75% if you cut three fourths 😉
-
John
You’re a total inspiration dude. You’ve helped me so much in learning how to create SVG images with your tutorials. I’ve been using them for web design which I am also learning and I feel that I am proficient at both GIMP and Inkscape because of you. Thank you for saving me a ton of time and frustration! Well into a career change and I cannot thank you enough.
-
-
Victor
Thank you for this! I discovered your YouTube channel a while ago and now I use sometimes GIMP and Inkscape for some minor drawings, editing images, logos, etc. I have drawn in inkscape the logo-images of all the subway stations in here and create a map of it. But I always wanted to know how to reduce the file size of the resulting pngs. And now i found this on your web. I’m surprised I didn’t see how to do this on one of your videos.
Thank you again and keep up the good work. Greetings from Mexico City. -
-
-
Stefan
hi and thanks for the tutorial.
I tried to reduce a jpg image exactly the way you described and exported it as png but it turned out the png was even bigger than the jpg.
Do I need to first convert it into a png or whould this work as well when using a jpg as soruce?
The latter obviosuly didn’t work.
Kind regards
Stefan