
Alpha Lock In Procreate: How It Works and Why It’s Useful
Alpha Lock In Procreate: How It Works and Why It’s Useful https://logosbynick.com/wp-content/uploads/2021/11/alpha-lock-procreate-2.png 800 470 Nick Saporito https://secure.gravatar.com/avatar/8e31bf392f0ba8850f29a1a2e833cdd020909bfd44613c7e222072c40e031c34?s=96&d=mm&r=gIn this tutorial we’ll be going over how to use the Alpha Lock in Procreate, which is a useful tool that can save you time and help you create artwork with more precision.
In short, the main benefit of using alpha lock in Procreate is that it forces you to color inside of the lines. Let’s go over how it works and then have a look at some examples where it would be useful.
Table of ContentsAlpha Lock In ProcreateHow To Use Alpha Lock In Procreate |
Alpha Lock In Procreate
In Procreate, Alpha Lock is a masking feature for layers that gives you more control over the edits and transformations you can make to a given layer.
Alpha Lock, as the name suggests, works by locking the alpha channel of a given layer.
What Is An Alpha Channel?
According to Techopedia, an alpha channel is a component of a layer’s color data that includes transparency and opacity values (in addition to color values.)
A good example of this would be a PNG image. PNG images allow for transparent backgrounds because the PNG format has an alpha channel added — something that is absent from JPEG files, and the reason why JPEGs cannot have transparent backgrounds.
By default, all layers created in Procreate have alpha channels. If you erase part of a layer then the layers beneath it will show through those transparent areas. The alpha channel is what makes this possible.
How Alpha Lock Works In Procreate
The alpha lock name may be a bit confusing because the way this feature works in Procreate isn’t quite consistent with what the name implies.
If the alpha channel represents opacity and transparency values, then alpha lock must mean that enabling it makes it so you cannot edit those values, right? Well, not exactly.
Or in other words, alpha lock doesn’t actually lock the alpha channel. It just makes it so you cannot add contents to the transparent areas of a layer.
When An Alpha Lock Can Be Useful
A good example of when it can be useful to add an alpha lock in Procreate is when shading an object:
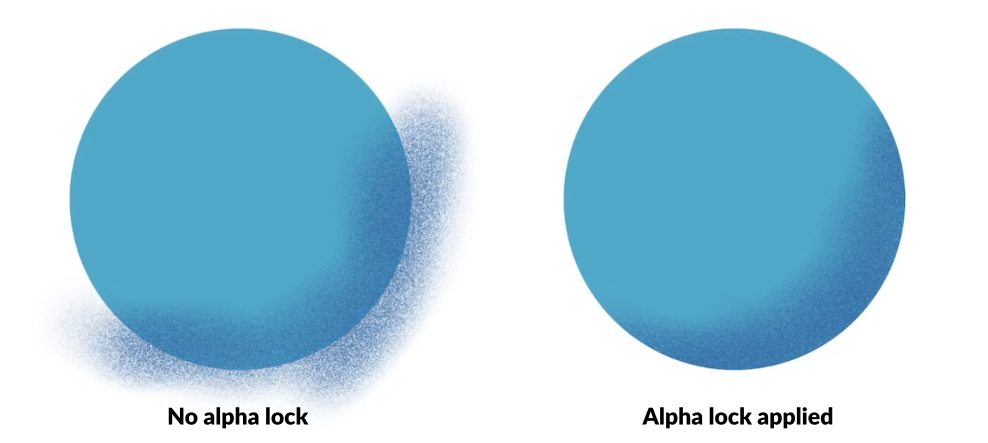
Alpha locks, in short, force you to color within the lines by making it so that you cannot make edits to the transparent areas of a layer.
As you can see in the diagram above, the object on the left does not have an alpha lock applied, meaning that when I tried to add shading to the circle, the shading spilled outside of the circle.
This is something that would normally have to be corrected using selections and erasers. However, adding an alpha lock in Procreate (as demonstrated in the object to the right) will make it so that your brush strokes are confined to the circle and do not spill outside of it.
In simplest terms possible, Alpha Lock forces you to color inside of the lines.
How To Use Alpha Lock In Procreate
Now that we’ve briefly gone over alpha channels and the concept behind alpha lock, let’s have a look at how to use it in Procreate for the iPad.
The following video tutorial will walk you through the entire process — demonstration included — in less than 2 minutes:
Continue on if you prefer the written instructions.
How To Apply An Alpha Lock
The Alpha Lock feature in Procreate can be accessed in the Layers menu.
Simply tap the icon in the top-right corner of the screen to open the Layers menu, select the layer you’d like to apply the alpha lock to, and tap on it again to get the flyout menu:
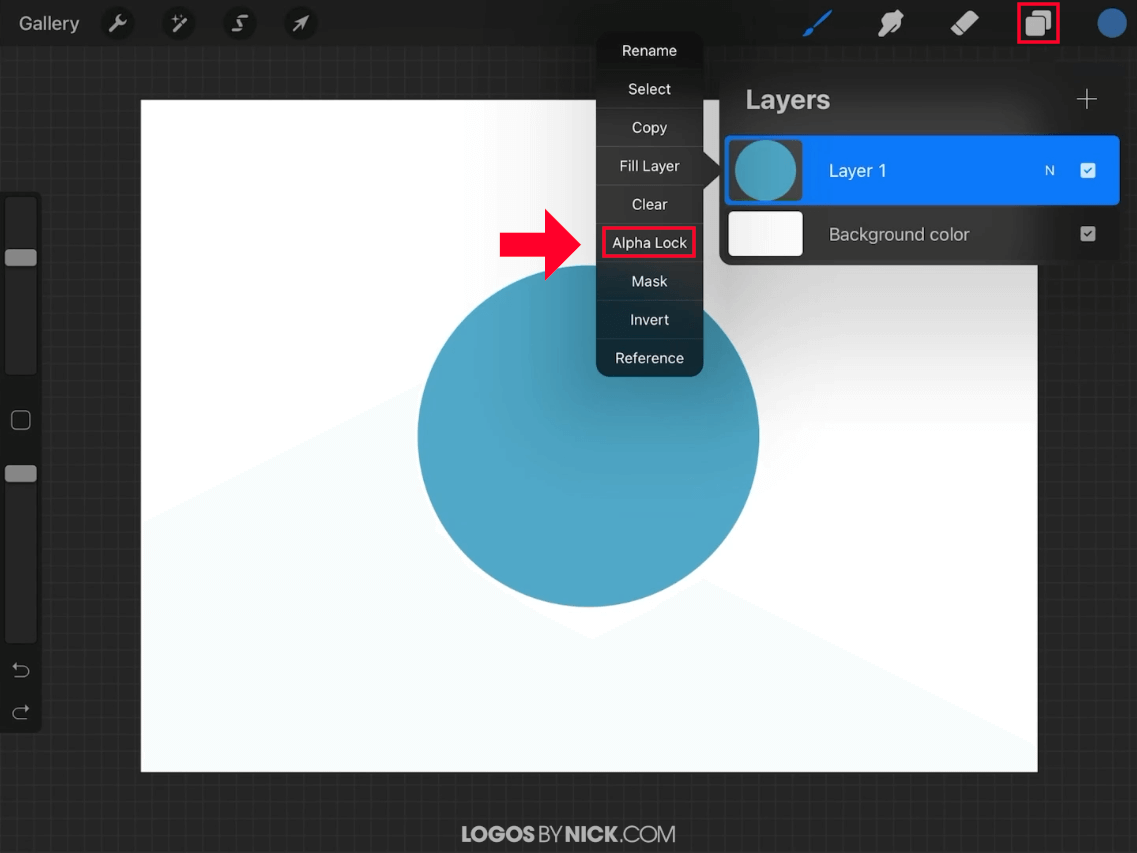
The alpha lock feature can be accessed in the Layers menu by selecting your layer and tapping it to get the layer options menu.
In the menu list you will be the Alpha Lock option. Tap on it to apply an alpha lock.
Once applied, you will see a check mark appear next to its label in the menu. You will also notice that the appearance of the layer’s thumbnail changes slightly, revealing a checkerboard pattern in the now-locked alpha areas:

The check mark next to the label, as well as the checkerboard background pattern in the thumbnail, will let you know that an alpha lock in applied.
With an alpha lock applied, you can now make transformations that will be confined to the contents of the layer and not its surrounding areas:
With alpha lock enabled, edits are confined to the contents of the layer and not its surrounding areas.
How To Remove An Alpha Lock
Once you are finished working with your alpha lock, you can remove it the same way that you added it.
Simply open up your Layers menu again, select the locked layer, tap on it to get the layer options flyout menu, and deselect the Alpha Lock menu item to remove the lock.
Once removed, you will be able to edit the transparent and surrounding areas of the layer again, and the changes that you made with the lock applied will remain in place.
Conclusion
Knowing how to use alpha lock in Procreate will allow you to draw, paint, sketch, and create artwork with more precision by giving you more control over how transformations are applied to a given layer. However, alpha lock is only one of several layer effects that produce this result. In addition, there are layer masks and clipping masks, which allow you to make non-destructive edits to a layer based on alpha values as well. We will be going over these in greater detail in future tutorials.
If you have any questions or need clarification on any of the steps taken in this lesson, simply leave a comment below.
Learn To Master The SoftwareGain a complete understanding of your favorite design apps with my comprehensive collection of video courses. Each course grants access to our private community where you can ask questions and get help when needed.
|
||||||||||||||||||||||||||||||||


