There’s 2 Ways To Offset A Path In Inkscape | Here’s How
There’s 2 Ways To Offset A Path In Inkscape | Here’s How https://logosbynick.com/wp-content/uploads/2021/09/offset-path-inkscape.png 800 470 Nick Saporito https://secure.gravatar.com/avatar/8e31bf392f0ba8850f29a1a2e833cdd020909bfd44613c7e222072c40e031c34?s=96&d=mm&r=gIn today’s tutorial we’ll be going over path offsetting in Inkscape. This is a fundamental function of vector design, and no vector design software is complete without it. There’s two ways to offset a path in Inkscape. One is quick and rudimentary, and the other requires more time but provides more control.
Let’s briefly go over what offsetting is (in terms of vector design) in case you’re not yet familiar.
What Is Path Offsetting?
Path offsetting is a way of increasing the size of an object by adding to its surface area rather than simply scaling up the width and height.
A good example of such would be the following shape:
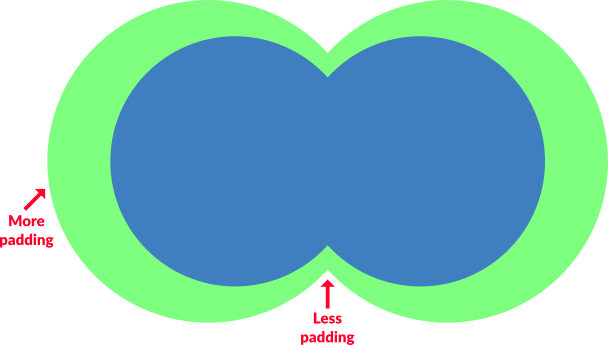
Scaling an object only affects its width and height, meaning there will be inconsistent spacing around the edges of the object if it isn’t perfectly symmetrical.
The blue object is the original shape that we’d like to offset, but the green object is the result of what happens when you scale the object rather than offset it.
The reason why this happens is because scaling only affects an object’s width and height, meaning the only way it’ll scale equally is if the object is perfectly symmetrical.
Since offsetting means that you’ll be enlarging the object by adding to its surface area rather than scaling it up, here’s what that looks like:
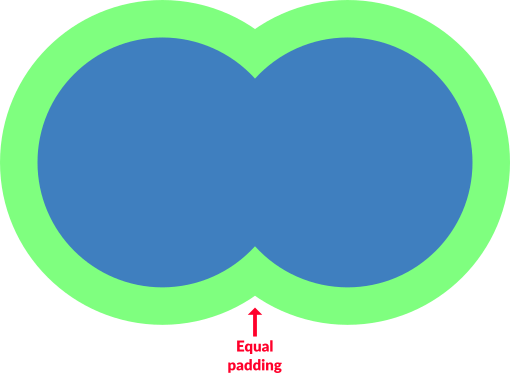
Offsetting a path allows you to change its size by adding or removing space from its edges instead of its overall width and height.
As you could imagine, this is a fundamental function when designing things like icons and logos. So in order for Inkscape to be a suitable application for such tasks, it must provide the ability to offset paths, which it does.
How To Offset A Path In Inkscape
There’s two ways to offset a path in Inkscape:
- By using the Dynamic Offset feature: this is a quick and simple feature that can be accessed with only a keyboard shortcut (Control + J), but the downside is that it forces the corners of the offset to become rounded.
- By using the new Offset Path Effect that was introduced in version 1.0 and above: this new path effect offers more control over the offset, allowing you to create sharp (or “miter” as they’re called) corners, but the downside is that it’s obscured within the Path Effects menu and cannot be accessed as quickly.
The following video tutorial will quickly walk you through how to use each of these features:
Continue on for the written instructions.
Two Methods For Path Offsetting In Inkscape: |
Offset a path with the Dynamic Offset feature
One way in which you can offset a path in Inkscape is by using the Dynamic Offset tool. To access it, select the object that you’d like to offset and navigate to:
Path > Dynamic Offset
Alternatively, you can access this tool a little more easily by simply using the keyboard shortcut for it, which is Control + J.
Once activated, you should notice a little node appear at the top of your object:

Clicking and dragging this handle will allow you to offset your path.
Simply click and drag on that node to offset the path.
Dragging the node down will decrease the offset, whereas dragging it upward will increase the offset:

Once you are finished, you can finalize the changes by converting the offset back into a path. To do so, make sure it’s selected and go to:
Path > Object to Path
The benefit of using the Dynamic Offset tool is that it’s easy to access and minimally interrupts your workflow. The downside, however, is that it forces the corners of an offset to become rounded, which can be problematic depending on the type of design you’re creating.
To offset a path in Inkscape with sharp corners, continue on to the next method.
Offset a path with the Offset path effect
In the spring of 2020 Inkscape released version 1.0, which came packed with lots of new features and improvements. One of which would be the new offset path effect, which I touched on briefly in my post outlining some of the best new features.
This new path effect improves offsetting in Inkscape because it now lets you retain sharp corners if you want. However, in order to gain access to this feature you must have Inkscape version 1.0 or later installed. If you’re unsure which version of Inkscape you’re using, navigate to:
Help > About Inkscape
If you’re using an older version (such as 0.92.5 or below) then make sure to upgrade to one of the newer versions.
Once you’re running version 1.0 or beyond, you can access the new offset path effect by selecting your object an opening the Path Effects menu by navigating to:
Path > Path Effects
The menu should open on the right side of your screen as a dockable menu. Here’s how it looks:
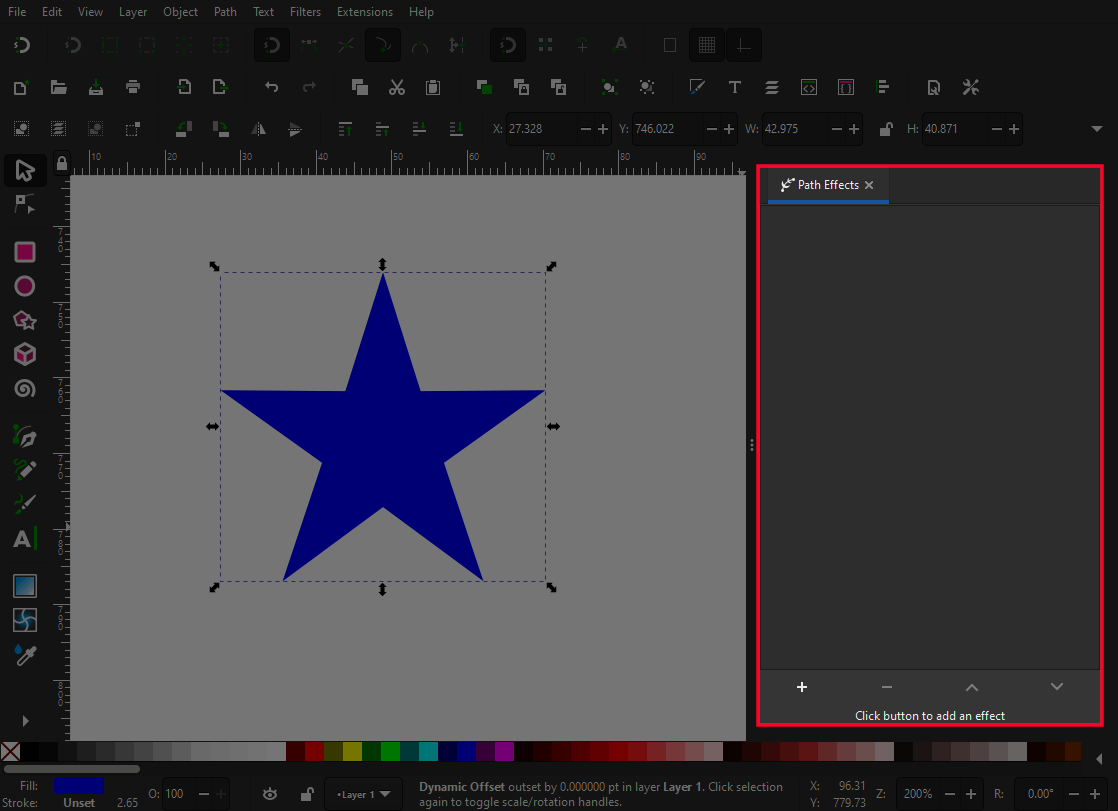
The Path Effects menu opens as a dockable menu.
With your object selected, click on the little plus (+) icon in the bottom-left corner of the Path Effects menu to add a new path effect. The following menu should populate with an assortment of path effects to choose from:

Look for the “Offset” path effect.
The path effect we’re looking for is labeled as Offset. Locate that option and click on it. If you’re having trouble finding it you can type “offset” into the search bar at the top of the menu.
Once selected, grab the Edit Paths By Nodes Tool (keyboard shortcut: n) and you will see a round knot appear at the top of your object:

As is the case for the Dynamic Offset tool, clicking and dragging the knot upwards will increase the offset, whereas moving it downward will decrease the offset.
In the Path Effects menu to the right of your screen you will see a variety of settings to choose from. These settings can be used to determine the type of offset you create.
The setting we’re paying the most attention to is Join. This dictates the type of corners used for your offset. They are as follows:
- Miter: makes your offset retain sharp corners if used
- Bevel: makes the corners of your offset appear as if they’re squared or cut off
- Rounded: makes the corners of your offset rounded
Choose the option you prefer and continue on to offset your path.
Once you are finished, you can finalize the changes by converting the offset back into a path. To do so, make sure it’s selected and go to:
Path > Object to Path
The benefit of using the offset path effect is that it provides more control over the type of offsets you create. The downside is that you need to navigate through a menu system to access it, which can be disruptive to your workflow.
Conclusion
Seeing as how the new path effect makes it easier to offset a path in Inkscape, I think it would make sense to remove the Dynamic Offset tool altogether and replace it with this path effect. Or at least program a keyboard shortcut into it so it can be accessed quickly without having to navigate through a menu system.
This is something that both Inkscape and Illustrator could learn from Affinity Designer — an application that handles path offsetting better than any other in my opinion.
If you have any questions or need clarification on anything from this post, simply leave a comment below.
Learn To Master The SoftwareGain a complete understanding of your favorite design apps with my comprehensive collection of video courses. Each course grants access to our private community where you can ask questions and get help when needed.
|
||||||||||||||||||||||||||||||||


You might also like


8 comments
-
-
-
abdul
on current version of inkscape, offset path effect is more precise and consistent compared to inset and outset.
-
D_ft Kid
I didn’t know about this haha. I used to just stroke the path I want to offset or inset to my desired thickness, convert stroke to path, and delete the unnecessary path points.
-
-
chris richie
is there a way to “define” the amount of the offset (“padding”(?))?
for example, i want a way to enter the “padding value” and have the new offset object adjust to the parameter value.
thanks
-
Nick Saporito
It doesn’t appear so. All you can do is manual transformations with clicking and dragging.
-
-
Patrice
Thank you. Thank you. Thank you. Too bad it took me a bit to find your great instructions. Great even tho my version is 1.4 and the exact screen shots are different this worked!!!