
How To Mirror In Procreate | Draw With Perfect Symmetry
How To Mirror In Procreate | Draw With Perfect Symmetry https://logosbynick.com/wp-content/uploads/2022/02/mirror-procreate.png 800 470 Nick Saporito https://secure.gravatar.com/avatar/8e31bf392f0ba8850f29a1a2e833cdd020909bfd44613c7e222072c40e031c34?s=96&d=mm&r=gProcreate makes drawing with a tablet and stylus pen a breeze. This is especially true if you need to draw something that is perfectly symmetrical, as Procreate for the iPad does indeed have robust symmetry and mirroring tools built in. In this tutorial we’ll be going over how to mirror in Procreate so that you can draw with perfect symmetry.
In short, the way to mirror in Procreate is to simply turn on the Drawing Guide located in the Canvas section of the Actions menu. From there, you can use the Symmetry menu to choose to mirror your drawing based on the vertical axis, the horizontal axis, quadrants, or radial.
In this post we’ll be going over all of these details in depth. Let’s dig in!
How To Mirror In Procreate
The following video tutorial will walk you through the entire process in less than 3 minutes:
Continue on for the written tutorial.
Table of ContentsHow To Mirror In Procreate
How To Disable Mirroring
|
How To Mirror In Procreate
Let’s first go over how to mirror using the Symmetry menu, then we’ll briefly go over how to disable symmetry drawing once you are finished.
Step 1: Open the Actions menu and select Canvas
The first step in our quest to mirror in Procreate is to open the Actions menu, represented as a wrench icon in the top-right corner of the screen:
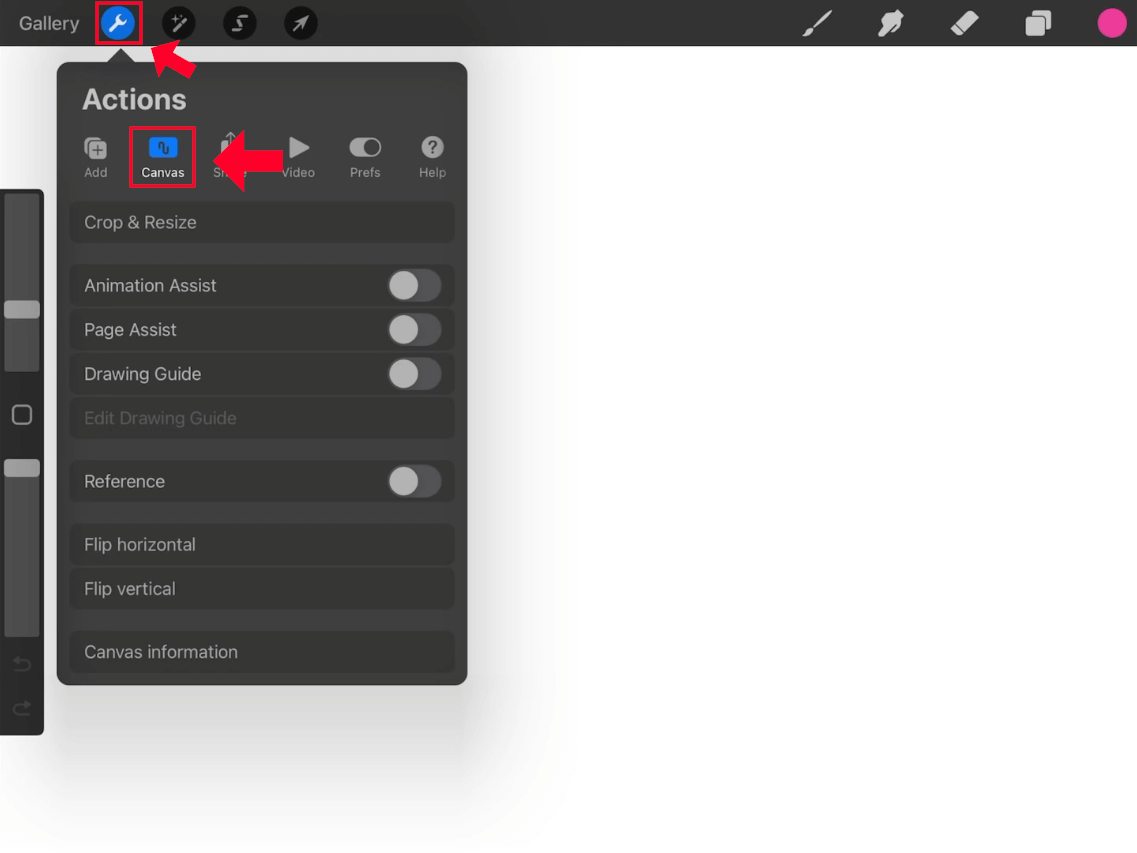
The Actions menu is represented by an icon that depicts a wrench (outlined in red.)
Within the Actions menu, select Canvas (highlighted in red above.)
Step 2: Enable the Drawing Guide setting and tap on Edit Drawing
Next, we are going to enable the Drawing Guide by tapping on the button to activate it:
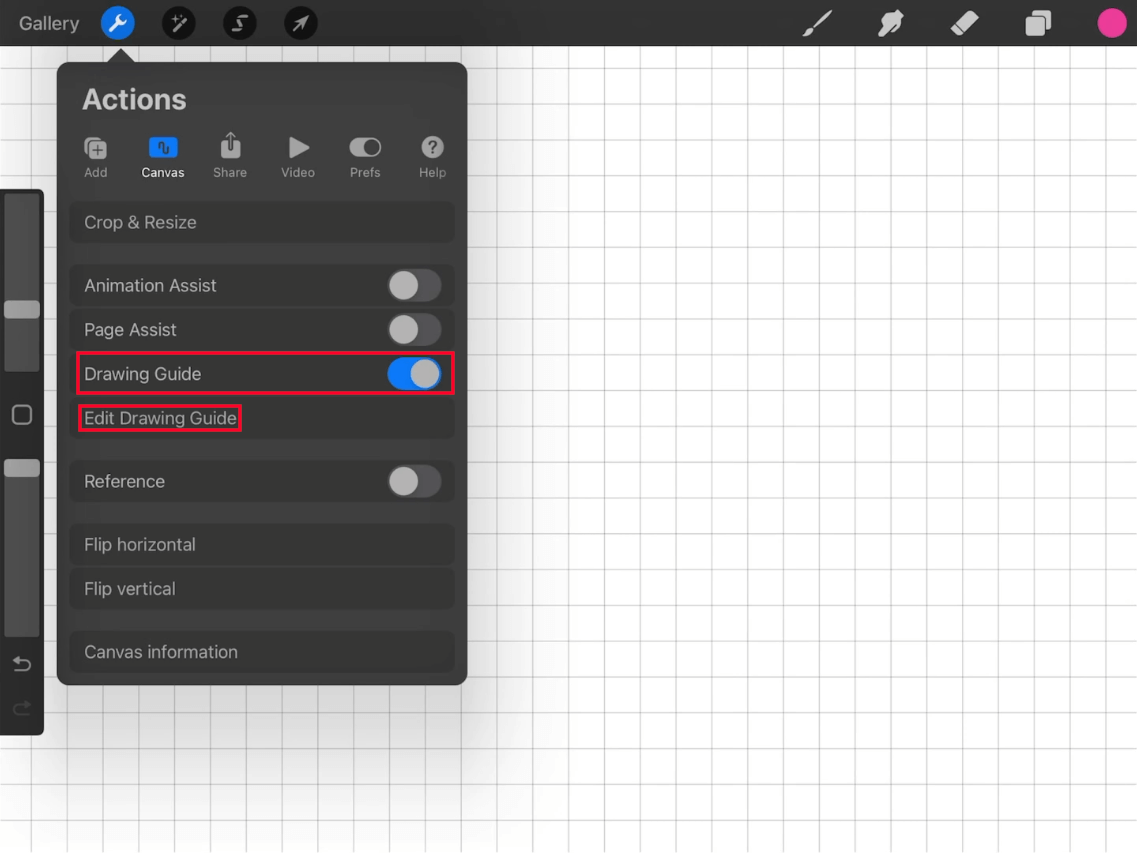
Enabling the Drawing Guide option will temporarily place a grid on your canvas.
Once activated you should notice a grid populates on your screen. Do not panic. This is only temporary, and it’s a step that is necessary to access the Symmetry options.
Once you’ve enabled the Drawing Guide, the Edit Drawing option should become active. Tap on that and proceed to the next step.
Step 3: Select Symmetry and open the Options menu to choose the axis for your mirror
By now you should be in the Drawing Guides menu.
Towards the bottom of the menu you will see an option labeled Symmetry:
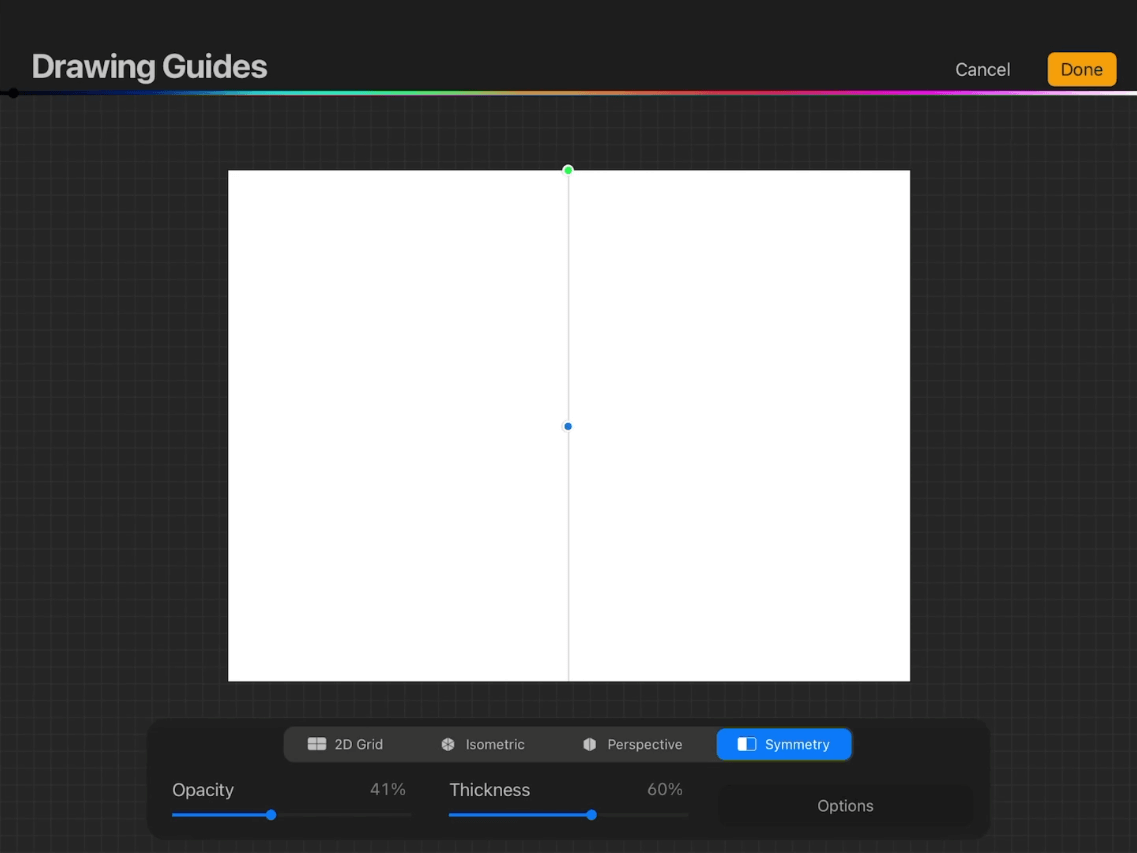
Tap the Symmetry button, highlighted in blue above.
This option needs to be selected in order to mirror in Procreate, so go ahead and tap on it to activate it.
You should notice a vertical guide placed on your screen at this point:
- The blue node allows you to change the position of the guide
- The green node allows you to rotate the guide
Next, tap on the Options button. The following menu should populate:
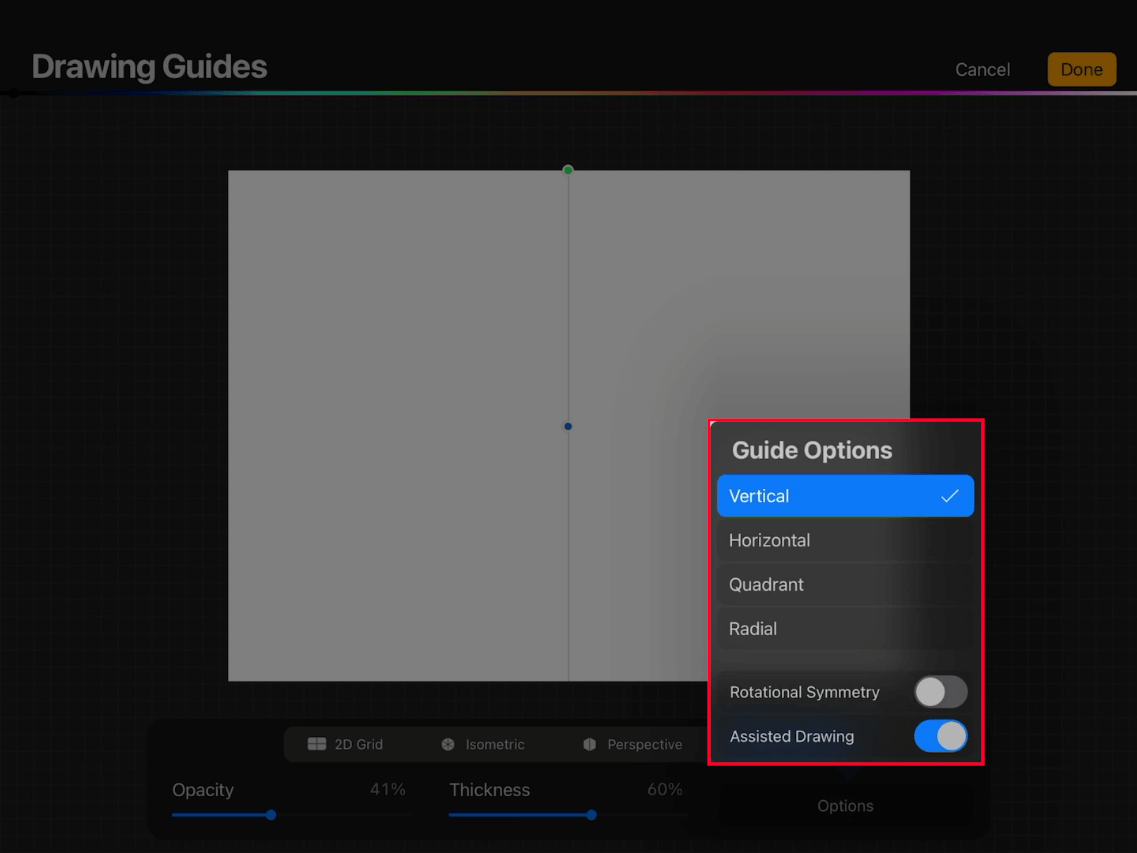
The Symmetry Options menu (outlined in red.)
You will see the following options for your mirrored drawing:
- Vertical: will make it so that your drawing is mirrored vertically across the screen
- Horizontal: will make it so that your drawing is mirrored horizontally across the screen
- Quadrant: will make it so that you drawing is mirrored in 4 sections
- Radial: will make it so that you drawing is mirrored in 8 sections
The following graphic depicts how the tool will behave in each setting:

In addition, you will also see the following settings in the Options menu:
- Rotational Symmetry: when enabled, this will make it so that your drawing is both mirrored and flipped
- Assisted Drawing: enabling this will make it so that your drawing is mirrored across the opposite axis
Here’s a depiction of how Rotational Symmetry works:

Please note: you must have Assisted Drawing enabled in order to mirror in Procreate.
Once you are finished you can tap the yellow Done button in the top-right corner to apply your changes. Your should now be able to draw with complete symmetry.
How To Disable Mirroring
Knowing how to mirror in Procreate is only half the battle. Once you are finished with your symmetry drawing, you may want to know how to disable it. This can be a little tricky. Let’s examine.
Step 1: Navigate back to the Drawing Guides menu
To turn off symmetry drawing in Procreate, first navigate back to the Drawing Guides menu.
If you do not remember how to get back there then refer to steps 1 and 2 from earlier in the lesson.
Step 2: Disable Assisted Drawing
Within the Drawing Guides menu, tap the Options button and disable the Assisted Drawing setting:
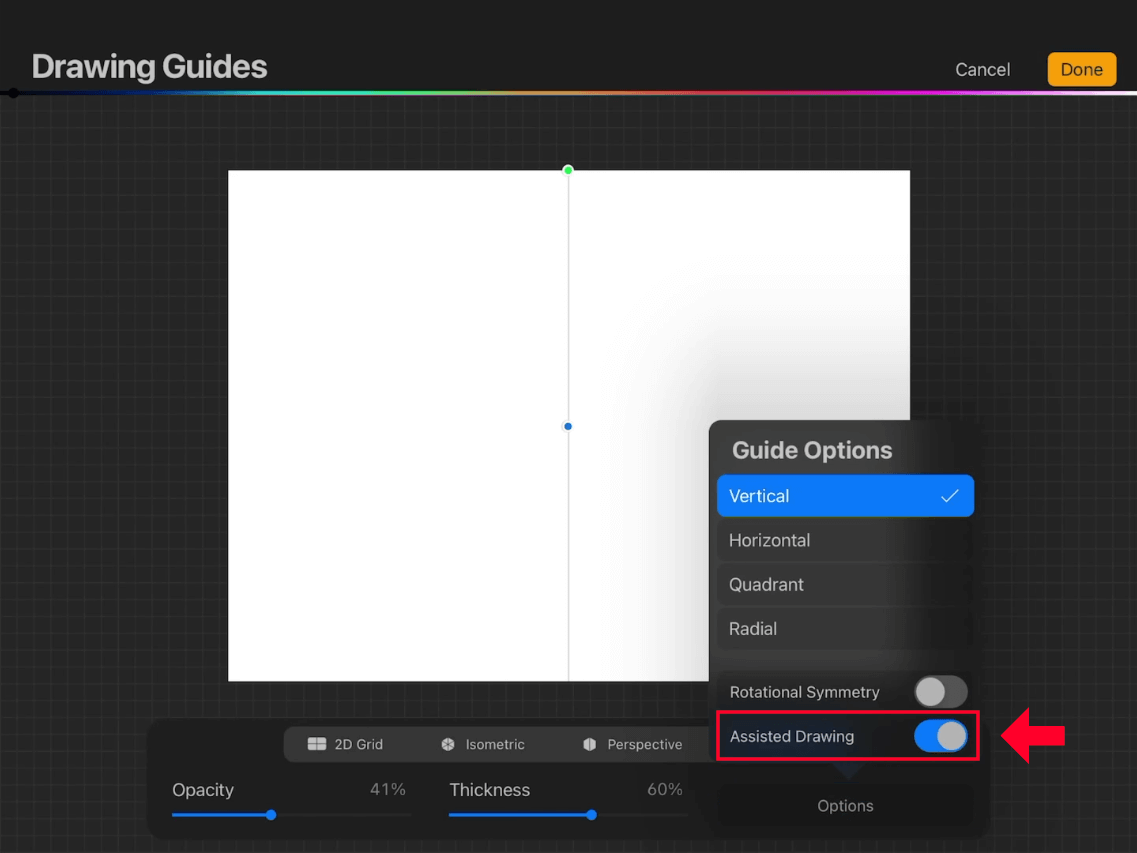
Disable Assisted Drawing to turn off symmetry drawing.
You will know it’s disabled once it is no longer highlighted in blue.
Once completed, tap Done to apply the changes.
Step 3: Disable the Drawing Guide
Disabling Assisted Drawing will close you out of the menu altogether, so we’ll need to navigate back there to finish disabling mirroring.
At this point mirroring should no longer work, but you will still have the guide on your canvas. Let’s get rid of it.
Navigate back to the Canvas section of the Actions menu and simply tap on Drawing Guide to disable it.
Once disabled the guide will disappear from the screen and you will be able to draw once again without it being mirrored.
Conclusion
Knowing how to mirror in Procreate is simply a matter of navigating through the menu system and enabling some options. It can be a little tricky at first — especially disabling symmetry drawing — but once you’re familiar with the software it should come as second nature.
Thankfully the good folks at Procreate have provided us with plenty of grid and guide options to work with — including mirror drawing.
If you have any questions or run into any problems with anything we’ve gone over in this lesson then simply leave a comment below!
Learn To Master The SoftwareGain a complete understanding of your favorite design apps with my comprehensive collection of video courses. Each course grants access to our private community where you can ask questions and get help when needed.
|
||||||||||||||||||||||||||||||||


