10 Hidden Inkscape Secrets That Will Improve Your Workflow
10 Hidden Inkscape Secrets That Will Improve Your Workflow https://logosbynick.com/wp-content/uploads/2020/04/inkscape-secrets.png 800 470 Nick Saporito https://secure.gravatar.com/avatar/8e31bf392f0ba8850f29a1a2e833cdd020909bfd44613c7e222072c40e031c34?s=96&d=mm&r=gInkscape is a capable open source alternative to commercial vector graphics applications like Illustrator and CorelDraw. It has a lot of features that make it shine, but many of Inkscape’s most useful features are nestled in obscure areas. In this post I’ll be sharing 10 of those hidden features and how they can improve your workflow once you’re aware of them.
10 Hidden Features in Inkscape
One of the benefits of having used Inkscape on a near full-time basis for the past 8 years is that I’ve become quite familiar with it. I’ve learned a lot of handy tricks and shortcuts that have saved me countless hours in the long run.
#1: Aligning Nodes
In Inkscape you can align and distribute individual nodes the same way you would align a selection of objects.
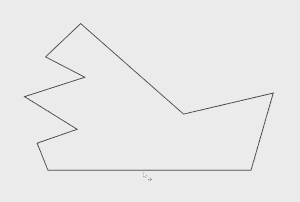
To do so, select multiple nodes with the Edit Paths By Nodes tool and navigate to the Align & Distribute menu. You’ll see a dedicated panel titled “Nodes” that allows you to align your nodes the same way you would align objects.
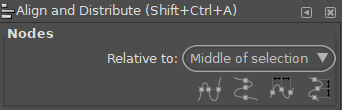
This can come in handy if you’re trying to alter your objects so that they have some degree of symmetry.
#2: Alt-Clicking Multiple Objects
We all know that you can select multiple objects in Inkscape by shift-clicking them, or by clicking and dragging a selection around them, but a lesser-known technique for selecting multiple objects is to hold Alt on your keyboard and click and drag a red line through them.

This is very useful because it allows you to select multiple objects with more precision than if you were to simply create a bounding box around them. With a bounding box you have no choice but to select every object within the boundaries, even if they’re objects you don’t want to select. Alt-clicking allows you to exclude those objects.
#3: Scale, Shear, and Rotate Nodes
As we already know, the Select Tool allows you to select objects, scale them, rotate, and shear them. What you may not know, however, is that you can do the same with individual nodes by activating a setting in the tool features of the Edit Paths By Nodes tool.
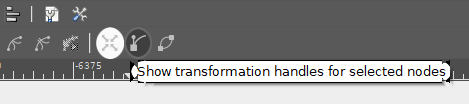
Within the tool settings at the top-right side of your screen you should see an icon labeled “Show transformation handles for selected nodes,” depicted as a series of four arrows. Activating this setting will allow you to edit the individual nodes of an object the same way you would edit an object itself with the Select Tool.
This is particularly useful for creating custom shapes with symmetry.
#4: Selecting Objects By Fill & Stroke Data
There’s various different ways to select multiple objects in Inkscape, but a lesser-known method that has proven to be very useful in my own workflow is to select individual objects by fill color, stroke color, or fill and stroke color.
This can be accomplished by selecting an object and navigating to Edit > Select Same > Fill & Stroke.
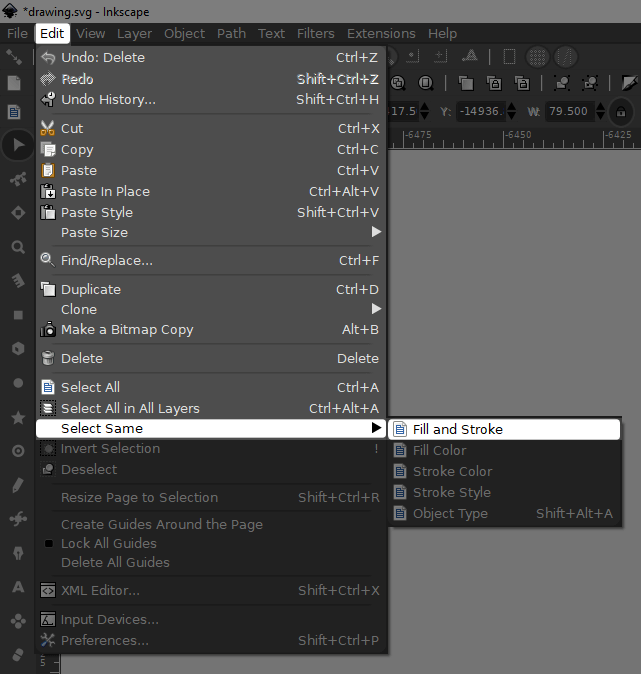
Inkscape will then select every other object on the canvas with the same fill and stroke color.

You can also select objects by…
- Just the fill color
- Just the stroke color
- Stroke style
- Object type
This can be useful when working with complex designs with many objects. I’ve personally found this to be useful when designing and editing patterns.
#5: Creating Custom Templates
Within Inkscape there’s a handy feature that allows you to open a new document based on a specific template. If you navigate to File > New From Template, you’ll have the option of opening a new document that is already sized to fit specific branding assets like business cards, DVD covers, and desktop wallpapers.
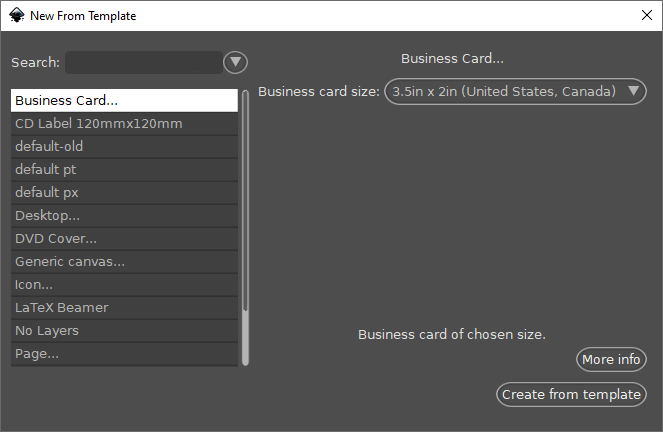
What you may not know is that you can manually create your own templates in SVG format and add them to this list by navigating to (C:) > Program Files > Inkscape > Share > Templates and pasting them in there. And the next time you restart Inkscape your custom templates will populate in that list.
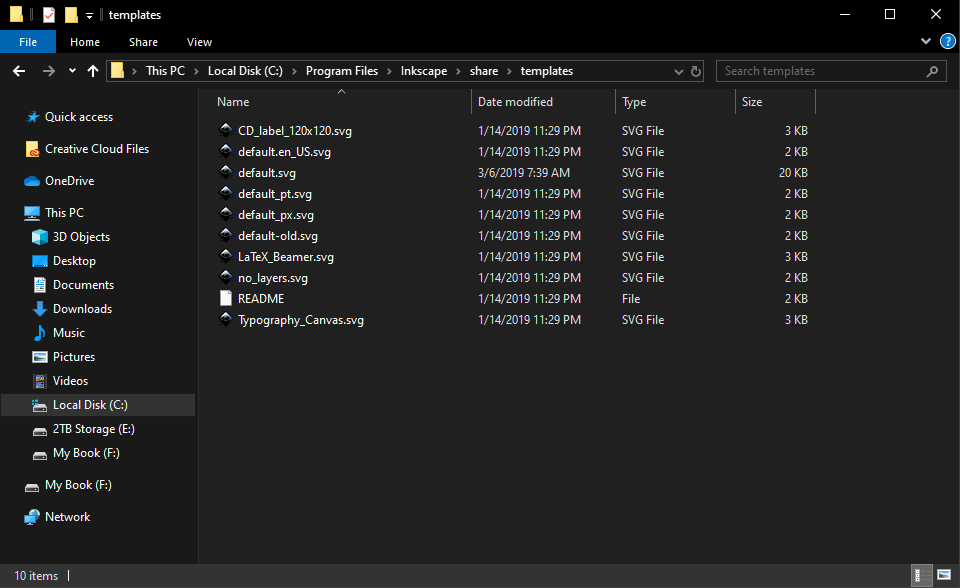
I’ve personally found this to be useful for creating templates for certain types of designs that I create frequently, like YouTube thumbnails and cover graphics for social media.
#6: Batch Export PNG Images
Inkscape has a setting in its Export menu that allows you to export multiple objects as individual PNG files, but it’s easy to miss it if you’re not looking for it. Simply tick the box labeled “Batch export all selected objects” before exporting your work.
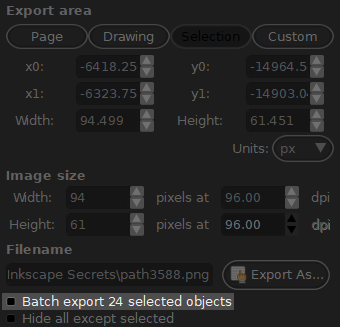
This is particularly useful for designing something like an app icon, where you need to generate the same design in many different sizes.
#7: Open Illustrator Files
One of the biggest downsides of using open source software as a graphic designer is some of the cross-platform compatibility issues you’ll run into when a client or another designer wants to send you an Adobe-specific file to work with, like Illustrator’s .AI format. However, you can easily open Illustrator files with Inkscape by simply changing the file’s name from .ai to .pdf.
Inkscape will then treat the Illustrator file like a PDF file when you go to open it.
This also works in reverse. If someone requests an Illustrator file specifically, just save your work as a PDF document and change the name so that it ends in .ai.
#8: Turning Objects Into Patterns
There’s many different ways to create patterns from objects in Inkscape, but one of the easiest ways is to simply select the object and go to Object > Pattern > Objects To Pattern.
You’ll then be able to activate the Nodes tool and maneuver the handles to adjust the pattern to your liking.
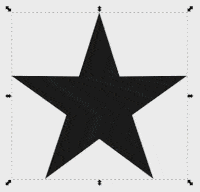
#9: Converting Objects To Bitmaps
Inkscape allows you to quickly convert your vector designs into raster bitmaps if you so desire. You can do this by selecting your work and navigating to Edit > Make A Bitmap Copy.
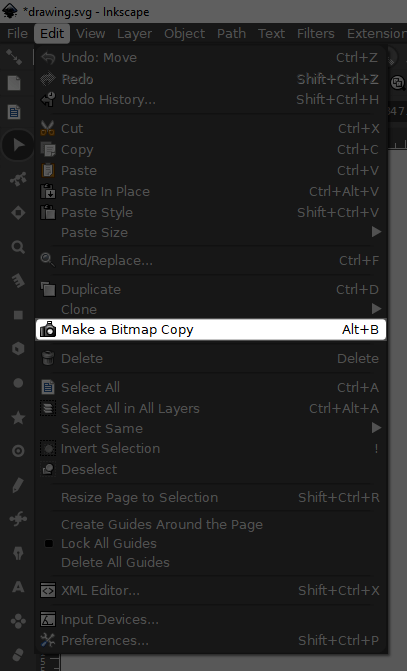
Not only will Inkscape generate a raster copy of your selected design, but it will save a copy of it in whatever folder you currently have your work saved in.
This is useful because vector graphics tend to retain more data than raster graphics, and they take up more disk space because of it. This means that if you’re working on a large, complex design with lots of vector objects, you may run into performance issues with your computer. Converting your designs to bitmap can help mitigate that by freeing up system resources.
#10: Custom Angle Guides
As you may already know, you can create guides in Inkscape by clicking and dragging on the rulers on the top and left edges of your document. By default, you’ll be able to create both horizontal and vertical guides, as well as guides at 45 degree angles.
What you may not know though, is that you can manually adjust the angle of the guide by double-clicking it, which will bring up a settings menu.
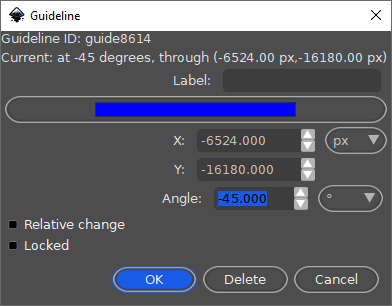
This will allow you to adjust some of the properties of that guide, like its color, position on the canvas, and its angle. This can prove useful when designing geometric shapes that need to be drawn at specific angles.
Conclusion
That should do it for this list of hidden features in Inkscape. Leave a comment below to let me know what you think. Did you already know about any of these features? And more importantly, now that you do know about them, will you be using them? As always, thanks for watching!
Learn To Master The SoftwareGain a complete understanding of your favorite design apps with my comprehensive collection of video courses. Each course grants access to our private community where you can ask questions and get help when needed.
|
||||||||||||||||||||||||||||||||


You might also like


18 comments
-
-
-
Matti Juhani Piilola
Your tutorial gave me one solution which is important to me: To show the angle of a guideline. But still I miss functions which are very familiar to all CAD programs: How to trim and extend lines. Or how to erase parts of lines. CorelDraw can do this very easily but I wonder if there is a simple way also in Inkscape to do these, so far I haven’t found any?
-
Nick Saporito
Hi Matti, you can delete parts of lines with the Cut Path feature. You can also use the Edit Paths By Nodes tool to manually move and delete nodes. You can also add nodes by double clicking the line.
-
-
-
Nick Saporito
Thank you. I just recorded myself designing the logo then played it back at a faster speed. I made the background of the Inkscape document black.
-
-
-
-
-
Nick
Thank you so much! Your tutorials are so useful. About 50% I already knew (but it doesn’t hurt to refresh). Most useful one that I didn’t know about is #8. Also a huge thanks from my kids (6 and 13 y.o). Watching me learning from your videos and using inkscape, they also started to play with it and use it mostly every day.
-
-
Kim Bartholomew
Thanks, Nick, for this refresher. Some of them I had forgotten like ALT selection and some I didn’t know like movable guides.
-
-
Abi
Nick, you are literally a life saver, no lie, every single one of these tips will help me with my current project. I’ve learned everything about Inkscape from you, thank you so much for this content. I really appreciate the time and effort you put into making it sleek and to the point yet jam packed with information, and for making it available for free for us newbies.
Forever grateful!
Abi -
Nick
Fantastic post, thank you! Many of these I already knew, but some I’d forgotten. At least a couple I don’t think I ever knew – Alt-selection in particular will prove super useful. Thanks!
-
Eniola
Thank you for writing this useful article! Going to share it immediately.
Question: Do you use inkscape extensions in your workflow and if you do which ones would you recommend to install.-
Nick Saporito
The only Inkscape extensions I use are Interpolate and Jitter Nodes. I may do a tutorial about that. Thanks Eniola!
-
-
John
Thanks, Nick,
This was really useful. You showed several features that I was completely unaware of. I can hardly wait to try them all out.
abdelnasir
Nick , YOU are Amazing