What’s New in Inkscape Version 1.0
What’s New in Inkscape Version 1.0 https://logosbynick.com/wp-content/uploads/2020/05/inkscape-new-features.png 800 470 Nick Saporito https://secure.gravatar.com/avatar/8e31bf392f0ba8850f29a1a2e833cdd020909bfd44613c7e222072c40e031c34?s=96&d=mm&r=gInkscape recently introduced version 1.0 as a new release, and this was not your typical update. This new release comes packed with lots of new features and functionality that might make your life a little easier as an Inkscape user.
You can check out the Wiki page for a complete list of of updates, but in this post I’d just like to go over a few of the features that I’m really excited about in particular. And if you are enrolled in my Inkscape Master Class I have updated the course contents according to the new release, and if you’re not enrolled maybe consider checking it out if you want to learn more about Inkscape.
New Features in Inkscape 1.0
Dark Theme & Updated UI
To get us started, Inkscape has officially added support for theme customization. Gone are the days where we had to tinker with system files and perform other types of voodoo magic just to get a more visually-appealing dark theme with a more modern icon pack. It’s now built right in. You can just navigate to Edit > Preferences, and click on Theme under the Interface tab, and from there you can choose from a variety of themes (and yes, that does include a dark theme!)
New integrated dark theme in Inkscape
Not only that, but you can also switch to a more modern icon pack with a monochromatic style that looks more like it belongs in the year 2020. You can even go as far as changing the color of those icons if you so desire.
You can make your icons any color you’d like!
Single Line Text Wrapping
One new feature that I’m really excited about in Inkscape version 1.0 has to do with the Text Tool. If you generate some text on your canvas, you’ll notice that there’s now a little node on the bottom-right side of your text item. Clicking and dragging that node will allow you to determine where a line of text should end.
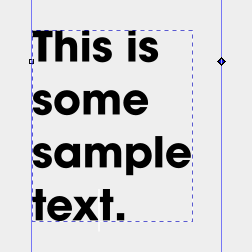
This will be really useful when designing things like brochures, where you have to confine your text to a specific vertical column. You won’t have to worry about making the bounding box of the text fit that column any more, you can simply adjust that node to make your lines of text end exactly where you want.
X-Ray Vision
Those of you who use Illustrator may already be familiar with the concept of outline mode, which allows you to view your design as somewhat of a skeleton, where you can see all of the individual paths and boundaries that make up a design without fill colors and other design elements getting in the way.
This is useful because sometimes you need to select or work with a particular object, but you can’t select it because you don’t know where it is, because it’s positioned beneath other objects with fill data. This is one of the reasons why I tend to make objects partially transparent when I’m designing something.
You just need to be able to know where things are sometimes, and Inkscape has now made that easier with their own version of outline mode. And I’ll even go as far as saying that they’ve outdone Illustrator with this update, because it offers a lot more versatility.
The first way you can view your work in outline mode is by navigating to the View menu and clicking on X-Ray Mode. This will allow you to use your cursor as somewhat of a viewfinder where you can hover it over specific areas of your design to see all of the individual outlines.

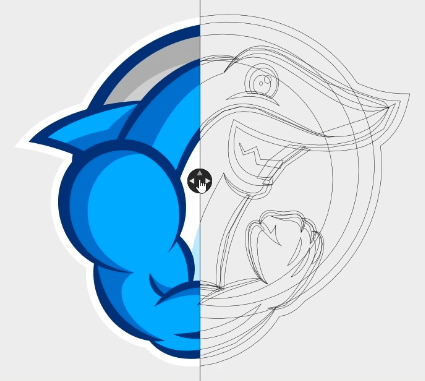
The second way you can view your design as outlines is by navigating to the View menu and selecting Split View Mode. This will generate a guide through the center of your screen that will show how your design normally looks on one side, and how it looks in outline mode on the other side. You can move the guide around by clicking and dragging it, and you can also change the orientation and the position of your guide by clicking on the individual arrows.
On-Canvas Alignment
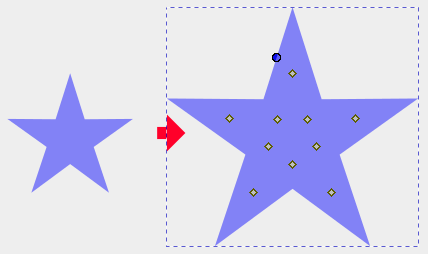
If you open up your Align & Distribute menu, you’ll notice a new icon in the top-left portion of the menu labeled “Enable on-canvas alignment handles” if you hover your cursor over it. Enabling that icon will allow you to align objects directly on the canvas without having to use the Alignment menu interface.
The way that it works is that you select the objects you’d like to align, click on them once to display the rotation handles, then click on them a second time to display the new alignment handles. Then from there you can simply click on those handles to align your objects the same way you normally would in the Align & Distribute menu.

This is a unique feature that I have not seen anywhere else, and it’s one of those things that you didn’t know you needed until you tried it.
Offset Live Path Effect
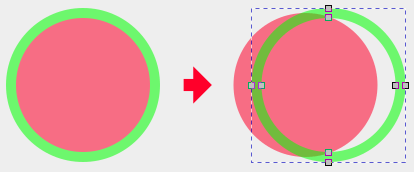
Another new feature that I know I’ll be using a lot is the new Offset Live Path Effect. This functions very similarly to the standard Dynamic Offset path operation, only with one very big improvement, and that is that it now allows you to maintain sharp corners!
To see what I mean, if you were to perform a Dynamic Offset on an object with sharp corners, like a star, you’ll notice that the corners become rounded as you offset the object. This is fine for objects with rounded corners, but it’s useless in scenarios where you need to maintain the sharp corners of an object.

My workaround for dealing with this in the past was to offset the object by adding a stroke with sharp corners, then converting the stroke to a path to work with it further. Now, those days are over, thanks to the new Offset live path effect, which allows you to maintain the sharp corners of objects as you offset them.
To access the new feature, select the object you’d like to offset, then navigate to Path > Path Effects to bring up your Path Effects window, then click on the little plus sign to add a new path effect. From the Path Effects menu, search for Offset and apply it. Then, you can grab the Edit Paths By Nodes tool and offset your object while maintaining sharp corners!
Notable Mentions
Inkscape version 1.0 comes with lots of welcomed improvements, like support for high-resolution displays. If you’re using a 4K monitor you’ll actually be able to see the user interface now.
There’s also some other subtle changes, like in the way that Stroke To Path works. When you convert a stroke to a path, it now retains the fill segment of that stroke as a separate object.
Like I mentioned earlier, there’s lots of new updates and details to comb through, so be sure to check out that Wiki page for a complete overview. And also be sure to check out a video by Davies Media Design where he goes over the top 5 new features in Inkscape’s latest release. Let me know what you think of the new version of Inkscape in the comments below, and as always, thanks for watching!
Learn To Master The SoftwareGain a complete understanding of your favorite design apps with my comprehensive collection of video courses. Each course grants access to our private community where you can ask questions and get help when needed.
|
||||||||||||||||||||||||||||||||


You might also like


22 comments
-
-
-
Ronda Leigh Gilbert
Hi, I watched part of your video and the Inkscape 1.0 I have, does not have the Edit, Preferences, Theme etc anywhere. I looked everywhere and under every tab. Is it because I have a MAC? I want to take your course but am getting frustrated when programs don’t match up. Thank you, Ronda G.
-
Nick Saporito
Hi Ronda, it might be a Mac thing but I don’t know for sure. I don’t have any experience using Inkscape on a Mac, sorry.
-
-
Bruce
Hi, Some great info you share Nick.
I am a total Newby.
Only just downloaded Version 9.2.
Before I go on my journey for INKSCAPE knowledge, should I update my version.
I am interseted in doing logo work to print on carry bags etc. -
-
Richard Howard
Hello Nick,
I was doing some line art the way you showed in one tutorial using the bezier tool with the shape from the clipboard, but for some reason it does not work the same now that I have downloaded the new version. Have you experienced this?
-
-
Richard Howard
After copying the shape made from the two circles, the bezier tool creates an outline of a path, where before I would just get a solid black line . It seems like there may be a setting somewhere to fix this that I am missing. If I use the bezier with the Ellipse shape it is more like what I was used to. Thanks!
-
Richard
When using the bezier shape “from clipboard”, I get a hollow outline of a path and not solid black line. If I select it I can make it solid black but before the line would just be drawn solid. I tried using the ellipse shape and it was somewhat similar to what I was used too. Thanks for the reply!
-
-
-
Oswald
Hi Nick, I can’t believe that you missed the fillet chamfer effect in the video. That was the main feature I was most excited about!😜
-
-
gnx
Hello.Do you know if there is any way of change the workspace background colour from the canvas colour? Or do we have to make your trick modifying the default doc? In documents properties it still changes both.
Thanks in advance.-
Nick Saporito
You can still change the document’s background color the same way you did in previous versions. It won’t save those settings unless you change the default startup file though.
-
-
-
Nick Saporito
Nope. When you download 1.0 it’ll ask you if you want to uninstall the old version first.
-
-
Diego
Hello Nick, recently bought your courses and after checking this post, went to the course site but for me there are no updated videos. Are you going to update the course content soon?
-
Nick Saporito
Hi Diego, the course contents have been updated already. I’m not sure why you’re not seeing the added videos. Please email me for further assistance.
-
Diego
Have checked again, some hours after asking you. Was my fault, sorry for that. Did a fast check in a first moment, and didn´t see the new additions, just the old videos. Thats why i came here to ask you, thinking that you meant all videos were updated.
Thanks for answering quickly, i like so much your courses and youtube channel
-
Nick Saporito
Glad you got it! Most of the videos are unchanged because most of the tools and features in the 1.0 release are unchanged. I added new videos for the new features though.
-
-
-
-
-
Nick Saporito
No need to this time around. The new icon pack they’re using is as good, if not better, than anything I would come up with 🙂
-
Claudia
Hi Nick.
I’m writing to thank you for your dedicated job in producing this very good instructional material about design with Inkscape.
One year and half ago, I started to learn Inkscape and I could say that you were my Inkscape teacher. I still follow your courses and they are very useful. Thanks!