
How To Fit An Image To A Shape In Procreate For iPad
How To Fit An Image To A Shape In Procreate For iPad https://logosbynick.com/wp-content/uploads/2022/10/fit-image-to-shape-procreate.png 800 470 Nick Saporito https://secure.gravatar.com/avatar/8e31bf392f0ba8850f29a1a2e833cdd020909bfd44613c7e222072c40e031c34?s=96&d=mm&r=gIn previous tutorials we’ve gone over how to crop and resize images in Procreate for the iPad. If you wanted to crop an image to a shape, however, the process is a little more involved. In this tutorial we’ll be going over how to fit an image to a shape in Procreate by using selections and the cropping tool.
In short, the way to fit an image to a shape in Procreate is to use the Selections tool to create an inverted selection around the area of the image you’d like cropped and cut it. Then, we will follow the steps taken in a previous lesson to fit the document to the newly-cropped image. Let’s have a closer look.
Fit An Image To A Shape In Procreate
The following video tutorial will walk you through the entire process step-by-step and in less than 2 minutes:
Continue on for a written overview.
Table of Contents |
Step 1: Open the Layers menu and disable the visibility of the Background layer
When fitting an image to a shape, it is recommended that the background layer be disable so that the surrounding area of your cropped shape will be transparent rather than filled with white.
To do so, open the Layers menu in the top-right corner and disable the Background layer’s visibility by deselecting the checkbox next to its name:
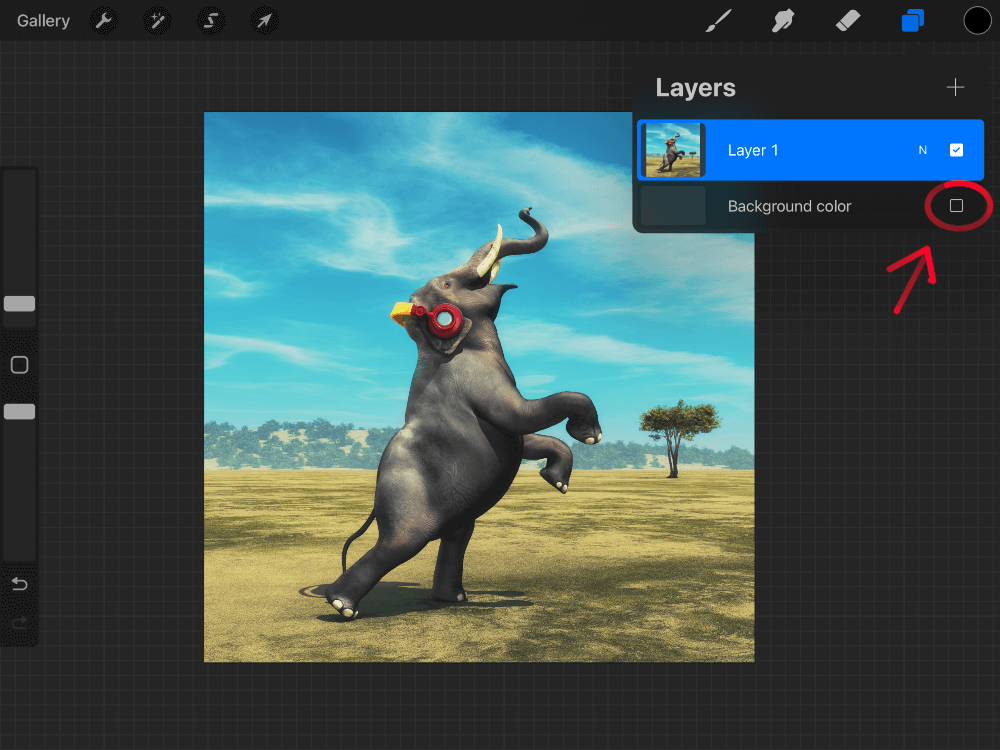
It is a good idea to disable the background layer before proceeding.
Once you are finished, close out of the Layers menu tapping the menu icon.
Step 2: Open the Selections menu and create an inverted selection over your image using your shape of choice
Now we are going to choose a shape and define the area of the image we’d like it applied to.
Open the Selections tool and look towards the bottom of the screen for the menu. You will see various options for creating selections, but the two we’ll be focusing on in this tutorial are Rectangle and Ellipse. Tap on whichever option you’d like to crop your image to. For this demonstration we will be creating a circle, so we will choose Ellipse.
Once selected, tap and swipe over your image to create a selection in your desired shape. Holding a tap on the canvas with your index finger from your other hand will lock the aspect ratio when drawing so that you can create a perfectly round circle or symmetrical square:

Create a selection over the image in your desired shape.
Step 3: Invert and cut the selection
At this point the shape we have drawn over out image is what’s selected. We need to select the inverse of the (the area around the shape) instead so that we can delete it.
Within the Selections menu, tap the button labeled Invert. Nothing will visibly change on your screen, but the selection will be corrected to accommodate what we’re trying to do.
Next, open the Actions menu (the little wrench icon in the top-left corner of the screen,) navigate to Add, and select Cut from the list. This will clear your selection so that only the shape, with its filled image, remains:
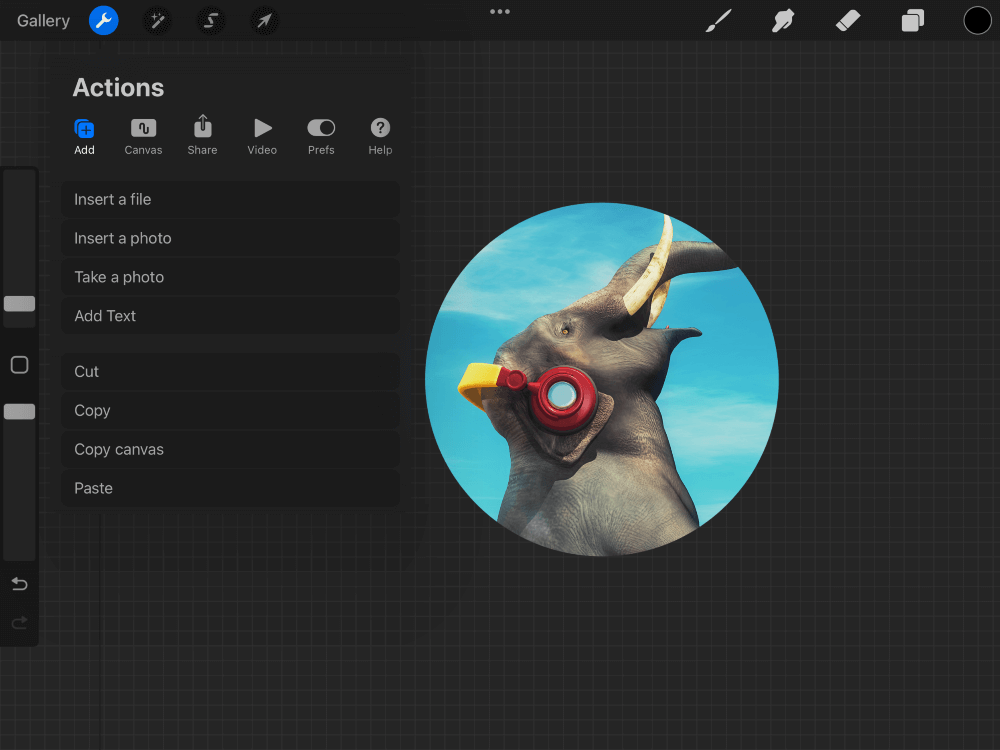
Cutting the inverted selection will remove the area of the image surrounding the shape.
Keep the Actions menu open as we’ll be using it in the final step.
Step 4: Resize the document to fit the newly-cropped image
All we have to do now is resize the document to fit the newly-cropped image. To do this we will be using the Actions menu again.
Within the Actions menu, navigate to the Canvas tab and select Crop & Resize.
Next, tap on the Settings label in the top-right corner of the screen and enable Snapping in the menu.
All you have to do now is tap and swipe the edges of the document to resize it around the cropped image:
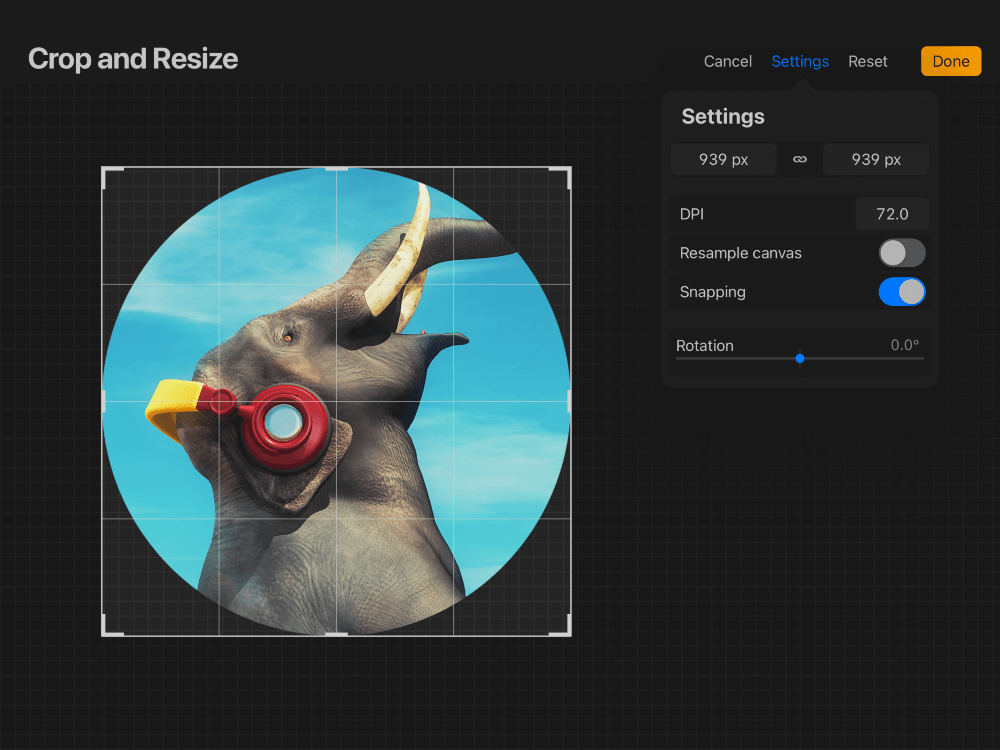
How the image looks fit inside of a shape and cropped.
Tap Done once finished and you’re done!
Conclusion
This workflow for fitting an image to a shape in Procreate is simple enough, but it does include several steps. It is also a destructive method, meaning the excluded area around the image is deleted for good. This is why it’s a good idea to keep another copy of your image on hand just in case you ever need it.
It would be great if Procreate could implement a way to paste images into clipping masks, which would provide for a non-destructive method, but for now this will do.
If you have any questions or need clarification on any of the steps taken in this lesson just leave a comment below.
Learn To Master The SoftwareGain a complete understanding of your favorite design apps with my comprehensive collection of video courses. Each course grants access to our private community where you can ask questions and get help when needed.
|
||||||||||||||||||||||||||||||||


