How To Invert Colors with Inkscape
How To Invert Colors with Inkscape https://logosbynick.com/wp-content/uploads/2023/06/invert-colors-inkscape.webp 1000 587 Nick Saporito https://secure.gravatar.com/avatar/8e31bf392f0ba8850f29a1a2e833cdd020909bfd44613c7e222072c40e031c34?s=96&d=mm&r=gColor inversion is typically a quick process that only requires a few clicks, but Inkscape provides a variety of settings that can be adjusted to fine-tune every color to your liking. In this tutorial we’ll be going over all of those settings and everything else having to do with inverting colors of vector objects in Inkscape.
In short, to invert colors in Inkscape all you have to do is apply the Invert filter to a selected object. However, once applied, you will be prompted with a menu of settings that enable you to fine-tune the inversion. That’s have a closer look.
Invert Colors In Inkscape
The following video tutorial will walk you through the entire process:
Continue on for the written instructions.
How To Invert Colors
Tips & Precautions |
Step 1: Select your object(s) and apply the Invert filter
In Inkscape you can invert the colors of individual objects or multiple objects. Start out by selecting the object(s) you want to invert by clicking on them with the Select Tool.
Once selected, apply the Invert filter by navigating to:
Filters > Color > Invert
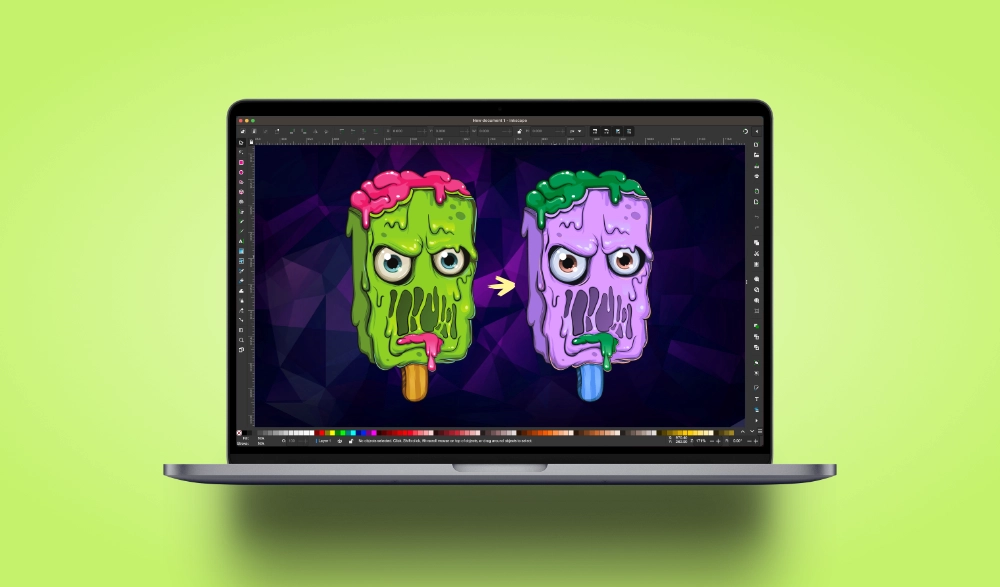
For this demonstration I will be inverting the colors of the following example graphic:

Step 2: Use the Invert menu to adjust the settings to your preference
Once applied, the Invert menu will populate on your screen:

Click to enlarge.
Enable the Live Preview so you can see how your changes look as they’re applied.
Let’s have a closer look at how some of these settings work.
Invert Channels
The Invert Channels setting allows you to invert the colors of your image based on the color channels rather than the individual colors. The options are:
- Red & Blue
- Red & Green
- Green & Blue
Here’s a preview of how each setting looks once applied:

How the color look when inverted by specific channels.
Invert Hue
The Invert Hue setting inverts all of the colors and not the grayscales/brightness. Here’s an example of how it looks once applied:
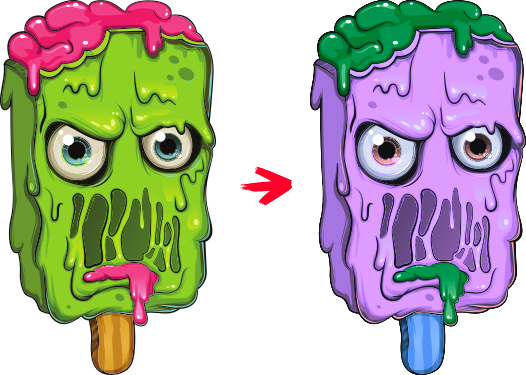
In this example, inverting only the Hue preserves the whiteness of the eyes.
As you can see, only the colors have been swapped, and the whiteness/brightness of the eyes and shading are mostly unchanged.
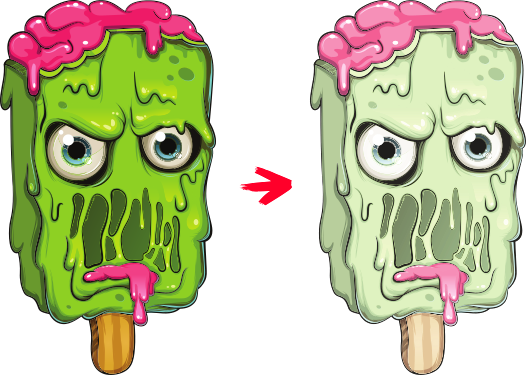
Invert Lightness
Selecting the Invert Lightness setting will invert those grayscales and brightness as well so that you end up with more of a photo negative effect:

Inverting the Lightness as well applies the effect to all shades and tones.
Invert Transparency
The Invert Transparency setting will invert alpha channels with partial opacity on a scale of 0 to 100. So for example, objects with a partial opacity of 80% will become 20% and vice versa.
Light Transparency
Finally, the Light Transparency slider allows you to adjust the opacity of the object’s lightness:
This can be useful at times when your inverted colors may need to be darkened due to the composition of your image.
Step 3: Apply the changes and close out of the menu
Adjust the settings to your liking and once you are satisfied with the results click the OK button to apply your changes, then close out of the menu.
Tips & Precautions
The following are a couple of tips to keep in mind when inverting colors in Inkscape.
How To Remove The Filter
The good thing about working with filters in Inkscape is that they’re temporary, meaning you can remove them at any time.
To remove the Invert filter and restore the original colors of your image, select it and navigate to:
Filters > Remove Filters
Inverting Colors Manually
Finally, it should be noted that whenever you invert colors in Inkscape by using filters, you’re not actually changing the colors of the object. You’re just applying a temporary filter over them to change how they appear on your screen.
The colors may appear different, but if you select them one-by-one you can see that they still register as their original colors in the status indicator.
This is not a problem if you plan to export your design as a rasterized PNG or JPEG. However, if you plan on opening the SVG file in another application — such as Cricut Design Space or Illustrator — then this effect will not carry over as it is an Inkscape-specific effect.
In these instances it is recommended that you manually apply the inverted colors once the filter is applied. Check the video tutorial at the top of the page for more instructions on how to do that.
In Conclusion
Of all the vector applications I use, Inkscape by far has the most comprehensive options for inverting colors. This makes it an invaluable tool, especially when you need to invert certain aspects of the image and not others.
Learn To Master The SoftwareGain a complete understanding of your favorite design apps with my comprehensive collection of video courses. Each course grants access to our private community where you can ask questions and get help when needed.
|
||||||||||||||||||||||||||||||||


Leave a Reply