How To Create An Isometric Grid with Affinity Designer
How To Create An Isometric Grid with Affinity Designer https://logosbynick.com/wp-content/uploads/2020/08/isometric-grid-affinity.png 800 470 Nick Saporito https://secure.gravatar.com/avatar/8e31bf392f0ba8850f29a1a2e833cdd020909bfd44613c7e222072c40e031c34?s=96&d=mm&r=gIn this tutorial I’ll be demonstrating how to create an isometric grid with Affinity Designer. This will help you in creating isometric illustrations where objects are drawn in a flat 2D environment, but appear as if they’re 3D. Affinity’s grid settings make it easy to create these sorts of illustrations by allowing you to generate a grid that can be used as a reference when drawing.
In the first part of this tutorial I’ll be demonstrating how to set up an isometric grid, then I’ll be demonstrating how you can use the grid to draw an isometric storefront icon. Be sure to check out the video tutorial at the top of the page for complete step-by-step instructions.
Isometric Illustration
Isometric design is a style of illustration where objects are drawn in a flat 2D environment, but they appear as if they’re 3D.
Another characteristic of isometric design is that it lacks the realistic perspective that a 3D illustration would typically have. A good example of this would be the phone illustration that I recently created for an Inkscape tutorial on isometric design.

In reality, the width of the phone would decrease the further away from the camera (or viewer) is. However, in an isometric illustration, perspective is disregarded because all of the lines drawn are locked to 30 degree angles. This makes isometric design a unique art style that is more suitable for an imaginative sort of look rather than a realistic look.
Create An Isometric Grid with Affinity Designer
| To create an isometric grid with Affinity designer, navigate to View and select Grid and Axis Manager. Tick the box that reads Show Grid, then navigate to the Advanced tab and select Isometric from the Grid Type drop down. |
Step 1: Open The Grid and Axis Manager
To create an isometric grid with Affinity Designer, the first thing we need to do is navigate to View in the toolbar at the top of the screen, then select Grid and Axis Manager. This will open up the grid settings menu.

Step 2: Activate The Grid
In the menu, tick the box that reads Show Grid. This will apply a standard box grid to your canvas.
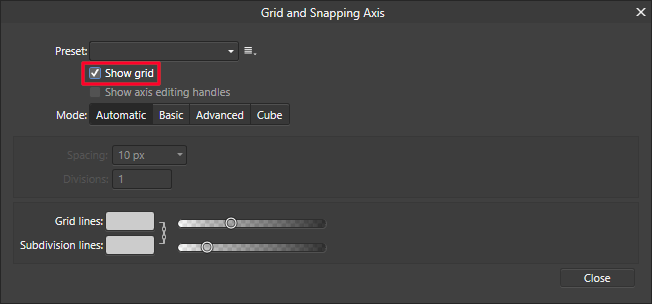
Tick the box that says Show Grid
Step 3: Change The Grid To Isometric
Next, click on the Advanced tab, and from the Grid type drop down, choose Isometric.
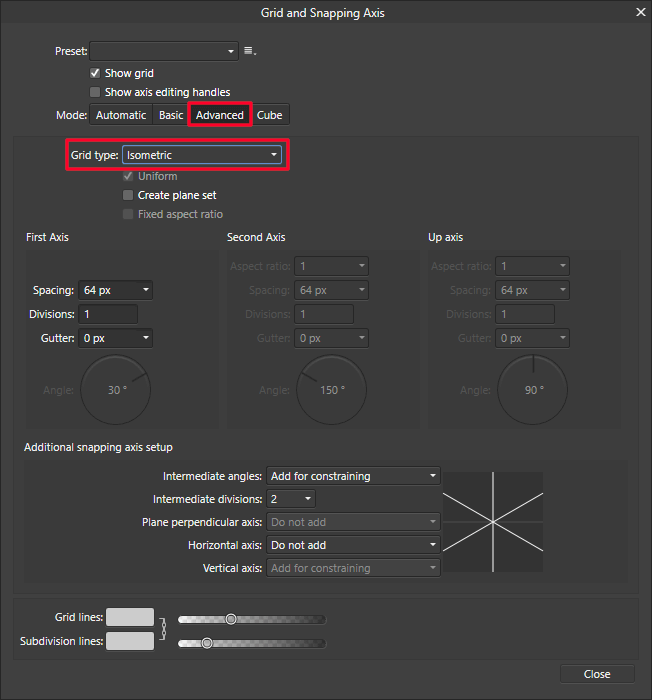
Click the Advanced tab and choose Isometric from the grid type drop down
The next step is optional but recommended.
Step 4: Adjust The Spacing of The Grid
By default, Affinity Designer will generate an isometric grid on your canvas where the lines are spaced out at 64 pixels. Decreasing the spacing between these guide lines will make it easier to create more complex illustrations.
For this tutorial, I set the Spacing to 25 pixels.
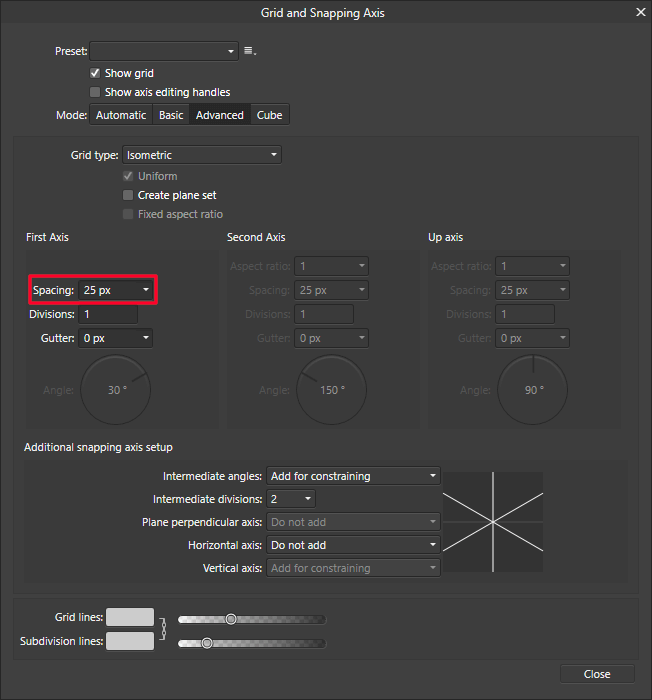
Set the spacing to 25 pixels
Once set, you can close out of the menu. You should now have an isometric grid on your canvas.
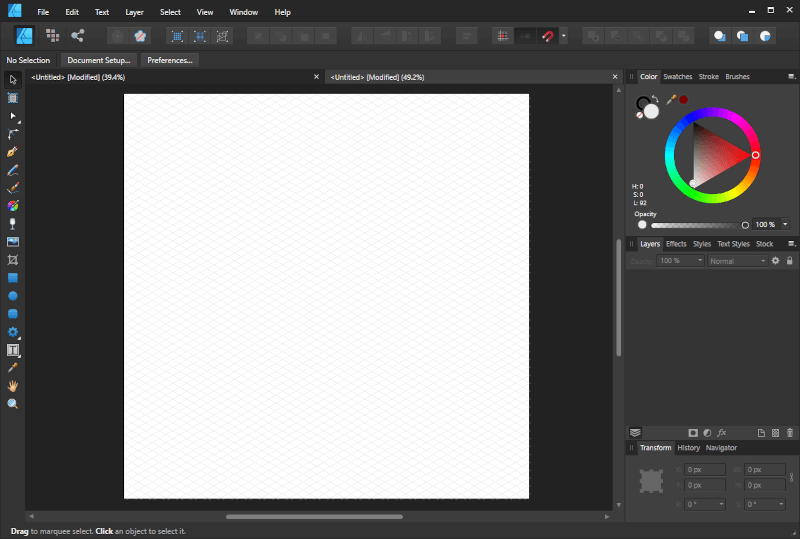
How your isometric grid will look once generated
And that is how you can create an isometric grid with Affinity Designer!
Create Isometric Designs with Affinity Designer
Now let’s take a brief look at how you can use your newly-created isometric grid to draw some isometric illustrations.
Before moving forward I’d just like the reiterate that the following is a brief overview of how to create this isometric design. Please refer to the video tutorial at the top of the page for complete step-by-step instruction.
Step 1: Make Sure Snapping Is Enabled
Your isometric grid will only be useful if you follow the guide lines precisely. Fortunately, Affinity Designer makes it easy to draw along the grid with the Snapping feature. Enabling snapping will ensure that the Pen tool snaps to the grid lines as you’re drawing.
Snapping is typically enabled by default, but it’s a good idea to check beforehand just to make sure.
At the top-right of your screen, you will see a little red magnet icon in the user interface. This icon represents the snapping menu and settings.
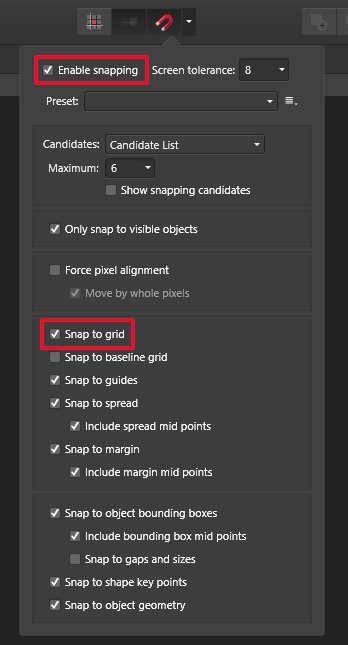
Make sure snapping is enabled
Click the drop down to expand the menu and make sure you have both Enable Snapping and Snap To Grid activated by ticking the boxes next to them.
Step 2: Draw with The Pen Tool
This is where the fun begins! In this step you’ll be using your creativity to draw some isometric illustrations along the grid lines using the Pen Tool.
This sort of art style requires you to be imaginative in visualizing how things should be drawn. It takes some time and practice to get the hang of it, so feel free to follow along with the design I’ve created in the video tutorial.

As you can see in the above depiction, I drew all of the shapes without color first. This isn’t necessary, but you may find it more convenient then constantly switching back and forth from the Pen Tool to the color selector.
Step 3: Color Your Objects Accordingly
Once you’ve created your objects, it’s time to start filling them with color.

As you can see in my example, color usage will dictate much of how 3D your illustrations look. Take note of the following…
- The right edges of the design have a darker shade (the wall, the side of the awning, the lip of the roof)
- The left edges use lighter shades
- The top (roof, the top of the awning) uses medium shades
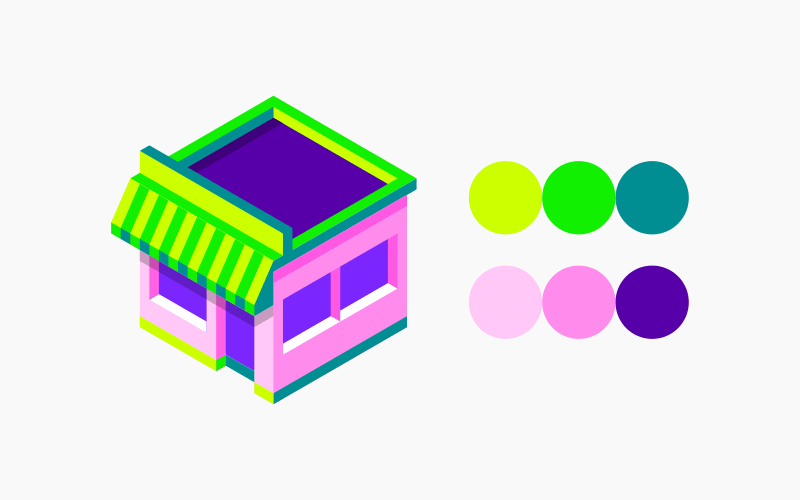
Using 3 shades of colors helps to make your designs look 3D
This 3-shade approach to coloring your objects helps in bringing your isometric designs to life because by nature, isometric designs only have three sides: the right, the right, and the top. Using 3 different shades of each color addresses all of these angles.

Once you’re finished with your drawing, you can disable the isometric grid by navigating to View and deselecting Show Grid.
Conclusion
That should wrap up this tutorial on how to create an isometric grid with Affinity Designer. Hopefully the example demonstration is a helpful introduction to the isometric art style. Feel free to let your creativity run wild and see what kind of concoctions you can come up with! If you have any questions just leave a comment below. As always, thanks for watching!
Learn To Master The SoftwareGain a complete understanding of your favorite design apps with my comprehensive collection of video courses. Each course grants access to our private community where you can ask questions and get help when needed.
|
||||||||||||||||||||||||||||||||


