
How To Change Image Colors In Affinity Designer
How To Change Image Colors In Affinity Designer https://logosbynick.com/wp-content/uploads/2023/04/change-object-color-affinity-designer2-1024x602.webp 1024 602 Nick Saporito https://secure.gravatar.com/avatar/8e31bf392f0ba8850f29a1a2e833cdd020909bfd44613c7e222072c40e031c34?s=96&d=mm&r=gAlthough Affinity Designer is mostly used as a vector design tool, it also has lots of powerful image-editing features built in. One such feature would be the ability to change the color of an object in a photo, which can be accomplished with a simple adjustment layer. This tutorial will demonstrate how to do just that.
In short, the simplest way to change an image’s colors in Affinity Designer is to use an HSL adjustment layer, which will allow us to specify a color range and change it throughout the entire image. Let’s have a closer look.
Change Image Colors In Affinity Designer
The following video tutorial will walk you through the entire process of changing the colors of an image:
Continue on for a written breakdown.
Table of Contents |
Step 1: Open your image and ensure the layer is unlocked
The first step is to open your image with Affinity Designer and ensure that the image’s layer is not locked.
As of the most recent version, whenever you open a photo with Designer it does so with the image layer locked by default. You can verify this by looking for an arrow icon next to the layer’s name:
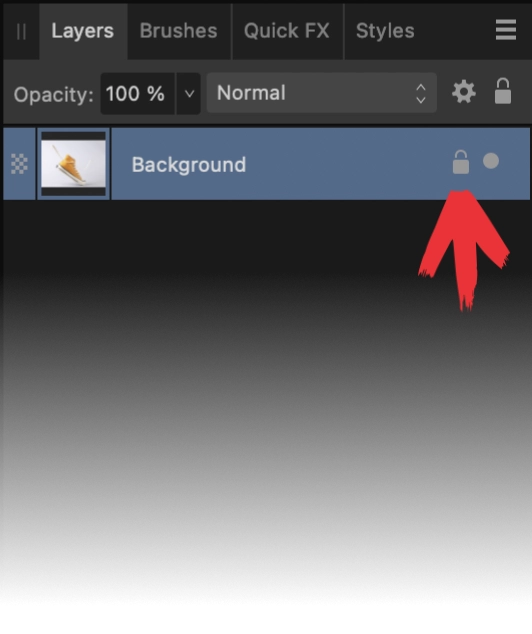
Check the Layers menu on the side of the screen to see if your image’s layer is locked.
If that lock is visible on your layer then click on it to disable it. If you don’t have a lock there then you are good to go.
Step 2: Add an HSL adjustment layer to the image
The tool that allows us to change the colors in an image in Affinity Designer is the HSL adjustment.
To enable it, click on your image layer to select it and navigate to:
Layer > New Adjustment > HSL
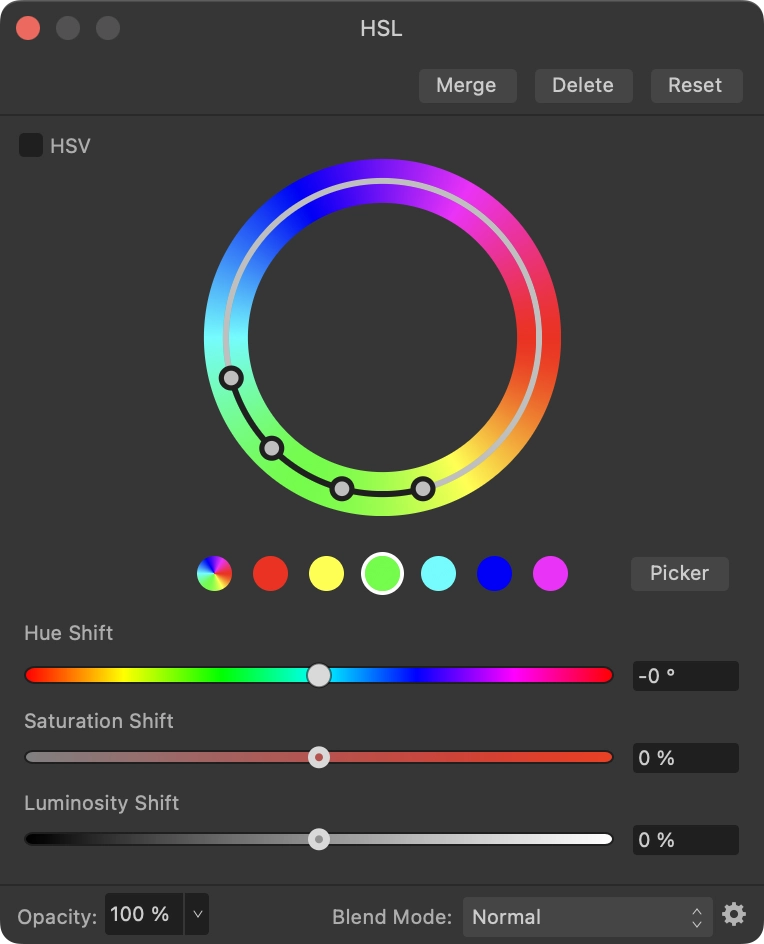
A menu should populate on your screen that looks like this:
Step 3: Use the menu interface to change the colors
Now let’s use the menu’s interface to specify a color and change it. Use the screenshot below as a reference:
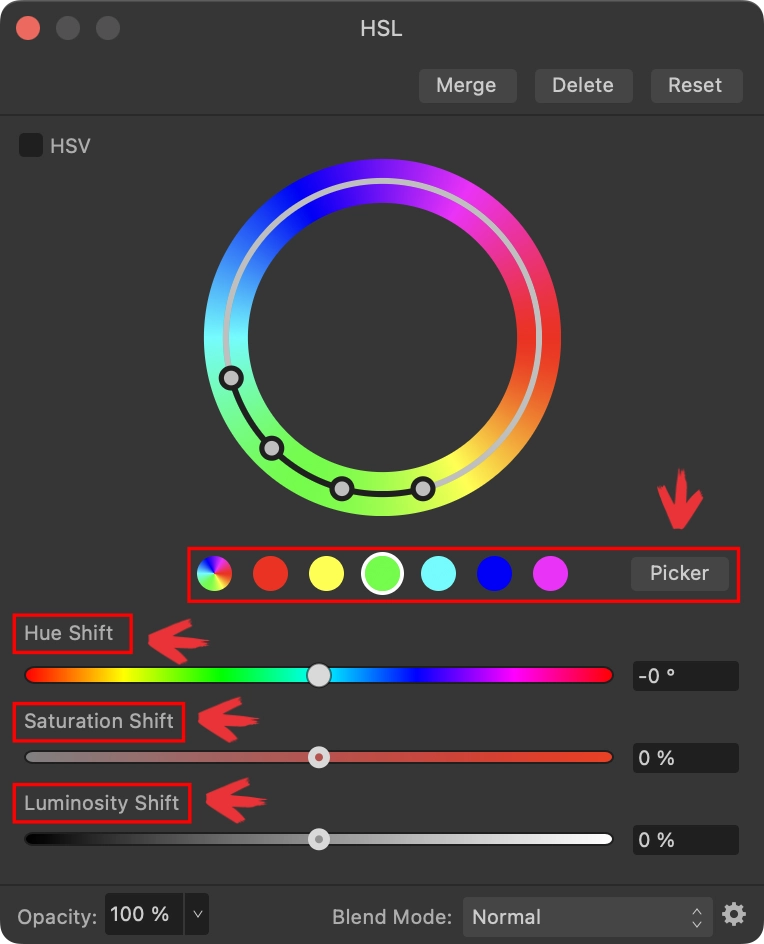
First, specify which color you’d like to change by clicking on one of the colors in the color palette at the top of the menu. Clicking the Picker button allows you to pick a color directly from the image (watch the video tutorial above for more info on that.)
In my example image I have a yellow shoe, so I am going to choose the color yellow in the menu interface because that’s the color I want to change.
With your color specified, use the sliders below to change your colors:
- Hue Shift: Adjust this slider to find a new color to replace the selected color with.
- Saturation Shift: This slider controls the vibrance of the new color. Moving it right will make it more colorful and moving it left will decrease the color until it is black and white.
- Luminosity Shift: This slider controls the darkness and lightness of the color. Move it right to make it lighter and left to make it darker.
With some minor adjustments you will have no problem changing a specific color in your image while leaving the rest of them preserved:

Best of all, adjustment layers and non-destructive, meaning you can turn the effect off at any time and your original image will be preserved as it original was.
In Conclusion
One of the greatest advantages of using an application like Affinity Designer is that it allows you to make somewhat advanced photo edits, such as color changes, all while being a fully featured vector design tool. This means that you can get more done in one app instead of switching back and forth between others.
Learn To Master The SoftwareGain a complete understanding of your favorite design apps with my comprehensive collection of video courses. Each course grants access to our private community where you can ask questions and get help when needed.
|
||||||||||||||||||||||||||||||||


Could you show how to adjust the color in only a portion of an image, when multiple areas have the similar color, but you only want one of them changed?
That could be done by going into the Pixel Persona and using one of the selection tools to create a selection around the area you want to change. Then when you apply the adjustment layer it’ll only be applied to that area.
Thank you for all of the helpful tips you have provided. If the color in the design that you want to change is white, how do would one go about changing that to say blue or orange – since white (or black) is not an option in the color selection? In your tennis shoe example, what if you wanted to change the white toe of the shoe instead of the canvas areas? How would that be accomplished? Thank you again for your help. It is greatly appreciated.
Hi Ginger, you’d have to use a different approach for that. I would go into the Pixel Persona and use the Select Brush to manually draw a selection over the white area, then you could fill that selection with whatever color you’d like.